
Spotify for terminal written in Go.
with builtin cover-art view and much more.
Discussion
 ](https://aur.archlinux.org/packages/gspt-git/)
```bash
$ yay -S gspt-git
```
###### Pre-built Binaries are available [here](https://github.com/aditya-K2/gspt/releases/tag/pre-release)
##### Manually
```bash
# Install go, git, make before this.
$ git clone https://github.com/aditya-K2/gspt.git # Cloning
$ cd gspt
$ sudo make install
```
### Afer Installation Steps
#### Generate an API Key from Spotify Dashboard
If you want to use Spotify's API to create applications that interact with
their music streaming service, you will need an API key. Here's how you can
generate one from the Spotify Dashboard:
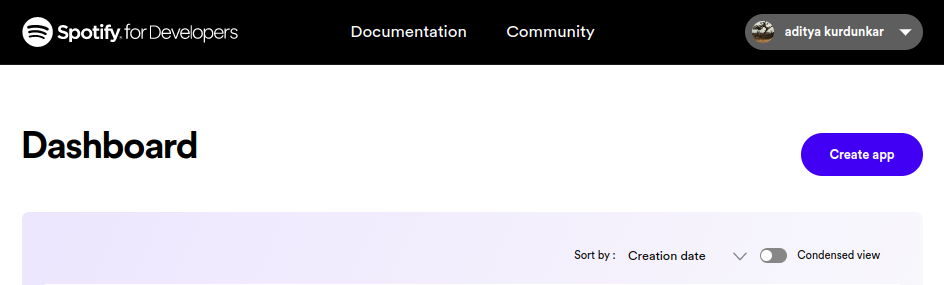
1. Go to the [Spotify Developer Dashboard](https://developer.spotify.com/dashboard/)
and log in with your Spotify account credentials.
2. Click on the "Create an App" button to create a new application.
3. Give your application a name and description, and agree to the terms of
service. In the `Redirect URI` section add `http://localhost:8080/callback`
as a callback URL. This is necessary for the OAuth 2.0 authentication flow
to work. Click on "Create" to proceed. 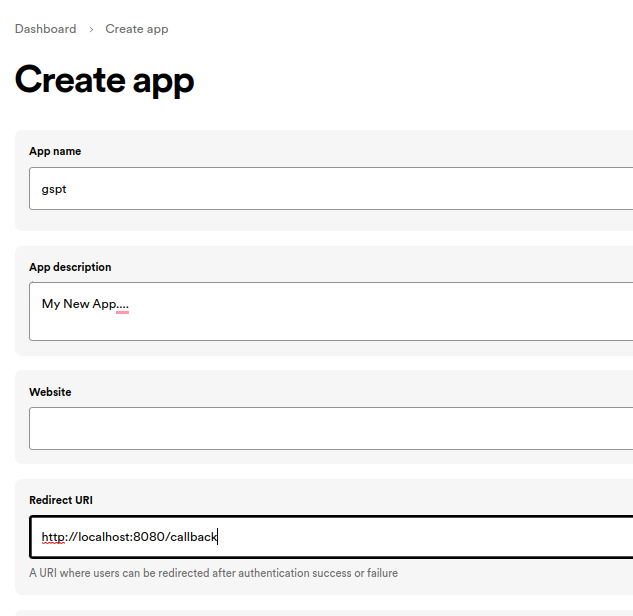
4. On the next page, you'll see the details of your newly created application.
In the Settings Look for the section labeled "Client ID" and click on the
"Show Client Secret" button. You will now see your Client ID and Client
Secret. You will need both of these to use the Spotify API in "gspt"
#### Using the Generated Credentials
1. Set the following environment variables from the credentials you generated.
```bash
# Add this to ~/.bashrc (or your $SHELL equivalent)
export SPOTIFY_ID= # client id
export SPOTIFY_SECRET= # client secret
```
2. After this you can just run `gspt`. And follow the link that it generates, and Login.
```bash
$ gspt
```
---
### Default Key Mappings
1. `d` Open the device menu to choose a device from
1. `1`, `2`, `3` Switch between the views
1. `enter` - Select an entry
1. `?` Search
1. `v` Toggle Visual Mode (Only works in some views)
1. `a` Add to Playlist (Only works in some views)
1. `q` Queue Songs or Contexts (Only works in some views)
1. `ctrl-p` Start playing the entry under the cursor in some views (PlaylistNavigator, Albums, etc.)
1. ` ` Toggle Playback (Space)
1. `o` Open the Current Track's Album
1. `O` Open the Current Track's Artist
1. `ctrl-o` Open the Current Context (Album/Artist/Playlist)
1. `n` Play Next Song in Queue
1. `p` Play Previous Song in Queue
## Command-line Parameters
```
NOTE: Command-line flags take priority over config values.
Usage of ./gspt:
-c string
Specify The Directory to check for config.yml file. (default "$XDG_CONFIG_HOME/gspt")
-corners string
Enable or disable Rounded Corners ( 'rounded' | 'default' )
-icons
Use Icons
-image string
Show or Hide Image ( 'show' | 'hidden' )
-v Output version information and exit
-version
Output version information and exit
```
## Configuration
The configuration is done through `$XDG_CONFIG_HOME/gspt/config.yml`
or the path to the folder provided by the `-c` flag before starting the app.
See [Command-line Parameters](#command-line-parameters)
Also, Configuration is live updated when you make a change except for some parts
*(Key Mappings, Border Colors)*.
#### Config Parameters
```yml
# Parameter followed by default values
# For the default configuration used by gspt please see:
# https://github.com/aditya-K2/gspt/blob/master/extras/CONFIG.md
# Path to where the cached images should be stored.
cache_dir: $XDG_CACHE_HOME
# The amount of milliseconds after which the cover art should be redrawn if there is a event.
redraw_interval: 500
# Do not display the cover art image.
hide_image: false
# Enable Rounded Corners
rounded_corners: false
# Use Special Characters to display information
use_icons: false
# Image Drawing related parameters. You aren't supposed to define them manually.
# See the next section to see how you can calibrate the Image placement.
additional_padding_x : 0
additional_padding_y : 0
image_width_extra_x : 0
image_width_extra_y : 0
---
# Color configuration has the following api
colors:
entity:
fg: # foreground (Can be Hex value or a color name)
bg: # background (Can be Hex value or a color name)
bold: # true/false (boolean)
italic: # true/false (boolean)
# for e.g
colors:
artist:
fg: "#ff0000"
bg: black # Background will be ignored in most cases. (Terminals default background color is used)
bold: false
italic: true
# For the default colors used for the "entities" please see:
# https://github.com/aditya-K2/gspt/blob/master/extras/CONFIG.md
# Available color names (i.e. pink, green, etc.) can be seen here:
# https://github.com/gdamore/tcell/blob/main/color.go#L845
---
# Key mappings has the following API
mappings:
view:
mode: # normal/visual
function: key_mapping
# for e.g
mappings:
recently_played_view:
normal:
play_entry: "ctrl-p"
visual:
add_to_playlist: "a"
# "global" mappings are special mappings that are not view specific
# ( "toggle_playback", "next", "previous", etc.)
# These mappings can be changed for different views.
# for e.g
mappings:
global:
normal:
previous: "N"
recently_played_view:
normal:
previous: "P"
# As you can assume, here "N" will be globally mapped to the "previous" function,
# and then "P" will too be mapped to "previous" in the recently_played_view (keep
# in mind that "N" will still be mapped to the "previous" function i.e "N" and
# "P" will both be mapped to the same function in recently_played_view)
# Visual Mode is similar to vim. Only some views support it.
# (viz. playlist_view, recently_played_view, liked_songs_view, album_view)
# For the default mappings for each view please see:
# https://github.com/aditya-K2/gspt/blob/master/extras/CONFIG.md
---
# Icons have the following API
icons:
icon_name: "icon_string"
# for e.g
icons:
computer: "🖥️"
# Note: icons are used only if `use_icons` is true
# For the default icons used and all available icon names please see:
# https://github.com/aditya-K2/gspt/blob/master/extras/CONFIG.md
```
## Calibrating Image Placement
1. To make it easier for users to adjust the position and size of the image
preview box, we have added key mappings to the application. These mappings
allow you to move the image up, down, left, or right, as well as adjust its
height and width. The mappings are as follows:
- ctrl+h Move the image left
- ctrl+j Move the image down
- ctrl+k Move the image up
- ctrl+l Move the image right
- H Decrease the width of the image (from the right)
- J Increase the height of the image (from the bottom)
- K Decrease the height of the image (from the bottom)
- L Increase the width of the image (from the right)
Note that when you increase or decrease the image height, it only affects the
bottom of the image. Similarly, when you increase or decrease the image width,
it only affects the right side of the image.
2. After you have made the changes according to your needs you can save the config
by pressing ctrl-s
](https://aur.archlinux.org/packages/gspt-git/)
```bash
$ yay -S gspt-git
```
###### Pre-built Binaries are available [here](https://github.com/aditya-K2/gspt/releases/tag/pre-release)
##### Manually
```bash
# Install go, git, make before this.
$ git clone https://github.com/aditya-K2/gspt.git # Cloning
$ cd gspt
$ sudo make install
```
### Afer Installation Steps
#### Generate an API Key from Spotify Dashboard
If you want to use Spotify's API to create applications that interact with
their music streaming service, you will need an API key. Here's how you can
generate one from the Spotify Dashboard:
1. Go to the [Spotify Developer Dashboard](https://developer.spotify.com/dashboard/)
and log in with your Spotify account credentials.
2. Click on the "Create an App" button to create a new application.

3. Give your application a name and description, and agree to the terms of
service. In the `Redirect URI` section add `http://localhost:8080/callback`
as a callback URL. This is necessary for the OAuth 2.0 authentication flow
to work. Click on "Create" to proceed. 
4. On the next page, you'll see the details of your newly created application.
In the Settings Look for the section labeled "Client ID" and click on the
"Show Client Secret" button. You will now see your Client ID and Client
Secret. You will need both of these to use the Spotify API in "gspt"
#### Using the Generated Credentials
1. Set the following environment variables from the credentials you generated.
```bash
# Add this to ~/.bashrc (or your $SHELL equivalent)
export SPOTIFY_ID= # client id
export SPOTIFY_SECRET= # client secret
```
2. After this you can just run `gspt`. And follow the link that it generates, and Login.
```bash
$ gspt
```
---
### Default Key Mappings
1. `d` Open the device menu to choose a device from
1. `1`, `2`, `3` Switch between the views
1. `enter` - Select an entry
1. `?` Search
1. `v` Toggle Visual Mode (Only works in some views)
1. `a` Add to Playlist (Only works in some views)
1. `q` Queue Songs or Contexts (Only works in some views)
1. `ctrl-p` Start playing the entry under the cursor in some views (PlaylistNavigator, Albums, etc.)
1. ` ` Toggle Playback (Space)
1. `o` Open the Current Track's Album
1. `O` Open the Current Track's Artist
1. `ctrl-o` Open the Current Context (Album/Artist/Playlist)
1. `n` Play Next Song in Queue
1. `p` Play Previous Song in Queue
## Command-line Parameters
```
NOTE: Command-line flags take priority over config values.
Usage of ./gspt:
-c string
Specify The Directory to check for config.yml file. (default "$XDG_CONFIG_HOME/gspt")
-corners string
Enable or disable Rounded Corners ( 'rounded' | 'default' )
-icons
Use Icons
-image string
Show or Hide Image ( 'show' | 'hidden' )
-v Output version information and exit
-version
Output version information and exit
```
## Configuration
The configuration is done through `$XDG_CONFIG_HOME/gspt/config.yml`
or the path to the folder provided by the `-c` flag before starting the app.
See [Command-line Parameters](#command-line-parameters)
Also, Configuration is live updated when you make a change except for some parts
*(Key Mappings, Border Colors)*.
#### Config Parameters
```yml
# Parameter followed by default values
# For the default configuration used by gspt please see:
# https://github.com/aditya-K2/gspt/blob/master/extras/CONFIG.md
# Path to where the cached images should be stored.
cache_dir: $XDG_CACHE_HOME
# The amount of milliseconds after which the cover art should be redrawn if there is a event.
redraw_interval: 500
# Do not display the cover art image.
hide_image: false
# Enable Rounded Corners
rounded_corners: false
# Use Special Characters to display information
use_icons: false
# Image Drawing related parameters. You aren't supposed to define them manually.
# See the next section to see how you can calibrate the Image placement.
additional_padding_x : 0
additional_padding_y : 0
image_width_extra_x : 0
image_width_extra_y : 0
---
# Color configuration has the following api
colors:
entity:
fg: # foreground (Can be Hex value or a color name)
bg: # background (Can be Hex value or a color name)
bold: # true/false (boolean)
italic: # true/false (boolean)
# for e.g
colors:
artist:
fg: "#ff0000"
bg: black # Background will be ignored in most cases. (Terminals default background color is used)
bold: false
italic: true
# For the default colors used for the "entities" please see:
# https://github.com/aditya-K2/gspt/blob/master/extras/CONFIG.md
# Available color names (i.e. pink, green, etc.) can be seen here:
# https://github.com/gdamore/tcell/blob/main/color.go#L845
---
# Key mappings has the following API
mappings:
view:
mode: # normal/visual
function: key_mapping
# for e.g
mappings:
recently_played_view:
normal:
play_entry: "ctrl-p"
visual:
add_to_playlist: "a"
# "global" mappings are special mappings that are not view specific
# ( "toggle_playback", "next", "previous", etc.)
# These mappings can be changed for different views.
# for e.g
mappings:
global:
normal:
previous: "N"
recently_played_view:
normal:
previous: "P"
# As you can assume, here "N" will be globally mapped to the "previous" function,
# and then "P" will too be mapped to "previous" in the recently_played_view (keep
# in mind that "N" will still be mapped to the "previous" function i.e "N" and
# "P" will both be mapped to the same function in recently_played_view)
# Visual Mode is similar to vim. Only some views support it.
# (viz. playlist_view, recently_played_view, liked_songs_view, album_view)
# For the default mappings for each view please see:
# https://github.com/aditya-K2/gspt/blob/master/extras/CONFIG.md
---
# Icons have the following API
icons:
icon_name: "icon_string"
# for e.g
icons:
computer: "🖥️"
# Note: icons are used only if `use_icons` is true
# For the default icons used and all available icon names please see:
# https://github.com/aditya-K2/gspt/blob/master/extras/CONFIG.md
```
## Calibrating Image Placement
1. To make it easier for users to adjust the position and size of the image
preview box, we have added key mappings to the application. These mappings
allow you to move the image up, down, left, or right, as well as adjust its
height and width. The mappings are as follows:
- ctrl+h Move the image left
- ctrl+j Move the image down
- ctrl+k Move the image up
- ctrl+l Move the image right
- H Decrease the width of the image (from the right)
- J Increase the height of the image (from the bottom)
- K Decrease the height of the image (from the bottom)
- L Increase the width of the image (from the right)
Note that when you increase or decrease the image height, it only affects the
bottom of the image. Similarly, when you increase or decrease the image width,
it only affects the right side of the image.
2. After you have made the changes according to your needs you can save the config
by pressing ctrl-s