mirror of
https://github.com/All-Hands-AI/OpenHands.git
synced 2026-04-29 03:00:45 -04:00
Compare commits
26 Commits
0.37.0
...
microagent
| Author | SHA1 | Date | |
|---|---|---|---|
|
|
ae45159ac6 | ||
|
|
a72938fd87 | ||
|
|
f809b08df7 | ||
|
|
c1b92311da | ||
|
|
6cfeb525f5 | ||
|
|
dd2085c8c4 | ||
|
|
6d993d4e21 | ||
|
|
350518f3d6 | ||
|
|
dba430dd57 | ||
|
|
ebd02bc383 | ||
|
|
cac76026d4 | ||
|
|
69ea4ddc42 | ||
|
|
403070f57f | ||
|
|
46b1c96437 | ||
|
|
cdab20d8a3 | ||
|
|
4417dd97c3 | ||
|
|
fa5e088ec1 | ||
|
|
fdf981817d | ||
|
|
cc8d3b6a98 | ||
|
|
5b68893879 | ||
|
|
2c0ad34ad7 | ||
|
|
9dee3d5818 | ||
|
|
1b34e5e3f0 | ||
|
|
044f5df408 | ||
|
|
872f0edab8 | ||
|
|
c7ab36521b |
5
.github/ISSUE_TEMPLATE/bug_template.yml
vendored
5
.github/ISSUE_TEMPLATE/bug_template.yml
vendored
@@ -5,12 +5,11 @@ labels: ['bug']
|
||||
body:
|
||||
- type: markdown
|
||||
attributes:
|
||||
value: Thank you for taking the time to fill out this bug report. Please provide as much information as possible
|
||||
to help us understand and address the issue effectively.
|
||||
value: Thank you for taking the time to fill out this bug report. Please provide as much information as possible to help us understand and address the issue effectively.
|
||||
|
||||
- type: checkboxes
|
||||
attributes:
|
||||
label: Is there an existing issue for the same bug? (If one exists, thumbs up or comment on the issue instead).
|
||||
label: Is there an existing issue for the same bug?
|
||||
description: Please check if an issue already exists for the bug you encountered.
|
||||
options:
|
||||
- label: I have checked the existing issues.
|
||||
|
||||
13
.github/ISSUE_TEMPLATE/feature_request.md
vendored
13
.github/ISSUE_TEMPLATE/feature_request.md
vendored
@@ -1,6 +1,6 @@
|
||||
---
|
||||
name: Feature Request or Enhancement
|
||||
about: Suggest an idea for an OpenHands feature or enhancement
|
||||
name: Feature Request
|
||||
about: Suggest an idea for OpenHands features
|
||||
title: ''
|
||||
labels: 'enhancement'
|
||||
assignees: ''
|
||||
@@ -9,9 +9,10 @@ assignees: ''
|
||||
|
||||
**What problem or use case are you trying to solve?**
|
||||
|
||||
**Describe the UX or technical implementation you have in mind**
|
||||
**Describe the UX of the solution you'd like**
|
||||
|
||||
**Do you have thoughts on the technical implementation?**
|
||||
|
||||
**Describe alternatives you've considered**
|
||||
|
||||
**Additional context**
|
||||
|
||||
|
||||
### If you find this feature request or enhancement useful, make sure to add a 👍 to the issue
|
||||
|
||||
18
.github/ISSUE_TEMPLATE/technical_proposal.md
vendored
Normal file
18
.github/ISSUE_TEMPLATE/technical_proposal.md
vendored
Normal file
@@ -0,0 +1,18 @@
|
||||
---
|
||||
name: Technical Proposal
|
||||
about: Propose a new architecture or technology
|
||||
title: ''
|
||||
labels: 'proposal'
|
||||
assignees: ''
|
||||
|
||||
---
|
||||
|
||||
**Summary**
|
||||
|
||||
**Motivation**
|
||||
|
||||
**Technical Design**
|
||||
|
||||
**Alternatives to Consider**
|
||||
|
||||
**Additional context**
|
||||
6
.github/pull_request_template.md
vendored
6
.github/pull_request_template.md
vendored
@@ -1,12 +1,12 @@
|
||||
- [ ] This change is worth documenting at https://docs.all-hands.dev/
|
||||
- [ ] Include this change in the Release Notes. If checked, you **must** provide an **end-user friendly** description for your change below
|
||||
|
||||
**End-user friendly description of the problem this fixes or functionality this introduces.**
|
||||
**End-user friendly description of the problem this fixes or functionality that this introduces.**
|
||||
|
||||
|
||||
---
|
||||
**Summarize what the PR does, explaining any non-trivial design decisions.**
|
||||
**Give a summary of what the PR does, explaining any non-trivial design decisions.**
|
||||
|
||||
|
||||
---
|
||||
**Link of any specific issues this addresses:**
|
||||
**Link of any specific issues this addresses.**
|
||||
|
||||
53
.github/workflows/dummy-agent-test.yml
vendored
Normal file
53
.github/workflows/dummy-agent-test.yml
vendored
Normal file
@@ -0,0 +1,53 @@
|
||||
# Workflow that uses the DummyAgent to run a simple task
|
||||
name: Run E2E test with dummy agent
|
||||
|
||||
# Always run on "main"
|
||||
# Always run on PRs
|
||||
on:
|
||||
push:
|
||||
branches:
|
||||
- main
|
||||
pull_request:
|
||||
|
||||
# If triggered by a PR, it will be in the same group. However, each commit on main will be in its own unique group
|
||||
concurrency:
|
||||
group: ${{ github.workflow }}-${{ (github.head_ref && github.ref) || github.run_id }}
|
||||
cancel-in-progress: true
|
||||
|
||||
jobs:
|
||||
test:
|
||||
runs-on: blacksmith-4vcpu-ubuntu-2204
|
||||
steps:
|
||||
- uses: actions/checkout@v4
|
||||
- name: Set up Docker Buildx
|
||||
id: buildx
|
||||
uses: docker/setup-buildx-action@v3
|
||||
- name: Install tmux
|
||||
run: sudo apt-get update && sudo apt-get install -y tmux
|
||||
- name: Setup Node.js
|
||||
uses: useblacksmith/setup-node@v5
|
||||
with:
|
||||
node-version: '22.x'
|
||||
- name: Install poetry via pipx
|
||||
run: pipx install poetry
|
||||
- name: Set up Python
|
||||
uses: useblacksmith/setup-python@v6
|
||||
with:
|
||||
python-version: '3.12'
|
||||
cache: 'poetry'
|
||||
- name: Install Python dependencies using Poetry
|
||||
run: poetry install --without evaluation
|
||||
- name: Build Environment
|
||||
run: make build
|
||||
- name: Run tests
|
||||
run: |
|
||||
set -e
|
||||
SANDBOX_FORCE_REBUILD_RUNTIME=True poetry run python3 openhands/core/main.py -t "do a flip" -d ./workspace/ -c DummyAgent
|
||||
- name: Check exit code
|
||||
run: |
|
||||
if [ $? -ne 0 ]; then
|
||||
echo "Test failed"
|
||||
exit 1
|
||||
else
|
||||
echo "Test passed"
|
||||
fi
|
||||
146
.github/workflows/ghcr-build.yml
vendored
146
.github/workflows/ghcr-build.yml
vendored
@@ -25,31 +25,10 @@ concurrency:
|
||||
cancel-in-progress: true
|
||||
|
||||
env:
|
||||
BASE_IMAGE_FOR_HASH_EQUIVALENCE_TEST: nikolaik/python-nodejs:python3.12-nodejs22
|
||||
RELEVANT_SHA: ${{ github.event.pull_request.head.sha || github.sha }}
|
||||
|
||||
jobs:
|
||||
define-matrix:
|
||||
runs-on: blacksmith
|
||||
outputs:
|
||||
base_image: ${{ steps.define-base-images.outputs.base_image }}
|
||||
steps:
|
||||
- name: Define base images
|
||||
shell: bash
|
||||
id: define-base-images
|
||||
run: |
|
||||
# Only build nikolaik on PRs, otherwise build both nikolaik and ubuntu.
|
||||
if [[ "$GITHUB_EVENT_NAME" == "pull_request" ]]; then
|
||||
json=$(jq -n -c '[
|
||||
{ image: "nikolaik/python-nodejs:python3.12-nodejs22", tag: "nikolaik" }
|
||||
]')
|
||||
else
|
||||
json=$(jq -n -c '[
|
||||
{ image: "nikolaik/python-nodejs:python3.12-nodejs22", tag: "nikolaik" },
|
||||
{ image: "ubuntu:24.04", tag: "ubuntu" }
|
||||
]')
|
||||
fi
|
||||
echo "base_image=$json" >> "$GITHUB_OUTPUT"
|
||||
|
||||
# Builds the OpenHands Docker images
|
||||
ghcr_build_app:
|
||||
name: Build App Image
|
||||
@@ -58,7 +37,6 @@ jobs:
|
||||
contents: read
|
||||
packages: write
|
||||
outputs:
|
||||
# Since this job uses outputs it cannot use matrix
|
||||
hash_from_app_image: ${{ steps.get_hash_in_app_image.outputs.hash_from_app_image }}
|
||||
steps:
|
||||
- name: Checkout
|
||||
@@ -106,10 +84,11 @@ jobs:
|
||||
permissions:
|
||||
contents: read
|
||||
packages: write
|
||||
needs: define-matrix
|
||||
strategy:
|
||||
matrix:
|
||||
base_image: ${{ fromJson(needs.define-matrix.outputs.base_image) }}
|
||||
base_image:
|
||||
- image: 'nikolaik/python-nodejs:python3.12-nodejs22'
|
||||
tag: nikolaik
|
||||
steps:
|
||||
- name: Checkout
|
||||
uses: actions/checkout@v4
|
||||
@@ -139,54 +118,35 @@ jobs:
|
||||
~/.cache/pypoetry
|
||||
~/.virtualenvs
|
||||
key: ${{ runner.os }}-poetry-${{ hashFiles('**/poetry.lock') }}
|
||||
# This is the one that saves the cache, the others set 'lookup-only: true'
|
||||
restore-keys: |
|
||||
${{ runner.os }}-poetry-
|
||||
- name: Install poetry via pipx
|
||||
run: pipx install poetry
|
||||
- name: Install Python dependencies using Poetry
|
||||
run: make install-python-dependencies POETRY_GROUP=main INSTALL_PLAYWRIGHT=0
|
||||
run: make install-python-dependencies
|
||||
- name: Create source distribution and Dockerfile
|
||||
run: poetry run python3 openhands/runtime/utils/runtime_build.py --base_image ${{ matrix.base_image.image }} --build_folder containers/runtime --force_rebuild
|
||||
- name: Lowercase Repository Owner
|
||||
run: |
|
||||
echo REPO_OWNER=$(echo ${{ github.repository_owner }} | tr '[:upper:]' '[:lower:]') >> $GITHUB_ENV
|
||||
- name: Short SHA
|
||||
run: |
|
||||
echo SHORT_SHA=$(git rev-parse --short "$RELEVANT_SHA") >> $GITHUB_ENV
|
||||
- name: Determine docker build params
|
||||
if: github.event.pull_request.head.repo.fork != true
|
||||
shell: bash
|
||||
run: |
|
||||
./containers/build.sh -i runtime -o ${{ env.REPO_OWNER }} -t ${{ matrix.base_image.tag }} --dry
|
||||
|
||||
DOCKER_BUILD_JSON=$(jq -c . < docker-build-dry.json)
|
||||
echo "DOCKER_TAGS=$(echo "$DOCKER_BUILD_JSON" | jq -r '.tags | join(",")')" >> $GITHUB_ENV
|
||||
echo "DOCKER_PLATFORM=$(echo "$DOCKER_BUILD_JSON" | jq -r '.platform')" >> $GITHUB_ENV
|
||||
echo "DOCKER_BUILD_ARGS=$(echo "$DOCKER_BUILD_JSON" | jq -r '.build_args | join(",")')" >> $GITHUB_ENV
|
||||
- name: Build and push runtime image ${{ matrix.base_image.image }}
|
||||
if: github.event.pull_request.head.repo.fork != true
|
||||
uses: useblacksmith/build-push-action@v1
|
||||
with:
|
||||
push: true
|
||||
tags: ${{ env.DOCKER_TAGS }}
|
||||
platforms: ${{ env.DOCKER_PLATFORM }}
|
||||
build-args: ${{ env.DOCKER_BUILD_ARGS }}
|
||||
context: containers/runtime
|
||||
provenance: false
|
||||
# Forked repos can't push to GHCR, so we just build in order to populate the cache for rebuilding
|
||||
run: |
|
||||
./containers/build.sh -i runtime -o ${{ env.REPO_OWNER }} --push -t ${{ matrix.base_image.tag }}
|
||||
# Forked repos can't push to GHCR, so we need to upload the image as an artifact
|
||||
- name: Build runtime image ${{ matrix.base_image.image }} for fork
|
||||
if: github.event.pull_request.head.repo.fork
|
||||
uses: useblacksmith/build-push-action@v1
|
||||
uses: docker/build-push-action@v6
|
||||
with:
|
||||
tags: ghcr.io/${{ env.REPO_OWNER }}/runtime:${{ env.RELEVANT_SHA }}-${{ matrix.base_image.tag }}
|
||||
outputs: type=docker,dest=/tmp/runtime-${{ matrix.base_image.tag }}.tar
|
||||
context: containers/runtime
|
||||
- name: Upload runtime source for fork
|
||||
- name: Upload runtime image for fork
|
||||
if: github.event.pull_request.head.repo.fork
|
||||
uses: actions/upload-artifact@v4
|
||||
with:
|
||||
name: runtime-src-${{ matrix.base_image.tag }}
|
||||
path: containers/runtime
|
||||
name: runtime-${{ matrix.base_image.tag }}
|
||||
path: /tmp/runtime-${{ matrix.base_image.tag }}.tar
|
||||
|
||||
verify_hash_equivalence_in_runtime_and_app:
|
||||
name: Verify Hash Equivalence in Runtime and Docker images
|
||||
@@ -196,8 +156,6 @@ jobs:
|
||||
fail-fast: false
|
||||
matrix:
|
||||
base_image: ['nikolaik']
|
||||
env:
|
||||
BASE_IMAGE_FOR_HASH_EQUIVALENCE_TEST: nikolaik/python-nodejs:python3.12-nodejs22
|
||||
steps:
|
||||
- uses: actions/checkout@v4
|
||||
with:
|
||||
@@ -209,7 +167,6 @@ jobs:
|
||||
~/.cache/pypoetry
|
||||
~/.virtualenvs
|
||||
key: ${{ runner.os }}-poetry-${{ hashFiles('**/poetry.lock') }}
|
||||
lookup-only: true
|
||||
restore-keys: |
|
||||
${{ runner.os }}-poetry-
|
||||
- name: Set up Python
|
||||
@@ -219,7 +176,7 @@ jobs:
|
||||
- name: Install poetry via pipx
|
||||
run: pipx install poetry
|
||||
- name: Install Python dependencies using Poetry
|
||||
run: make install-python-dependencies POETRY_GROUP=main INSTALL_PLAYWRIGHT=0
|
||||
run: make install-python-dependencies
|
||||
- name: Get hash in App Image
|
||||
run: |
|
||||
echo "Hash from app image: ${{ needs.ghcr_build_app.outputs.hash_from_app_image }}"
|
||||
@@ -246,34 +203,28 @@ jobs:
|
||||
# Run unit tests with the Docker runtime Docker images as root
|
||||
test_runtime_root:
|
||||
name: RT Unit Tests (Root)
|
||||
needs: [ghcr_build_runtime, define-matrix]
|
||||
runs-on: blacksmith-8vcpu-ubuntu-2204
|
||||
needs: [ghcr_build_runtime]
|
||||
runs-on: blacksmith-4vcpu-ubuntu-2204
|
||||
strategy:
|
||||
fail-fast: false
|
||||
matrix:
|
||||
base_image: ${{ fromJson(needs.define-matrix.outputs.base_image) }}
|
||||
base_image: ['nikolaik']
|
||||
steps:
|
||||
- uses: actions/checkout@v4
|
||||
- name: Set up Docker Buildx
|
||||
id: buildx
|
||||
uses: docker/setup-buildx-action@v3
|
||||
- name: Download runtime source for fork
|
||||
# Forked repos can't push to GHCR, so we need to download the image as an artifact
|
||||
- name: Download runtime image for fork
|
||||
if: github.event.pull_request.head.repo.fork
|
||||
uses: actions/download-artifact@v4
|
||||
with:
|
||||
name: runtime-src-${{ matrix.base_image.tag }}
|
||||
path: containers/runtime
|
||||
- name: Lowercase Repository Owner
|
||||
run: |
|
||||
echo REPO_OWNER=$(echo ${{ github.repository_owner }} | tr '[:upper:]' '[:lower:]') >> $GITHUB_ENV
|
||||
# Forked repos can't push to GHCR, so we need to rebuild using cache
|
||||
- name: Build runtime image ${{ matrix.base_image.image }} for fork
|
||||
name: runtime-${{ matrix.base_image }}
|
||||
path: /tmp
|
||||
- name: Load runtime image for fork
|
||||
if: github.event.pull_request.head.repo.fork
|
||||
uses: useblacksmith/build-push-action@v1
|
||||
with:
|
||||
load: true
|
||||
tags: ghcr.io/${{ env.REPO_OWNER }}/runtime:${{ env.RELEVANT_SHA }}-${{ matrix.base_image.tag }}
|
||||
context: containers/runtime
|
||||
run: |
|
||||
docker load --input /tmp/runtime-${{ matrix.base_image }}.tar
|
||||
- name: Cache Poetry dependencies
|
||||
uses: useblacksmith/cache@v5
|
||||
with:
|
||||
@@ -281,7 +232,6 @@ jobs:
|
||||
~/.cache/pypoetry
|
||||
~/.virtualenvs
|
||||
key: ${{ runner.os }}-poetry-${{ hashFiles('**/poetry.lock') }}
|
||||
lookup-only: true
|
||||
restore-keys: |
|
||||
${{ runner.os }}-poetry-
|
||||
- name: Set up Python
|
||||
@@ -291,7 +241,10 @@ jobs:
|
||||
- name: Install poetry via pipx
|
||||
run: pipx install poetry
|
||||
- name: Install Python dependencies using Poetry
|
||||
run: make install-python-dependencies POETRY_GROUP=main,test,runtime INSTALL_PLAYWRIGHT=0
|
||||
run: make install-python-dependencies
|
||||
- name: Lowercase Repository Owner
|
||||
run: |
|
||||
echo REPO_OWNER=$(echo ${{ github.repository_owner }} | tr '[:upper:]' '[:lower:]') >> $GITHUB_ENV
|
||||
- name: Run docker runtime tests
|
||||
run: |
|
||||
# We install pytest-xdist in order to run tests across CPUs
|
||||
@@ -300,17 +253,14 @@ jobs:
|
||||
# Install to be able to retry on failures for flaky tests
|
||||
poetry run pip install pytest-rerunfailures
|
||||
|
||||
image_name=ghcr.io/${{ env.REPO_OWNER }}/runtime:${{ env.RELEVANT_SHA }}-${{ matrix.base_image.tag }}
|
||||
|
||||
# Setting RUN_AS_OPENHANDS to false means use root.
|
||||
# That should mean SANDBOX_USER_ID is ignored but some tests do not check for RUN_AS_OPENHANDS.
|
||||
image_name=ghcr.io/${{ env.REPO_OWNER }}/runtime:${{ env.RELEVANT_SHA }}-${{ matrix.base_image }}
|
||||
|
||||
TEST_RUNTIME=docker \
|
||||
SANDBOX_USER_ID=$(id -u) \
|
||||
SANDBOX_RUNTIME_CONTAINER_IMAGE=$image_name \
|
||||
TEST_IN_CI=true \
|
||||
RUN_AS_OPENHANDS=false \
|
||||
poetry run pytest -n 7 -raRs --reruns 2 --reruns-delay 5 --cov=openhands --cov-report=xml -s ./tests/runtime --ignore=tests/runtime/test_browsergym_envs.py --durations=10
|
||||
poetry run pytest -n 3 -raRs --reruns 2 --reruns-delay 5 --cov=openhands --cov-report=xml -s ./tests/runtime --ignore=tests/runtime/test_browsergym_envs.py
|
||||
- name: Upload coverage to Codecov
|
||||
uses: codecov/codecov-action@v5
|
||||
env:
|
||||
@@ -319,33 +269,27 @@ jobs:
|
||||
# Run unit tests with the Docker runtime Docker images as openhands user
|
||||
test_runtime_oh:
|
||||
name: RT Unit Tests (openhands)
|
||||
runs-on: blacksmith-8vcpu-ubuntu-2204
|
||||
needs: [ghcr_build_runtime, define-matrix]
|
||||
runs-on: blacksmith-4vcpu-ubuntu-2204
|
||||
needs: [ghcr_build_runtime]
|
||||
strategy:
|
||||
matrix:
|
||||
base_image: ${{ fromJson(needs.define-matrix.outputs.base_image) }}
|
||||
base_image: ['nikolaik']
|
||||
steps:
|
||||
- uses: actions/checkout@v4
|
||||
- name: Set up Docker Buildx
|
||||
id: buildx
|
||||
uses: docker/setup-buildx-action@v3
|
||||
- name: Download runtime source for fork
|
||||
# Forked repos can't push to GHCR, so we need to download the image as an artifact
|
||||
- name: Download runtime image for fork
|
||||
if: github.event.pull_request.head.repo.fork
|
||||
uses: actions/download-artifact@v4
|
||||
with:
|
||||
name: runtime-src-${{ matrix.base_image.tag }}
|
||||
path: containers/runtime
|
||||
- name: Lowercase Repository Owner
|
||||
run: |
|
||||
echo REPO_OWNER=$(echo ${{ github.repository_owner }} | tr '[:upper:]' '[:lower:]') >> $GITHUB_ENV
|
||||
# Forked repos can't push to GHCR, so we need to rebuild using cache
|
||||
- name: Build runtime image ${{ matrix.base_image.image }} for fork
|
||||
name: runtime-${{ matrix.base_image }}
|
||||
path: /tmp
|
||||
- name: Load runtime image for fork
|
||||
if: github.event.pull_request.head.repo.fork
|
||||
uses: useblacksmith/build-push-action@v1
|
||||
with:
|
||||
load: true
|
||||
tags: ghcr.io/${{ env.REPO_OWNER }}/runtime:${{ env.RELEVANT_SHA }}-${{ matrix.base_image.tag }}
|
||||
context: containers/runtime
|
||||
run: |
|
||||
docker load --input /tmp/runtime-${{ matrix.base_image }}.tar
|
||||
- name: Cache Poetry dependencies
|
||||
uses: useblacksmith/cache@v5
|
||||
with:
|
||||
@@ -353,7 +297,6 @@ jobs:
|
||||
~/.cache/pypoetry
|
||||
~/.virtualenvs
|
||||
key: ${{ runner.os }}-poetry-${{ hashFiles('**/poetry.lock') }}
|
||||
lookup-only: true
|
||||
restore-keys: |
|
||||
${{ runner.os }}-poetry-
|
||||
- name: Set up Python
|
||||
@@ -363,7 +306,10 @@ jobs:
|
||||
- name: Install poetry via pipx
|
||||
run: pipx install poetry
|
||||
- name: Install Python dependencies using Poetry
|
||||
run: make install-python-dependencies POETRY_GROUP=main,test,runtime INSTALL_PLAYWRIGHT=0
|
||||
run: make install-python-dependencies
|
||||
- name: Lowercase Repository Owner
|
||||
run: |
|
||||
echo REPO_OWNER=$(echo ${{ github.repository_owner }} | tr '[:upper:]' '[:lower:]') >> $GITHUB_ENV
|
||||
- name: Run runtime tests
|
||||
run: |
|
||||
# We install pytest-xdist in order to run tests across CPUs
|
||||
@@ -372,14 +318,14 @@ jobs:
|
||||
# Install to be able to retry on failures for flaky tests
|
||||
poetry run pip install pytest-rerunfailures
|
||||
|
||||
image_name=ghcr.io/${{ env.REPO_OWNER }}/runtime:${{ env.RELEVANT_SHA }}-${{ matrix.base_image.tag }}
|
||||
image_name=ghcr.io/${{ env.REPO_OWNER }}/runtime:${{ env.RELEVANT_SHA }}-${{ matrix.base_image }}
|
||||
|
||||
TEST_RUNTIME=docker \
|
||||
SANDBOX_USER_ID=$(id -u) \
|
||||
SANDBOX_RUNTIME_CONTAINER_IMAGE=$image_name \
|
||||
TEST_IN_CI=true \
|
||||
RUN_AS_OPENHANDS=true \
|
||||
poetry run pytest -n 7 -raRs --reruns 2 --reruns-delay 5 --cov=openhands --cov-report=xml -s ./tests/runtime --ignore=tests/runtime/test_browsergym_envs.py --durations=10
|
||||
poetry run pytest -n 3 -raRs --reruns 2 --reruns-delay 5 --cov=openhands --cov-report=xml -s ./tests/runtime --ignore=tests/runtime/test_browsergym_envs.py
|
||||
- name: Upload coverage to Codecov
|
||||
uses: codecov/codecov-action@v5
|
||||
env:
|
||||
|
||||
19
.github/workflows/openhands-resolver.yml
vendored
19
.github/workflows/openhands-resolver.yml
vendored
@@ -16,15 +16,10 @@ on:
|
||||
type: string
|
||||
default: "main"
|
||||
description: "Target branch to pull and create PR against"
|
||||
pr_type:
|
||||
required: false
|
||||
type: string
|
||||
default: "draft"
|
||||
description: "The PR type that is going to be created (draft, ready)"
|
||||
LLM_MODEL:
|
||||
required: false
|
||||
type: string
|
||||
default: "anthropic/claude-3-7-sonnet-20250219"
|
||||
default: "anthropic/claude-3-5-sonnet-20241022"
|
||||
LLM_API_VERSION:
|
||||
required: false
|
||||
type: string
|
||||
@@ -150,15 +145,13 @@ jobs:
|
||||
fi
|
||||
|
||||
- name: Set environment variables
|
||||
env:
|
||||
REVIEW_BODY: ${{ github.event.review.body || '' }}
|
||||
run: |
|
||||
# Handle pull request events first
|
||||
if [ -n "${{ github.event.pull_request.number }}" ]; then
|
||||
echo "ISSUE_NUMBER=${{ github.event.pull_request.number }}" >> $GITHUB_ENV
|
||||
echo "ISSUE_TYPE=pr" >> $GITHUB_ENV
|
||||
# Handle pull request review events
|
||||
elif [ -n "$REVIEW_BODY" ]; then
|
||||
elif [ -n "${{ github.event.review.body }}" ]; then
|
||||
echo "ISSUE_NUMBER=${{ github.event.pull_request.number }}" >> $GITHUB_ENV
|
||||
echo "ISSUE_TYPE=pr" >> $GITHUB_ENV
|
||||
# Handle issue comment events that reference a PR
|
||||
@@ -171,7 +164,7 @@ jobs:
|
||||
echo "ISSUE_TYPE=issue" >> $GITHUB_ENV
|
||||
fi
|
||||
|
||||
if [ -n "$REVIEW_BODY" ]; then
|
||||
if [ -n "${{ github.event.review.body }}" ]; then
|
||||
echo "COMMENT_ID=${{ github.event.review.id || 'None' }}" >> $GITHUB_ENV
|
||||
else
|
||||
echo "COMMENT_ID=${{ github.event.comment.id || 'None' }}" >> $GITHUB_ENV
|
||||
@@ -179,7 +172,7 @@ jobs:
|
||||
|
||||
echo "MAX_ITERATIONS=${{ inputs.max_iterations || 50 }}" >> $GITHUB_ENV
|
||||
echo "SANDBOX_ENV_GITHUB_TOKEN=${{ secrets.PAT_TOKEN || github.token }}" >> $GITHUB_ENV
|
||||
echo "SANDBOX_BASE_CONTAINER_IMAGE=${{ inputs.base_container_image }}" >> $GITHUB_ENV
|
||||
echo "SANDBOX_ENV_BASE_CONTAINER_IMAGE=${{ inputs.base_container_image }}" >> $GITHUB_ENV
|
||||
|
||||
# Set branch variables
|
||||
echo "TARGET_BRANCH=${{ inputs.target_branch || 'main' }}" >> $GITHUB_ENV
|
||||
@@ -285,9 +278,9 @@ jobs:
|
||||
cd /tmp && python -m openhands.resolver.send_pull_request \
|
||||
--issue-number ${{ env.ISSUE_NUMBER }} \
|
||||
--target-branch ${{ env.TARGET_BRANCH }} \
|
||||
--pr-type ${{ inputs.pr_type || 'draft' }} \
|
||||
--pr-type draft \
|
||||
--reviewer ${{ github.actor }} | tee pr_result.txt && \
|
||||
grep "PR created" pr_result.txt | sed 's/.*\///g' > pr_number.txt
|
||||
grep "draft created" pr_result.txt | sed 's/.*\///g' > pr_number.txt
|
||||
else
|
||||
cd /tmp && python -m openhands.resolver.send_pull_request \
|
||||
--issue-number ${{ env.ISSUE_NUMBER }} \
|
||||
|
||||
3
.github/workflows/run-eval.yml
vendored
3
.github/workflows/run-eval.yml
vendored
@@ -19,10 +19,9 @@ jobs:
|
||||
ref: ${{ github.head_ref }}
|
||||
|
||||
- name: Trigger remote job
|
||||
env:
|
||||
PR_BRANCH: ${{ github.head_ref }}
|
||||
run: |
|
||||
REPO_URL="https://github.com/${{ github.repository }}"
|
||||
PR_BRANCH="${{ github.head_ref }}"
|
||||
echo "Repository URL: $REPO_URL"
|
||||
echo "PR Branch: $PR_BRANCH"
|
||||
|
||||
|
||||
@@ -54,20 +54,3 @@ Frontend:
|
||||
## Template for Github Pull Request
|
||||
|
||||
If you are starting a pull request (PR), please follow the template in `.github/pull_request_template.md`.
|
||||
|
||||
## Implementation Details
|
||||
|
||||
These details may or may not be useful for your current task.
|
||||
|
||||
### Frontend
|
||||
|
||||
#### Action Handling:
|
||||
- Actions are defined in `frontend/src/types/action-type.ts`
|
||||
- The `HANDLED_ACTIONS` array in `frontend/src/state/chat-slice.ts` determines which actions are displayed as collapsible UI elements
|
||||
- To add a new action type to the UI:
|
||||
1. Add the action type to the `HANDLED_ACTIONS` array
|
||||
2. Implement the action handling in `addAssistantAction` function in chat-slice.ts
|
||||
3. Add a translation key in the format `ACTION_MESSAGE$ACTION_NAME` to the i18n files
|
||||
- Actions with `thought` property are displayed in the UI based on their action type:
|
||||
- Regular actions (like "run", "edit") display the thought as a separate message
|
||||
- Special actions (like "think") are displayed as collapsible elements only
|
||||
|
||||
@@ -1,73 +0,0 @@
|
||||
#!/bin/bash
|
||||
|
||||
echo "Running OpenHands pre-commit hook..."
|
||||
|
||||
# Store the exit code to return at the end
|
||||
# This allows us to be additive to existing pre-commit hooks
|
||||
EXIT_CODE=0
|
||||
|
||||
# Check if frontend directory has changed
|
||||
frontend_changes=$(git diff --cached --name-only | grep "^frontend/")
|
||||
if [ -n "$frontend_changes" ]; then
|
||||
echo "Frontend changes detected. Running frontend checks..."
|
||||
|
||||
# Check if frontend directory exists
|
||||
if [ -d "frontend" ]; then
|
||||
# Change to frontend directory
|
||||
cd frontend || exit 1
|
||||
|
||||
# Run lint:fix
|
||||
echo "Running npm lint:fix..."
|
||||
npm run lint:fix
|
||||
if [ $? -ne 0 ]; then
|
||||
echo "Frontend linting failed. Please fix the issues before committing."
|
||||
EXIT_CODE=1
|
||||
fi
|
||||
|
||||
# Run build
|
||||
echo "Running npm build..."
|
||||
npm run build
|
||||
if [ $? -ne 0 ]; then
|
||||
echo "Frontend build failed. Please fix the issues before committing."
|
||||
EXIT_CODE=1
|
||||
fi
|
||||
|
||||
# Run tests
|
||||
echo "Running npm test..."
|
||||
npm test
|
||||
if [ $? -ne 0 ]; then
|
||||
echo "Frontend tests failed. Please fix the failing tests before committing."
|
||||
EXIT_CODE=1
|
||||
fi
|
||||
|
||||
# Return to the original directory
|
||||
cd ..
|
||||
|
||||
if [ $EXIT_CODE -eq 0 ]; then
|
||||
echo "Frontend checks passed!"
|
||||
fi
|
||||
else
|
||||
echo "Frontend directory not found. Skipping frontend checks."
|
||||
fi
|
||||
else
|
||||
echo "No frontend changes detected. Skipping frontend checks."
|
||||
fi
|
||||
|
||||
# Run any existing pre-commit hooks that might have been installed by the user
|
||||
# This makes our hook additive rather than replacing existing hooks
|
||||
if [ -f ".git/hooks/pre-commit.local" ]; then
|
||||
echo "Running existing pre-commit hooks..."
|
||||
bash .git/hooks/pre-commit.local
|
||||
if [ $? -ne 0 ]; then
|
||||
echo "Existing pre-commit hooks failed."
|
||||
EXIT_CODE=1
|
||||
fi
|
||||
fi
|
||||
|
||||
if [ $EXIT_CODE -eq 0 ]; then
|
||||
echo "All pre-commit checks passed!"
|
||||
else
|
||||
echo "Some pre-commit checks failed. Please fix the issues before committing."
|
||||
fi
|
||||
|
||||
exit $EXIT_CODE
|
||||
@@ -2,11 +2,4 @@
|
||||
|
||||
echo "Setting up the environment..."
|
||||
|
||||
# Install pre-commit package
|
||||
python -m pip install pre-commit
|
||||
|
||||
# Install pre-commit hooks if .git directory exists
|
||||
if [ -d ".git" ]; then
|
||||
echo "Installing pre-commit hooks..."
|
||||
pre-commit install
|
||||
fi
|
||||
|
||||
@@ -121,7 +121,7 @@ These Slack and Discord etiquette guidelines are designed to foster an inclusive
|
||||
- Use threads for specific discussions to keep channels organized and easier to follow.
|
||||
- Tag others only when their input is critical or urgent, and use @here, @channel or @everyone sparingly to minimize disruptions.
|
||||
- Be patient, as open-source contributors and maintainers often have other commitments and may need time to respond.
|
||||
- Post questions or discussions in the most relevant channel (e.g., for [slack - #general](https://openhands-ai.slack.com/archives/C06P5NCGSFP) for general topics, [slack - #questions](https://openhands-ai.slack.com/archives/C06U8UTKSAD) for queries/questions, [discord - #general](https://discord.com/channels/1222935860639563850/1222935861386018885)).
|
||||
- Post questions or discussions in the most relevant channel (e.g., for [slack - #general](https://app.slack.com/client/T06P212QSEA/C06P5NCGSFP) for general topics, [slack - #questions](https://openhands-ai.slack.com/archives/C06U8UTKSAD) for queries/questions, [discord - #general](https://discord.com/channels/1222935860639563850/1222935861386018885)).
|
||||
- When asking for help or raising issues, include necessary details like links, screenshots, or clear explanations to provide context.
|
||||
- Keep discussions in public channels whenever possible to allow others to benefit from the conversation, unless the matter is sensitive or private.
|
||||
- Always adhere to [our standards](https://github.com/All-Hands-AI/OpenHands/blob/main/CODE_OF_CONDUCT.md#our-standards) to ensure a welcoming and collaborative environment.
|
||||
|
||||
@@ -118,7 +118,7 @@ poetry run pytest ./tests/unit/test_*.py
|
||||
To reduce build time (e.g., if no changes were made to the client-runtime component), you can use an existing Docker container image by
|
||||
setting the SANDBOX_RUNTIME_CONTAINER_IMAGE environment variable to the desired Docker image.
|
||||
|
||||
Example: `export SANDBOX_RUNTIME_CONTAINER_IMAGE=ghcr.io/all-hands-ai/runtime:0.37-nikolaik`
|
||||
Example: `export SANDBOX_RUNTIME_CONTAINER_IMAGE=ghcr.io/all-hands-ai/runtime:0.30-nikolaik`
|
||||
|
||||
## Develop inside Docker container
|
||||
|
||||
|
||||
48
Makefile
48
Makefile
@@ -39,7 +39,6 @@ ifeq ($(INSTALL_DOCKER),)
|
||||
@$(MAKE) -s check-docker
|
||||
endif
|
||||
@$(MAKE) -s check-poetry
|
||||
@$(MAKE) -s check-tmux
|
||||
@echo "$(GREEN)Dependencies checked successfully.$(RESET)"
|
||||
|
||||
check-system:
|
||||
@@ -102,18 +101,6 @@ check-docker:
|
||||
exit 1; \
|
||||
fi
|
||||
|
||||
check-tmux:
|
||||
@echo "$(YELLOW)Checking tmux installation...$(RESET)"
|
||||
@if command -v tmux > /dev/null; then \
|
||||
echo "$(BLUE)$(shell tmux -V) is already installed.$(RESET)"; \
|
||||
else \
|
||||
echo "$(YELLOW)╔════════════════════════════════════════════════════════════════════════════╗$(RESET)"; \
|
||||
echo "$(YELLOW)║ OPTIONAL: tmux is not installed. ║$(RESET)"; \
|
||||
echo "$(YELLOW)║ Some advanced terminal features may not work without tmux. ║$(RESET)"; \
|
||||
echo "$(YELLOW)║ You can install it if needed, but it's not required for development. ║$(RESET)"; \
|
||||
echo "$(YELLOW)╚════════════════════════════════════════════════════════════════════════════╝$(RESET)"; \
|
||||
fi
|
||||
|
||||
check-poetry:
|
||||
@echo "$(YELLOW)Checking Poetry installation...$(RESET)"
|
||||
@if command -v poetry > /dev/null; then \
|
||||
@@ -146,29 +133,20 @@ install-python-dependencies:
|
||||
export HNSWLIB_NO_NATIVE=1; \
|
||||
poetry run pip install chroma-hnswlib; \
|
||||
fi
|
||||
@if [ -n "${POETRY_GROUP}" ]; then \
|
||||
echo "Installing only POETRY_GROUP=${POETRY_GROUP}"; \
|
||||
poetry install --only $${POETRY_GROUP}; \
|
||||
@poetry install
|
||||
@if [ -f "/etc/manjaro-release" ]; then \
|
||||
echo "$(BLUE)Detected Manjaro Linux. Installing Playwright dependencies...$(RESET)"; \
|
||||
poetry run pip install playwright; \
|
||||
poetry run playwright install chromium; \
|
||||
else \
|
||||
poetry install; \
|
||||
fi
|
||||
@if [ "${INSTALL_PLAYWRIGHT}" != "false" ] && [ "${INSTALL_PLAYWRIGHT}" != "0" ]; then \
|
||||
if [ -f "/etc/manjaro-release" ]; then \
|
||||
echo "$(BLUE)Detected Manjaro Linux. Installing Playwright dependencies...$(RESET)"; \
|
||||
poetry run pip install playwright; \
|
||||
poetry run playwright install chromium; \
|
||||
if [ ! -f cache/playwright_chromium_is_installed.txt ]; then \
|
||||
echo "Running playwright install --with-deps chromium..."; \
|
||||
poetry run playwright install --with-deps chromium; \
|
||||
mkdir -p cache; \
|
||||
touch cache/playwright_chromium_is_installed.txt; \
|
||||
else \
|
||||
if [ ! -f cache/playwright_chromium_is_installed.txt ]; then \
|
||||
echo "Running playwright install --with-deps chromium..."; \
|
||||
poetry run playwright install --with-deps chromium; \
|
||||
mkdir -p cache; \
|
||||
touch cache/playwright_chromium_is_installed.txt; \
|
||||
else \
|
||||
echo "Setup already done. Skipping playwright installation."; \
|
||||
fi \
|
||||
echo "Setup already done. Skipping playwright installation."; \
|
||||
fi \
|
||||
else \
|
||||
echo "Skipping Playwright installation (INSTALL_PLAYWRIGHT=${INSTALL_PLAYWRIGHT})."; \
|
||||
fi
|
||||
@echo "$(GREEN)Python dependencies installed successfully.$(RESET)"
|
||||
|
||||
@@ -188,7 +166,7 @@ install-pre-commit-hooks:
|
||||
|
||||
lint-backend:
|
||||
@echo "$(YELLOW)Running linters...$(RESET)"
|
||||
@poetry run pre-commit run --files openhands/**/* evaluation/**/* tests/**/* --show-diff-on-failure --config $(PRE_COMMIT_CONFIG_PATH)
|
||||
@poetry run pre-commit run --files openhands/**/* agenthub/**/* evaluation/**/* --show-diff-on-failure --config $(PRE_COMMIT_CONFIG_PATH)
|
||||
|
||||
lint-frontend:
|
||||
@echo "$(YELLOW)Running linters for frontend...$(RESET)"
|
||||
@@ -207,7 +185,7 @@ test:
|
||||
|
||||
build-frontend:
|
||||
@echo "$(YELLOW)Building frontend...$(RESET)"
|
||||
@cd frontend && npm run prepare && npm run build
|
||||
@cd frontend && npm run build
|
||||
|
||||
# Start backend
|
||||
start-backend:
|
||||
|
||||
61
README.md
61
README.md
@@ -9,15 +9,16 @@
|
||||
<div align="center">
|
||||
<a href="https://github.com/All-Hands-AI/OpenHands/graphs/contributors"><img src="https://img.shields.io/github/contributors/All-Hands-AI/OpenHands?style=for-the-badge&color=blue" alt="Contributors"></a>
|
||||
<a href="https://github.com/All-Hands-AI/OpenHands/stargazers"><img src="https://img.shields.io/github/stars/All-Hands-AI/OpenHands?style=for-the-badge&color=blue" alt="Stargazers"></a>
|
||||
<a href="https://codecov.io/github/All-Hands-AI/OpenHands?branch=main"><img alt="CodeCov" src="https://img.shields.io/codecov/c/github/All-Hands-AI/OpenHands?style=for-the-badge&color=blue"></a>
|
||||
<a href="https://github.com/All-Hands-AI/OpenHands/blob/main/LICENSE"><img src="https://img.shields.io/github/license/All-Hands-AI/OpenHands?style=for-the-badge&color=blue" alt="MIT License"></a>
|
||||
<br/>
|
||||
<a href="https://join.slack.com/t/openhands-ai/shared_invite/zt-34zm4j0gj-Qz5kRHoca8DFCbqXPS~f_A"><img src="https://img.shields.io/badge/Slack-Join%20Us-red?logo=slack&logoColor=white&style=for-the-badge" alt="Join our Slack community"></a>
|
||||
<a href="https://join.slack.com/t/openhands-ai/shared_invite/zt-2ngejmfw6-9gW4APWOC9XUp1n~SiQ6iw"><img src="https://img.shields.io/badge/Slack-Join%20Us-red?logo=slack&logoColor=white&style=for-the-badge" alt="Join our Slack community"></a>
|
||||
<a href="https://discord.gg/ESHStjSjD4"><img src="https://img.shields.io/badge/Discord-Join%20Us-purple?logo=discord&logoColor=white&style=for-the-badge" alt="Join our Discord community"></a>
|
||||
<a href="https://github.com/All-Hands-AI/OpenHands/blob/main/CREDITS.md"><img src="https://img.shields.io/badge/Project-Credits-blue?style=for-the-badge&color=FFE165&logo=github&logoColor=white" alt="Credits"></a>
|
||||
<br/>
|
||||
<a href="https://docs.all-hands.dev/modules/usage/getting-started"><img src="https://img.shields.io/badge/Documentation-000?logo=googledocs&logoColor=FFE165&style=for-the-badge" alt="Check out the documentation"></a>
|
||||
<a href="https://arxiv.org/abs/2407.16741"><img src="https://img.shields.io/badge/Paper%20on%20Arxiv-000?logoColor=FFE165&logo=arxiv&style=for-the-badge" alt="Paper on Arxiv"></a>
|
||||
<a href="https://docs.google.com/spreadsheets/d/1wOUdFCMyY6Nt0AIqF705KN4JKOWgeI4wUGUP60krXXs/edit?gid=0#gid=0"><img src="https://img.shields.io/badge/Benchmark%20score-000?logoColor=FFE165&logo=huggingface&style=for-the-badge" alt="Evaluation Benchmark Score"></a>
|
||||
<a href="https://huggingface.co/spaces/OpenHands/evaluation"><img src="https://img.shields.io/badge/Benchmark%20score-000?logoColor=FFE165&logo=huggingface&style=for-the-badge" alt="Evaluation Benchmark Score"></a>
|
||||
<hr>
|
||||
</div>
|
||||
|
||||
@@ -26,7 +27,7 @@ Welcome to OpenHands (formerly OpenDevin), a platform for software development a
|
||||
OpenHands agents can do anything a human developer can: modify code, run commands, browse the web,
|
||||
call APIs, and yes—even copy code snippets from StackOverflow.
|
||||
|
||||
Learn more at [docs.all-hands.dev](https://docs.all-hands.dev), or [sign up for OpenHands Cloud](https://app.all-hands.dev) to get started.
|
||||
Learn more at [docs.all-hands.dev](https://docs.all-hands.dev), or jump to the [Quick Start](#-quick-start).
|
||||
|
||||
> [!IMPORTANT]
|
||||
> Using OpenHands for work? We'd love to chat! Fill out
|
||||
@@ -35,50 +36,37 @@ Learn more at [docs.all-hands.dev](https://docs.all-hands.dev), or [sign up for
|
||||
|
||||

|
||||
|
||||
## ☁️ OpenHands Cloud
|
||||
The easiest way to get started with OpenHands is on [OpenHands Cloud](https://app.all-hands.dev),
|
||||
which comes with $50 in free credits for new users.
|
||||
## ⚡ Quick Start
|
||||
|
||||
## 💻 Running OpenHands Locally
|
||||
|
||||
OpenHands can also run on your local system using Docker.
|
||||
The easiest way to run OpenHands is in Docker.
|
||||
See the [Running OpenHands](https://docs.all-hands.dev/modules/usage/installation) guide for
|
||||
system requirements and more information.
|
||||
|
||||
> [!WARNING]
|
||||
> On a public network? See our [Hardened Docker Installation Guide](https://docs.all-hands.dev/modules/usage/runtimes/docker#hardened-docker-installation)
|
||||
> to secure your deployment by restricting network binding and implementing additional security measures.
|
||||
|
||||
|
||||
```bash
|
||||
docker pull docker.all-hands.dev/all-hands-ai/runtime:0.37-nikolaik
|
||||
docker pull docker.all-hands.dev/all-hands-ai/runtime:0.30-nikolaik
|
||||
|
||||
docker run -it --rm --pull=always \
|
||||
-e SANDBOX_RUNTIME_CONTAINER_IMAGE=docker.all-hands.dev/all-hands-ai/runtime:0.37-nikolaik \
|
||||
-e SANDBOX_RUNTIME_CONTAINER_IMAGE=docker.all-hands.dev/all-hands-ai/runtime:0.30-nikolaik \
|
||||
-e LOG_ALL_EVENTS=true \
|
||||
-v /var/run/docker.sock:/var/run/docker.sock \
|
||||
-v ~/.openhands-state:/.openhands-state \
|
||||
-p 3000:3000 \
|
||||
--add-host host.docker.internal:host-gateway \
|
||||
--name openhands-app \
|
||||
docker.all-hands.dev/all-hands-ai/openhands:0.37
|
||||
docker.all-hands.dev/all-hands-ai/openhands:0.30
|
||||
```
|
||||
|
||||
> [!WARNING]
|
||||
> On a public network? See our [Hardened Docker Installation](https://docs.all-hands.dev/modules/usage/runtimes/docker#hardened-docker-installation) guide
|
||||
> to secure your deployment by restricting network binding and implementing additional security measures.
|
||||
|
||||
You'll find OpenHands running at [http://localhost:3000](http://localhost:3000)!
|
||||
|
||||
When you open the application, you'll be asked to choose an LLM provider and add an API key.
|
||||
[Anthropic's Claude 3.7 Sonnet](https://www.anthropic.com/api) (`anthropic/claude-3-7-sonnet-20250219`)
|
||||
Finally, you'll need a model provider and API key.
|
||||
[Anthropic's Claude 3.5 Sonnet](https://www.anthropic.com/api) (`anthropic/claude-3-5-sonnet-20241022`)
|
||||
works best, but you have [many options](https://docs.all-hands.dev/modules/usage/llms).
|
||||
|
||||
## 💡 Other ways to run OpenHands
|
||||
|
||||
> [!CAUTION]
|
||||
> OpenHands is meant to be run by a single user on their local workstation.
|
||||
> It is not appropriate for multi-tenant deployments where multiple users share the same instance. There is no built-in authentication, isolation, or scalability.
|
||||
>
|
||||
> If you're interested in running OpenHands in a multi-tenant environment, please
|
||||
> [get in touch with us](https://docs.google.com/forms/d/e/1FAIpQLSet3VbGaz8z32gW9Wm-Grl4jpt5WgMXPgJ4EDPVmCETCBpJtQ/viewform)
|
||||
> for advanced deployment options.
|
||||
---
|
||||
|
||||
You can also [connect OpenHands to your local filesystem](https://docs.all-hands.dev/modules/usage/runtimes/docker#connecting-to-your-filesystem),
|
||||
run OpenHands in a scriptable [headless mode](https://docs.all-hands.dev/modules/usage/how-to/headless-mode),
|
||||
@@ -87,6 +75,14 @@ or run it on tagged issues with [a github action](https://docs.all-hands.dev/mod
|
||||
|
||||
Visit [Running OpenHands](https://docs.all-hands.dev/modules/usage/installation) for more information and setup instructions.
|
||||
|
||||
> [!CAUTION]
|
||||
> OpenHands is meant to be run by a single user on their local workstation.
|
||||
> It is not appropriate for multi-tenant deployments where multiple users share the same instance. There is no built-in isolation or scalability.
|
||||
>
|
||||
> If you're interested in running OpenHands in a multi-tenant environment, please
|
||||
> [get in touch with us](https://docs.google.com/forms/d/e/1FAIpQLSet3VbGaz8z32gW9Wm-Grl4jpt5WgMXPgJ4EDPVmCETCBpJtQ/viewform)
|
||||
> for advanced deployment options.
|
||||
|
||||
If you want to modify the OpenHands source code, check out [Development.md](https://github.com/All-Hands-AI/OpenHands/blob/main/Development.md).
|
||||
|
||||
Having issues? The [Troubleshooting Guide](https://docs.all-hands.dev/modules/usage/troubleshooting) can help.
|
||||
@@ -99,19 +95,12 @@ check out our [documentation](https://docs.all-hands.dev/modules/usage/getting-s
|
||||
There you'll find resources on how to use different LLM providers,
|
||||
troubleshooting resources, and advanced configuration options.
|
||||
|
||||
### Custom Scripts
|
||||
|
||||
OpenHands supports custom scripts that run at different points in the runtime lifecycle:
|
||||
|
||||
- **setup.sh**: Place this script in the `.openhands` directory of your repository to run custom setup commands when the runtime initializes.
|
||||
- **pre-commit.sh**: Place this script in the `.openhands` directory to add a custom git pre-commit hook that runs before each commit. This can be used to enforce code quality standards, run tests, or perform other checks before allowing commits.
|
||||
|
||||
## 🤝 How to Join the Community
|
||||
|
||||
OpenHands is a community-driven project, and we welcome contributions from everyone. We do most of our communication
|
||||
through Slack, so this is the best place to start, but we also are happy to have you contact us on Discord or Github:
|
||||
|
||||
- [Join our Slack workspace](https://join.slack.com/t/openhands-ai/shared_invite/zt-34zm4j0gj-Qz5kRHoca8DFCbqXPS~f_A) - Here we talk about research, architecture, and future development.
|
||||
- [Join our Slack workspace](https://join.slack.com/t/openhands-ai/shared_invite/zt-2ngejmfw6-9gW4APWOC9XUp1n~SiQ6iw) - Here we talk about research, architecture, and future development.
|
||||
- [Join our Discord server](https://discord.gg/ESHStjSjD4) - This is a community-run server for general discussion, questions, and feedback.
|
||||
- [Read or post Github Issues](https://github.com/All-Hands-AI/OpenHands/issues) - Check out the issues we're working on, or add your own ideas.
|
||||
|
||||
|
||||
@@ -216,26 +216,13 @@ model = "gpt-4o"
|
||||
[agent]
|
||||
|
||||
# Whether the browsing tool is enabled
|
||||
enable_browsing = true
|
||||
codeact_enable_browsing = true
|
||||
|
||||
# Whether the LLM draft editor is enabled
|
||||
enable_llm_editor = false
|
||||
|
||||
# Whether the standard editor tool (str_replace_editor) is enabled
|
||||
# Only has an effect if enable_llm_editor is False
|
||||
enable_editor = true
|
||||
codeact_enable_llm_editor = false
|
||||
|
||||
# Whether the IPython tool is enabled
|
||||
enable_jupyter = true
|
||||
|
||||
# Whether the command tool is enabled
|
||||
enable_cmd = true
|
||||
|
||||
# Whether the think tool is enabled
|
||||
enable_think = true
|
||||
|
||||
# Whether the finish tool is enabled
|
||||
enable_finish = true
|
||||
codeact_enable_jupyter = true
|
||||
|
||||
# LLM config group to use
|
||||
#llm_config = 'your-llm-config-group'
|
||||
@@ -316,10 +303,6 @@ llm_config = 'gpt3'
|
||||
# Additional Docker runtime kwargs
|
||||
#docker_runtime_kwargs = {}
|
||||
|
||||
# Specific port to use for VSCode. If not set, a random port will be chosen.
|
||||
# Useful when deploying OpenHands in a remote machine where you need to expose a specific port.
|
||||
#vscode_port = 41234
|
||||
|
||||
#################################### Security ###################################
|
||||
# Configuration for security features
|
||||
##############################################################################
|
||||
@@ -395,7 +378,7 @@ type = "noop"
|
||||
#[llm.condenser]
|
||||
#model = "gpt-4o"
|
||||
#temperature = 0.1
|
||||
#max_input_tokens = 1024
|
||||
#max_tokens = 1024
|
||||
|
||||
#################################### Eval ####################################
|
||||
# Configuration for the evaluation, please refer to the specific evaluation
|
||||
|
||||
@@ -7,17 +7,15 @@ org_name=""
|
||||
push=0
|
||||
load=0
|
||||
tag_suffix=""
|
||||
dry_run=0
|
||||
|
||||
# Function to display usage information
|
||||
usage() {
|
||||
echo "Usage: $0 -i <image_name> [-o <org_name>] [--push] [--load] [-t <tag_suffix>] [--dry]"
|
||||
echo "Usage: $0 -i <image_name> [-o <org_name>] [--push] [--load] [-t <tag_suffix>]"
|
||||
echo " -i: Image name (required)"
|
||||
echo " -o: Organization name"
|
||||
echo " --push: Push the image"
|
||||
echo " --load: Load the image"
|
||||
echo " -t: Tag suffix"
|
||||
echo " --dry: Don't build, only create build-args.json"
|
||||
exit 1
|
||||
}
|
||||
|
||||
@@ -29,7 +27,6 @@ while [[ $# -gt 0 ]]; do
|
||||
--push) push=1; shift ;;
|
||||
--load) load=1; shift ;;
|
||||
-t) tag_suffix="$2"; shift 2 ;;
|
||||
--dry) dry_run=1; shift ;;
|
||||
*) usage ;;
|
||||
esac
|
||||
done
|
||||
@@ -116,13 +113,10 @@ echo "Repo: $DOCKER_REPOSITORY"
|
||||
echo "Base dir: $DOCKER_BASE_DIR"
|
||||
|
||||
args=""
|
||||
full_tags=()
|
||||
for tag in "${tags[@]}"; do
|
||||
args+=" -t $DOCKER_REPOSITORY:$tag"
|
||||
full_tags+=("$DOCKER_REPOSITORY:$tag")
|
||||
done
|
||||
|
||||
|
||||
if [[ $push -eq 1 ]]; then
|
||||
args+=" --push"
|
||||
args+=" --cache-to=type=registry,ref=$DOCKER_REPOSITORY:$cache_tag,mode=max"
|
||||
@@ -142,26 +136,6 @@ else
|
||||
# For push or without load, build for multiple platforms
|
||||
platform="linux/amd64,linux/arm64"
|
||||
fi
|
||||
if [[ $dry_run -eq 1 ]]; then
|
||||
echo "Dry Run is enabled. Writing build config to docker-build-dry.json"
|
||||
jq -n \
|
||||
--argjson tags "$(printf '%s\n' "${full_tags[@]}" | jq -R . | jq -s .)" \
|
||||
--arg platform "$platform" \
|
||||
--arg openhands_build_version "$OPENHANDS_BUILD_VERSION" \
|
||||
--arg dockerfile "$dir/Dockerfile" \
|
||||
'{
|
||||
tags: $tags,
|
||||
platform: $platform,
|
||||
build_args: [
|
||||
"OPENHANDS_BUILD_VERSION=" + $openhands_build_version
|
||||
],
|
||||
dockerfile: $dockerfile
|
||||
}' > docker-build-dry.json
|
||||
|
||||
exit 0
|
||||
fi
|
||||
|
||||
|
||||
|
||||
echo "Building for platform(s): $platform"
|
||||
|
||||
|
||||
@@ -61,8 +61,8 @@ RUN add-apt-repository ppa:deadsnakes/ppa \
|
||||
&& apt-get install -y python3.12 python3.12-venv python3.12-dev python3-pip \
|
||||
&& ln -s /usr/bin/python3.12 /usr/bin/python
|
||||
|
||||
# NodeJS >= 22.x
|
||||
RUN curl -fsSL https://deb.nodesource.com/setup_22.x | bash - \
|
||||
# NodeJS >= 18.17.1
|
||||
RUN curl -fsSL https://deb.nodesource.com/setup_18.x | bash - \
|
||||
&& apt-get install -y nodejs
|
||||
|
||||
# Poetry >= 1.8
|
||||
@@ -108,7 +108,7 @@ WORKDIR /app
|
||||
|
||||
# cache build dependencies
|
||||
RUN \
|
||||
--mount=type=bind,source=./,target=/app/,rw \
|
||||
--mount=type=bind,source=./,target=/app/ \
|
||||
<<EOF
|
||||
#!/bin/bash
|
||||
make -s clean
|
||||
|
||||
@@ -11,7 +11,7 @@ services:
|
||||
- BACKEND_HOST=${BACKEND_HOST:-"0.0.0.0"}
|
||||
- SANDBOX_API_HOSTNAME=host.docker.internal
|
||||
#
|
||||
- SANDBOX_RUNTIME_CONTAINER_IMAGE=${SANDBOX_RUNTIME_CONTAINER_IMAGE:-ghcr.io/all-hands-ai/runtime:0.37-nikolaik}
|
||||
- SANDBOX_RUNTIME_CONTAINER_IMAGE=${SANDBOX_RUNTIME_CONTAINER_IMAGE:-ghcr.io/all-hands-ai/runtime:0.30-nikolaik}
|
||||
- SANDBOX_USER_ID=${SANDBOX_USER_ID:-1234}
|
||||
- WORKSPACE_MOUNT_PATH=${WORKSPACE_BASE:-$PWD/workspace}
|
||||
ports:
|
||||
|
||||
@@ -26,7 +26,7 @@ repos:
|
||||
- id: ruff
|
||||
entry: ruff check --config dev_config/python/ruff.toml
|
||||
types_or: [python, pyi, jupyter]
|
||||
args: [--fix, --unsafe-fixes]
|
||||
args: [--fix]
|
||||
# Run the formatter.
|
||||
- id: ruff-format
|
||||
entry: ruff format --config dev_config/python/ruff.toml
|
||||
|
||||
@@ -7,9 +7,6 @@ select = [
|
||||
"Q",
|
||||
"B",
|
||||
"ASYNC",
|
||||
"UP006", # Use `list` instead of `List` for annotations
|
||||
"UP007", # Use `X | Y` instead of `Union[X, Y]`
|
||||
"UP008", # Use `X | None` instead of `Optional[X]`
|
||||
]
|
||||
|
||||
ignore = [
|
||||
|
||||
@@ -7,7 +7,7 @@ services:
|
||||
image: openhands:latest
|
||||
container_name: openhands-app-${DATE:-}
|
||||
environment:
|
||||
- SANDBOX_RUNTIME_CONTAINER_IMAGE=${SANDBOX_RUNTIME_CONTAINER_IMAGE:-docker.all-hands.dev/all-hands-ai/runtime:0.37-nikolaik}
|
||||
- SANDBOX_RUNTIME_CONTAINER_IMAGE=${SANDBOX_RUNTIME_CONTAINER_IMAGE:-docker.all-hands.dev/all-hands-ai/runtime:0.30-nikolaik}
|
||||
#- SANDBOX_USER_ID=${SANDBOX_USER_ID:-1234} # enable this only if you want a specific non-root sandbox user but you will have to manually adjust permissions of openhands-state for this user
|
||||
- WORKSPACE_MOUNT_PATH=${WORKSPACE_BASE:-$PWD/workspace}
|
||||
ports:
|
||||
|
||||
1
docs/.gitignore
vendored
1
docs/.gitignore
vendored
@@ -3,7 +3,6 @@
|
||||
|
||||
# Production
|
||||
/build
|
||||
/static/swagger-ui
|
||||
|
||||
# Generated files
|
||||
.docusaurus
|
||||
|
||||
@@ -32,8 +32,6 @@ For instructions or processes that need to be followed in a specific order, use
|
||||
|
||||
Example:
|
||||
1. Step one: Do this.
|
||||
- First this sub step.
|
||||
- Then this sub step.
|
||||
2. Step two: Complete this action.
|
||||
3. Step three: Verify the result.
|
||||
|
||||
@@ -49,14 +47,6 @@ docker run -it \
|
||||
...
|
||||
```
|
||||
|
||||
### Use of Note and Warning
|
||||
|
||||
When adding a note or warning, use the built-in note and warning syntax.
|
||||
|
||||
Example:
|
||||
:::note
|
||||
This section is for advanced users only.
|
||||
:::
|
||||
|
||||
### Referring to UI Elements
|
||||
|
||||
|
||||
@@ -36,14 +36,6 @@ const config: Config = {
|
||||
mermaid: true,
|
||||
},
|
||||
themes: ['@docusaurus/theme-mermaid'],
|
||||
plugins: [
|
||||
[
|
||||
require.resolve('docusaurus-lunr-search'),
|
||||
{
|
||||
languages: ['en', 'zh', 'fr', 'ja', 'pt']
|
||||
}
|
||||
]
|
||||
],
|
||||
presets: [
|
||||
[
|
||||
'classic',
|
||||
@@ -83,19 +75,10 @@ const config: Config = {
|
||||
position: 'left',
|
||||
label: 'User Guides',
|
||||
},
|
||||
{
|
||||
href: 'https://docs.all-hands.dev/swagger-ui/', // FIXME: this should be a relative path, but docusarus steals the click
|
||||
label: 'API',
|
||||
position: 'left',
|
||||
},
|
||||
{
|
||||
type: 'localeDropdown',
|
||||
position: 'left',
|
||||
},
|
||||
{
|
||||
type: 'search',
|
||||
position: 'left',
|
||||
},
|
||||
{
|
||||
href: 'https://all-hands.dev',
|
||||
label: 'Company',
|
||||
|
||||
@@ -1,102 +0,0 @@
|
||||
const fs = require('fs');
|
||||
const path = require('path');
|
||||
const swaggerUiDist = require('swagger-ui-dist');
|
||||
|
||||
/**
|
||||
* This script manually sets up Swagger UI for the Docusaurus documentation.
|
||||
*
|
||||
* Why we need this approach:
|
||||
* 1. Docusaurus doesn't have a built-in way to integrate Swagger UI
|
||||
* 2. We need to copy the necessary files from swagger-ui-dist to our static directory
|
||||
* 3. We need to create a custom index.html file that points to our OpenAPI spec
|
||||
* 4. This approach allows us to customize the Swagger UI to match our documentation style
|
||||
*/
|
||||
|
||||
// Get the absolute path to the swagger-ui-dist package
|
||||
const swaggerUiDistPath = swaggerUiDist.getAbsoluteFSPath();
|
||||
|
||||
// Create the target directory if it doesn't exist
|
||||
const targetDir = path.join(__dirname, 'static', 'swagger-ui');
|
||||
if (!fs.existsSync(targetDir)) {
|
||||
fs.mkdirSync(targetDir, { recursive: true });
|
||||
}
|
||||
|
||||
// Copy all files from swagger-ui-dist to our target directory
|
||||
const files = fs.readdirSync(swaggerUiDistPath);
|
||||
files.forEach(file => {
|
||||
const sourcePath = path.join(swaggerUiDistPath, file);
|
||||
const targetPath = path.join(targetDir, file);
|
||||
|
||||
// Skip directories and non-essential files
|
||||
if (fs.statSync(sourcePath).isDirectory() ||
|
||||
file === 'package.json' ||
|
||||
file === 'README.md' ||
|
||||
file.endsWith('.map')) {
|
||||
return;
|
||||
}
|
||||
|
||||
fs.copyFileSync(sourcePath, targetPath);
|
||||
});
|
||||
|
||||
// Create a custom index.html file that points to our OpenAPI spec
|
||||
const indexHtml = `
|
||||
<!DOCTYPE html>
|
||||
<html lang="en">
|
||||
<head>
|
||||
<meta charset="UTF-8">
|
||||
<title>OpenHands API Documentation</title>
|
||||
<link rel="stylesheet" type="text/css" href="./swagger-ui.css" />
|
||||
<link rel="icon" type="image/png" href="./favicon-32x32.png" sizes="32x32" />
|
||||
<link rel="icon" type="image/png" href="./favicon-16x16.png" sizes="16x16" />
|
||||
<style>
|
||||
html {
|
||||
box-sizing: border-box;
|
||||
overflow: -moz-scrollbars-vertical;
|
||||
overflow-y: scroll;
|
||||
}
|
||||
|
||||
*,
|
||||
*:before,
|
||||
*:after {
|
||||
box-sizing: inherit;
|
||||
}
|
||||
|
||||
body {
|
||||
margin: 0;
|
||||
background: #fafafa;
|
||||
}
|
||||
</style>
|
||||
</head>
|
||||
|
||||
<body>
|
||||
<div id="swagger-ui"></div>
|
||||
|
||||
<script src="./swagger-ui-bundle.js" charset="UTF-8"> </script>
|
||||
<script src="./swagger-ui-standalone-preset.js" charset="UTF-8"> </script>
|
||||
<script>
|
||||
window.onload = function() {
|
||||
// Begin Swagger UI call region
|
||||
const ui = SwaggerUIBundle({
|
||||
url: "/openapi.json",
|
||||
dom_id: '#swagger-ui',
|
||||
deepLinking: true,
|
||||
presets: [
|
||||
SwaggerUIBundle.presets.apis,
|
||||
SwaggerUIStandalonePreset
|
||||
],
|
||||
plugins: [
|
||||
SwaggerUIBundle.plugins.DownloadUrl
|
||||
],
|
||||
layout: "StandaloneLayout"
|
||||
});
|
||||
// End Swagger UI call region
|
||||
window.ui = ui;
|
||||
};
|
||||
</script>
|
||||
</body>
|
||||
</html>
|
||||
`;
|
||||
|
||||
fs.writeFileSync(path.join(targetDir, 'index.html'), indexHtml);
|
||||
|
||||
console.log('Swagger UI files generated successfully in static/swagger-ui/');
|
||||
@@ -354,12 +354,12 @@ Les options de configuration de l'agent sont définies dans les sections `[agent
|
||||
- Valeur par défaut : `true`
|
||||
- Description : Si l'appel de fonction est activé
|
||||
|
||||
- `enable_browsing`
|
||||
- `codeact_enable_browsing`
|
||||
- Type : `bool`
|
||||
- Valeur par défaut : `false`
|
||||
- Description : Si le délégué de navigation est activé dans l'espace d'action (fonctionne uniquement avec l'appel de fonction)
|
||||
|
||||
- `enable_llm_editor`
|
||||
- `codeact_enable_llm_editor`
|
||||
- Type : `bool`
|
||||
- Valeur par défaut : `false`
|
||||
- Description : Si l'éditeur LLM est activé dans l'espace d'action (fonctionne uniquement avec l'appel de fonction)
|
||||
|
||||
@@ -60,7 +60,25 @@ Félicitations !
|
||||
|
||||
## Explication technique
|
||||
|
||||
Veuillez consulter le [chapitre sur les images Docker personnalisées dans la documentation d'exécution](https://docs.all-hands.dev/fr/modules/usage/architecture/runtime) pour obtenir des explications plus détaillées.
|
||||
Lorsqu'une image personnalisée est utilisée pour la première fois, elle ne sera pas trouvée et donc elle sera construite (à l'exécution ultérieure, l'image construite sera trouvée et renvoyée).
|
||||
|
||||
L'image personnalisée est construite avec [_build_sandbox_image()](https://github.com/All-Hands-AI/OpenHands/blob/main/openhands/runtime/docker/image_agnostic_util.py#L29), qui crée un fichier docker en utilisant votre image personnalisée comme base et configure ensuite l'environnement pour OpenHands, comme ceci:
|
||||
|
||||
```python
|
||||
dockerfile_content = (
|
||||
f'FROM {base_image}\n'
|
||||
'RUN apt update && apt install -y openssh-server wget sudo\n'
|
||||
'RUN mkdir -p -m0755 /var/run/sshd\n'
|
||||
'RUN mkdir -p /openhands && mkdir -p /openhands/logs && chmod 777 /openhands/logs\n'
|
||||
'RUN wget "https://github.com/conda-forge/miniforge/releases/latest/download/Miniforge3-$(uname)-$(uname -m).sh"\n'
|
||||
'RUN bash Miniforge3-$(uname)-$(uname -m).sh -b -p /openhands/miniforge3\n'
|
||||
'RUN bash -c ". /openhands/miniforge3/etc/profile.d/conda.sh && conda config --set changeps1 False && conda config --append channels conda-forge"\n'
|
||||
'RUN echo "export PATH=/openhands/miniforge3/bin:$PATH" >> ~/.bashrc\n'
|
||||
'RUN echo "export PATH=/openhands/miniforge3/bin:$PATH" >> /openhands/bash.bashrc\n'
|
||||
).strip()
|
||||
```
|
||||
|
||||
> Remarque: Le nom de l'image est modifié via [_get_new_image_name()](https://github.com/All-Hands-AI/OpenHands/blob/main/openhands/runtime/docker/image_agnostic_util.py#L63) et c'est ce nom modifié qui sera recherché lors des exécutions ultérieures.
|
||||
|
||||
## Dépannage / Erreurs
|
||||
|
||||
|
||||
@@ -52,7 +52,7 @@ LLM_API_KEY="sk_test_12345"
|
||||
```bash
|
||||
docker run -it \
|
||||
--pull=always \
|
||||
-e SANDBOX_RUNTIME_CONTAINER_IMAGE=docker.all-hands.dev/all-hands-ai/runtime:0.37-nikolaik \
|
||||
-e SANDBOX_RUNTIME_CONTAINER_IMAGE=docker.all-hands.dev/all-hands-ai/runtime:0.30-nikolaik \
|
||||
-e SANDBOX_USER_ID=$(id -u) \
|
||||
-e WORKSPACE_MOUNT_PATH=$WORKSPACE_BASE \
|
||||
-e LLM_API_KEY=$LLM_API_KEY \
|
||||
@@ -61,7 +61,7 @@ docker run -it \
|
||||
-v /var/run/docker.sock:/var/run/docker.sock \
|
||||
--add-host host.docker.internal:host-gateway \
|
||||
--name openhands-app-$(date +%Y%m%d%H%M%S) \
|
||||
docker.all-hands.dev/all-hands-ai/openhands:0.37 \
|
||||
docker.all-hands.dev/all-hands-ai/openhands:0.30 \
|
||||
python -m openhands.core.cli
|
||||
```
|
||||
|
||||
|
||||
@@ -21,18 +21,14 @@ OpenHands fournit un mode Interface Graphique (GUI) convivial pour interagir ave
|
||||
3. Entrez la `Clé API` correspondante pour le fournisseur choisi.
|
||||
4. Cliquez sur "Enregistrer" pour appliquer les paramètres.
|
||||
|
||||
### Jetons de Contrôle de Version
|
||||
|
||||
OpenHands prend en charge plusieurs fournisseurs de contrôle de version. Vous pouvez configurer des jetons pour plusieurs fournisseurs simultanément.
|
||||
|
||||
#### Configuration du Jeton GitHub
|
||||
### Configuration du Jeton GitHub
|
||||
|
||||
OpenHands exporte automatiquement un `GITHUB_TOKEN` vers l'environnement shell s'il est disponible. Cela peut se produire de deux manières :
|
||||
|
||||
1. **Localement (OSS)** : L'utilisateur saisit directement son jeton GitHub
|
||||
2. **En ligne (SaaS)** : Le jeton est obtenu via l'authentification OAuth GitHub
|
||||
|
||||
##### Configuration d'un Jeton GitHub Local
|
||||
#### Configuration d'un Jeton GitHub Local
|
||||
|
||||
1. **Générer un Personal Access Token (PAT)** :
|
||||
- Allez dans Paramètres GitHub > Paramètres développeur > Personal Access Tokens > Tokens (classique)
|
||||
@@ -44,11 +40,11 @@ OpenHands exporte automatiquement un `GITHUB_TOKEN` vers l'environnement shell s
|
||||
|
||||
2. **Entrer le Jeton dans OpenHands** :
|
||||
- Cliquez sur le bouton Paramètres (icône d'engrenage) en haut à droite
|
||||
- Accédez à la section "Git Provider Settings"
|
||||
- Accédez à la section "GitHub"
|
||||
- Collez votre jeton dans le champ "Jeton GitHub"
|
||||
- Cliquez sur "Enregistrer" pour appliquer les modifications
|
||||
|
||||
##### Politiques de Jetons Organisationnels
|
||||
#### Politiques de Jetons Organisationnels
|
||||
|
||||
Si vous travaillez avec des dépôts organisationnels, une configuration supplémentaire peut être nécessaire :
|
||||
|
||||
@@ -63,7 +59,7 @@ Si vous travaillez avec des dépôts organisationnels, une configuration supplé
|
||||
- Si nécessaire, cliquez sur "Activer SSO" à côté de votre organisation
|
||||
- Terminez le processus d'autorisation SSO
|
||||
|
||||
##### Authentification OAuth (Mode En Ligne)
|
||||
#### Authentification OAuth (Mode En Ligne)
|
||||
|
||||
Lorsque vous utilisez OpenHands en mode en ligne, le flux OAuth GitHub :
|
||||
|
||||
@@ -78,7 +74,7 @@ Lorsque vous utilisez OpenHands en mode en ligne, le flux OAuth GitHub :
|
||||
- Autorisez OpenHands à accéder à votre compte GitHub
|
||||
- Si vous utilisez une organisation, autorisez l'accès à l'organisation si vous y êtes invité
|
||||
|
||||
##### Dépannage
|
||||
#### Dépannage
|
||||
|
||||
Problèmes courants et solutions :
|
||||
|
||||
@@ -99,43 +95,6 @@ Problèmes courants et solutions :
|
||||
- Vérifiez la console du navigateur pour tout message d'erreur
|
||||
- Utilisez le bouton "Tester la connexion" dans les paramètres s'il est disponible
|
||||
|
||||
#### Configuration du Jeton GitLab
|
||||
|
||||
OpenHands exporte automatiquement un `GITLAB_TOKEN` vers l'environnement shell, uniquement pour les installations locales, s'il est disponible.
|
||||
|
||||
##### Configuration d'un Jeton GitLab
|
||||
|
||||
1. **Générer un Personal Access Token (PAT)** :
|
||||
- Sur GitLab, allez dans Paramètres utilisateur > Jetons d'accès
|
||||
- Créez un nouveau jeton avec les portées suivantes :
|
||||
- `api` (Accès API)
|
||||
- `read_user` (Lecture des informations utilisateur)
|
||||
- `read_repository` (Lecture du dépôt)
|
||||
- `write_repository` (Écriture du dépôt)
|
||||
- Définissez une date d'expiration ou laissez vide pour un jeton sans expiration
|
||||
|
||||
2. **Entrer le Jeton dans OpenHands** :
|
||||
- Cliquez sur le bouton Paramètres (icône d'engrenage)
|
||||
- Accédez à la section `Git Provider Settings`
|
||||
- Collez votre jeton dans le champ `Jeton GitLab`
|
||||
- Si vous utilisez GitLab auto-hébergé, entrez l'URL de votre instance GitLab
|
||||
- Cliquez sur `Enregistrer les modifications` pour appliquer les changements
|
||||
|
||||
##### Dépannage
|
||||
|
||||
Problèmes courants et solutions :
|
||||
|
||||
1. **Jeton Non Reconnu** :
|
||||
- Assurez-vous que le jeton est correctement enregistré dans les paramètres
|
||||
- Vérifiez que le jeton n'a pas expiré
|
||||
- Vérifiez que le jeton a les portées requises
|
||||
- Pour les instances auto-hébergées, vérifiez l'URL correcte de l'instance
|
||||
|
||||
2. **Accès Refusé** :
|
||||
- Vérifiez les permissions d'accès au projet
|
||||
- Vérifiez si le jeton possède les portées nécessaires
|
||||
- Pour les dépôts de groupe/organisation, assurez-vous d'avoir les accès appropriés
|
||||
|
||||
### Paramètres Avancés
|
||||
|
||||
1. Basculez sur `Options Avancées` pour accéder aux paramètres supplémentaires.
|
||||
|
||||
@@ -46,7 +46,7 @@ LLM_API_KEY="sk_test_12345"
|
||||
```bash
|
||||
docker run -it \
|
||||
--pull=always \
|
||||
-e SANDBOX_RUNTIME_CONTAINER_IMAGE=docker.all-hands.dev/all-hands-ai/runtime:0.37-nikolaik \
|
||||
-e SANDBOX_RUNTIME_CONTAINER_IMAGE=docker.all-hands.dev/all-hands-ai/runtime:0.30-nikolaik \
|
||||
-e SANDBOX_USER_ID=$(id -u) \
|
||||
-e WORKSPACE_MOUNT_PATH=$WORKSPACE_BASE \
|
||||
-e LLM_API_KEY=$LLM_API_KEY \
|
||||
@@ -56,6 +56,6 @@ docker run -it \
|
||||
-v /var/run/docker.sock:/var/run/docker.sock \
|
||||
--add-host host.docker.internal:host-gateway \
|
||||
--name openhands-app-$(date +%Y%m%d%H%M%S) \
|
||||
docker.all-hands.dev/all-hands-ai/openhands:0.37 \
|
||||
docker.all-hands.dev/all-hands-ai/openhands:0.30 \
|
||||
python -m openhands.core.main -t "write a bash script that prints hi" --no-auto-continue
|
||||
```
|
||||
|
||||
@@ -13,16 +13,16 @@
|
||||
La façon la plus simple d'exécuter OpenHands est avec Docker.
|
||||
|
||||
```bash
|
||||
docker pull docker.all-hands.dev/all-hands-ai/runtime:0.37-nikolaik
|
||||
docker pull docker.all-hands.dev/all-hands-ai/runtime:0.30-nikolaik
|
||||
|
||||
docker run -it --rm --pull=always \
|
||||
-e SANDBOX_RUNTIME_CONTAINER_IMAGE=docker.all-hands.dev/all-hands-ai/runtime:0.37-nikolaik \
|
||||
-e SANDBOX_RUNTIME_CONTAINER_IMAGE=docker.all-hands.dev/all-hands-ai/runtime:0.30-nikolaik \
|
||||
-e LOG_ALL_EVENTS=true \
|
||||
-v /var/run/docker.sock:/var/run/docker.sock \
|
||||
-p 3000:3000 \
|
||||
--add-host host.docker.internal:host-gateway \
|
||||
--name openhands-app \
|
||||
docker.all-hands.dev/all-hands-ai/openhands:0.37
|
||||
docker.all-hands.dev/all-hands-ai/openhands:0.30
|
||||
```
|
||||
|
||||
Vous pouvez également exécuter OpenHands en mode [headless scriptable](https://docs.all-hands.dev/modules/usage/how-to/headless-mode), en tant que [CLI interactive](https://docs.all-hands.dev/modules/usage/how-to/cli-mode), ou en utilisant l'[Action GitHub OpenHands](https://docs.all-hands.dev/modules/usage/how-to/github-action).
|
||||
|
||||
@@ -42,7 +42,7 @@ Explorez le code source d'OpenHands sur [GitHub](https://github.com/All-Hands-AI
|
||||
/>
|
||||
</a>
|
||||
<br></br>
|
||||
<a href="https://join.slack.com/t/openhands-ai/shared_invite/zt-34zm4j0gj-Qz5kRHoca8DFCbqXPS~f_A">
|
||||
<a href="https://join.slack.com/t/openhands-ai/shared_invite/zt-2ngejmfw6-9gW4APWOC9XUp1n~SiQ6iw">
|
||||
<img
|
||||
src="https://img.shields.io/badge/Slack-Join%20Us-red?logo=slack&logoColor=white&style=for-the-badge"
|
||||
alt="Join our Slack community"
|
||||
|
||||
@@ -13,7 +13,7 @@ C'est le Runtime par défaut qui est utilisé lorsque vous démarrez OpenHands.
|
||||
|
||||
```
|
||||
docker run # ...
|
||||
-e SANDBOX_RUNTIME_CONTAINER_IMAGE=docker.all-hands.dev/all-hands-ai/runtime:0.37-nikolaik \
|
||||
-e SANDBOX_RUNTIME_CONTAINER_IMAGE=docker.all-hands.dev/all-hands-ai/runtime:0.30-nikolaik \
|
||||
-v /var/run/docker.sock:/var/run/docker.sock \
|
||||
# ...
|
||||
```
|
||||
|
||||
@@ -348,12 +348,12 @@ dockerコマンドで使用する場合は、`-e LLM_<option>`として渡しま
|
||||
- デフォルト値: `true`
|
||||
- 説明: 関数呼び出しが有効かどうか
|
||||
|
||||
- `enable_browsing`
|
||||
- `codeact_enable_browsing`
|
||||
- 型: `bool`
|
||||
- デフォルト値: `false`
|
||||
- 説明: アクションスペースでブラウジングデリゲートが有効かどうか(関数呼び出しでのみ機能)
|
||||
|
||||
- `enable_llm_editor`
|
||||
- `codeact_enable_llm_editor`
|
||||
- 型: `bool`
|
||||
- デフォルト値: `false`
|
||||
- 説明: アクションスペースでLLMエディタが有効かどうか(関数呼び出しでのみ機能)
|
||||
|
||||
@@ -60,7 +60,25 @@ base_container_image="custom_image"
|
||||
|
||||
## 技術的な説明
|
||||
|
||||
詳細な説明については、[実行時ドキュメントのカスタムDockerイメージの章](https://docs.all-hands.dev/ja/modules/usage/architecture/runtime)を参照してください。
|
||||
カスタムイメージが初めて使用される場合、イメージが見つからないため、ビルドされます (その後の実行では、ビルドされたイメージが見つかり、返されます)。
|
||||
|
||||
カスタムイメージは [_build_sandbox_image()](https://github.com/All-Hands-AI/OpenHands/blob/main/openhands/runtime/docker/image_agnostic_util.py#L29) でビルドされます。これは、カスタムイメージをベースとして使用して docker ファイルを作成し、次のように OpenHands の環境を設定します:
|
||||
|
||||
```python
|
||||
dockerfile_content = (
|
||||
f'FROM {base_image}\n'
|
||||
'RUN apt update && apt install -y openssh-server wget sudo\n'
|
||||
'RUN mkdir -p -m0755 /var/run/sshd\n'
|
||||
'RUN mkdir -p /openhands && mkdir -p /openhands/logs && chmod 777 /openhands/logs\n'
|
||||
'RUN wget "https://github.com/conda-forge/miniforge/releases/latest/download/Miniforge3-$(uname)-$(uname -m).sh"\n'
|
||||
'RUN bash Miniforge3-$(uname)-$(uname -m).sh -b -p /openhands/miniforge3\n'
|
||||
'RUN bash -c ". /openhands/miniforge3/etc/profile.d/conda.sh && conda config --set changeps1 False && conda config --append channels conda-forge"\n'
|
||||
'RUN echo "export PATH=/openhands/miniforge3/bin:$PATH" >> ~/.bashrc\n'
|
||||
'RUN echo "export PATH=/openhands/miniforge3/bin:$PATH" >> /openhands/bash.bashrc\n'
|
||||
).strip()
|
||||
```
|
||||
|
||||
> 注: イメージ名は [_get_new_image_name()](https://github.com/All-Hands-AI/OpenHands/blob/main/openhands/runtime/docker/image_agnostic_util.py#L63) で変更され、この変更された名前が後続の実行時に検索されます。
|
||||
|
||||
## トラブルシューティング / エラー
|
||||
|
||||
|
||||
@@ -34,7 +34,7 @@ Docker で OpenHands を CLI モードで実行するには:
|
||||
```bash
|
||||
docker run -it \
|
||||
--pull=always \
|
||||
-e SANDBOX_RUNTIME_CONTAINER_IMAGE=docker.all-hands.dev/all-hands-ai/runtime:0.37-nikolaik \
|
||||
-e SANDBOX_RUNTIME_CONTAINER_IMAGE=docker.all-hands.dev/all-hands-ai/runtime:0.30-nikolaik \
|
||||
-e SANDBOX_USER_ID=$(id -u) \
|
||||
-e WORKSPACE_MOUNT_PATH=$WORKSPACE_BASE \
|
||||
-e LLM_API_KEY=$LLM_API_KEY \
|
||||
@@ -44,7 +44,7 @@ docker run -it \
|
||||
-v ~/.openhands-state:/.openhands-state \
|
||||
--add-host host.docker.internal:host-gateway \
|
||||
--name openhands-app-$(date +%Y%m%d%H%M%S) \
|
||||
docker.all-hands.dev/all-hands-ai/openhands:0.37 \
|
||||
docker.all-hands.dev/all-hands-ai/openhands:0.30 \
|
||||
python -m openhands.core.cli
|
||||
```
|
||||
|
||||
|
||||
@@ -16,11 +16,7 @@ OpenHandsは、AI アシスタントとやり取りするためのグラフィ
|
||||
3. 選択したプロバイダーに対応する`API Key`を入力します。
|
||||
4. `Save Changes`をクリックして設定を適用します。
|
||||
|
||||
### バージョン管理トークン
|
||||
|
||||
OpenHandsは複数のバージョン管理プロバイダーをサポートしています。複数のプロバイダーのトークンを同時に設定できます。
|
||||
|
||||
#### GitHubトークンの設定
|
||||
### GitHubトークンの設定
|
||||
|
||||
OpenHandsは、利用可能な場合、自動的に`GITHUB_TOKEN`をシェル環境にエクスポートします。これは2つの方法で行われます。
|
||||
|
||||
@@ -38,7 +34,7 @@ OpenHandsは、利用可能な場合、自動的に`GITHUB_TOKEN`をシェル環
|
||||
- Minimal Permissions(検索用に**Meta Data = Read-only**を選択し、ブランチ作成用に**Pull Requests = Read and Write**、**Content = Read and Write**を選択します)
|
||||
2. **OpenHandsにトークンを入力**:
|
||||
- 設定ボタン(歯車アイコン)をクリックします。
|
||||
- `Git Provider Settings`セクションに移動します。
|
||||
- `GitHub Settings`セクションに移動します。
|
||||
- `GitHub Token`フィールドにトークンを貼り付けます。
|
||||
- `Save Changes`をクリックして変更を適用します。
|
||||
</details>
|
||||
@@ -98,46 +94,6 @@ OpenHandsは、利用可能な場合、自動的に`GITHUB_TOKEN`をシェル環
|
||||
- 組織を使用している場合は、プロンプトが表示されたら組織へのアクセスを承認します。
|
||||
</details>
|
||||
|
||||
#### GitLabトークンの設定
|
||||
|
||||
OpenHandsは、利用可能な場合、ローカルインストールのみ、自動的に`GITLAB_TOKEN`をシェル環境にエクスポートします。
|
||||
|
||||
<details>
|
||||
<summary>GitLabトークンの設定</summary>
|
||||
|
||||
1. **Personal Access Token(PAT)の生成**:
|
||||
- GitLabで、User Settings > Access Tokensに移動します。
|
||||
- 以下のスコープを持つ新しいトークンを作成します:
|
||||
- `api`(APIアクセス)
|
||||
- `read_user`(ユーザー情報の読み取り)
|
||||
- `read_repository`(リポジトリ読み取り)
|
||||
- `write_repository`(リポジトリ書き込み)
|
||||
- 有効期限を設定するか、無期限トークンの場合は空白のままにします。
|
||||
2. **OpenHandsにトークンを入力**:
|
||||
- 設定ボタン(歯車アイコン)をクリックします。
|
||||
- `Git Provider Settings`セクションに移動します。
|
||||
- `GitLab Token`フィールドにトークンを貼り付けます。
|
||||
- セルフホスト型GitLabを使用している場合は、GitLabインスタンスのURLを入力します。
|
||||
- `Save Changes`をクリックして変更を適用します。
|
||||
</details>
|
||||
|
||||
<details>
|
||||
<summary>トラブルシューティング</summary>
|
||||
|
||||
一般的な問題と解決策:
|
||||
|
||||
- **トークンが認識されない**:
|
||||
- トークンが設定に正しく保存されていることを確認します。
|
||||
- トークンの有効期限が切れていないことを確認します。
|
||||
- トークンに必要なスコープがあることを確認します。
|
||||
- セルフホスト型インスタンスの場合は、正しいインスタンスURLを確認します。
|
||||
|
||||
- **アクセスが拒否された**:
|
||||
- プロジェクトのアクセス権限を確認します。
|
||||
- トークンに必要なスコープがあるかどうかを確認します。
|
||||
- グループ/組織のリポジトリの場合は、適切なアクセス権があることを確認します。
|
||||
</details>
|
||||
|
||||
### 高度な設定
|
||||
|
||||
1. 設定ページ内で、`Advanced`オプションを切り替えて追加の設定にアクセスします。
|
||||
|
||||
@@ -31,7 +31,7 @@ DockerでOpenHandsをヘッドレスモードで実行するには:
|
||||
```bash
|
||||
docker run -it \
|
||||
--pull=always \
|
||||
-e SANDBOX_RUNTIME_CONTAINER_IMAGE=docker.all-hands.dev/all-hands-ai/runtime:0.37-nikolaik \
|
||||
-e SANDBOX_RUNTIME_CONTAINER_IMAGE=docker.all-hands.dev/all-hands-ai/runtime:0.30-nikolaik \
|
||||
-e SANDBOX_USER_ID=$(id -u) \
|
||||
-e WORKSPACE_MOUNT_PATH=$WORKSPACE_BASE \
|
||||
-e LLM_API_KEY=$LLM_API_KEY \
|
||||
@@ -42,7 +42,7 @@ docker run -it \
|
||||
-v ~/.openhands-state:/.openhands-state \
|
||||
--add-host host.docker.internal:host-gateway \
|
||||
--name openhands-app-$(date +%Y%m%d%H%M%S) \
|
||||
docker.all-hands.dev/all-hands-ai/openhands:0.37 \
|
||||
docker.all-hands.dev/all-hands-ai/openhands:0.30 \
|
||||
python -m openhands.core.main -t "write a bash script that prints hi"
|
||||
```
|
||||
|
||||
|
||||
@@ -42,7 +42,7 @@ OpenHandsのソースコードを[GitHub](https://github.com/All-Hands-AI/OpenHa
|
||||
/>
|
||||
</a>
|
||||
<br></br>
|
||||
<a href="https://join.slack.com/t/openhands-ai/shared_invite/zt-34zm4j0gj-Qz5kRHoca8DFCbqXPS~f_A">
|
||||
<a href="https://join.slack.com/t/openhands-ai/shared_invite/zt-2ngejmfw6-9gW4APWOC9XUp1n~SiQ6iw">
|
||||
<img
|
||||
src="https://img.shields.io/badge/Slack-Join%20Us-red?logo=slack&logoColor=white&style=for-the-badge"
|
||||
alt="Slackコミュニティに参加"
|
||||
|
||||
@@ -13,7 +13,7 @@ OpenHandsがリポジトリで動作する際:
|
||||
|
||||
1. リポジトリに`.openhands/microagents/`が存在する場合、そこからリポジトリ固有の指示を読み込みます。
|
||||
2. 会話のキーワードによってトリガーされる一般的なガイドラインを読み込みます。
|
||||
現在の[パブリックMicroagents](https://github.com/All-Hands-AI/OpenHands/tree/main/microagents)を参照してください。
|
||||
現在の[パブリックMicroagents](https://github.com/All-Hands-AI/OpenHands/tree/main/microagents/knowledge)を参照してください。
|
||||
|
||||
## Microagentのフォーマット
|
||||
|
||||
@@ -21,8 +21,8 @@ OpenHandsがリポジトリで動作する際:
|
||||
```
|
||||
---
|
||||
name: <Microagentの名前>
|
||||
type: <Microagentのタイプ>
|
||||
version: <Microagentのバージョン>
|
||||
type: <MicroAgentのタイプ>
|
||||
version: <MicroAgentのバージョン>
|
||||
agent: <エージェントのタイプ (通常はCodeActAgent)>
|
||||
triggers:
|
||||
- <オプション: microagentをトリガーするキーワード。トリガーを削除すると、常に含まれるようになります>
|
||||
|
||||
@@ -88,4 +88,4 @@ triggers:
|
||||
- ビルド時間とイメージサイズを最適化
|
||||
```
|
||||
|
||||
より多くの例については、[現在のパブリックマイクロエージェント](https://github.com/All-Hands-AI/OpenHands/tree/main/microagents)をご覧ください。
|
||||
より多くの例については、[現在のパブリックマイクロエージェント](https://github.com/All-Hands-AI/OpenHands/tree/main/microagents/knowledge)をご覧ください。
|
||||
|
||||
@@ -25,7 +25,7 @@ nikolaik の `SANDBOX_RUNTIME_CONTAINER_IMAGE` は、ランタイムサーバー
|
||||
|
||||
```bash
|
||||
docker run # ...
|
||||
-e SANDBOX_RUNTIME_CONTAINER_IMAGE=docker.all-hands.dev/all-hands-ai/runtime:0.37-nikolaik \
|
||||
-e SANDBOX_RUNTIME_CONTAINER_IMAGE=docker.all-hands.dev/all-hands-ai/runtime:0.30-nikolaik \
|
||||
-e SANDBOX_USER_ID=$(id -u) \
|
||||
-e WORKSPACE_MOUNT_PATH=$WORKSPACE_BASE \
|
||||
-v $WORKSPACE_BASE:/opt/workspace_base \
|
||||
@@ -82,5 +82,5 @@ docker network create openhands-network
|
||||
# 分離されたネットワークで OpenHands を実行
|
||||
docker run # ... \
|
||||
--network openhands-network \
|
||||
docker.all-hands.dev/all-hands-ai/openhands:0.37
|
||||
docker.all-hands.dev/all-hands-ai/openhands:0.30
|
||||
```
|
||||
|
||||
@@ -7,7 +7,7 @@ O GitHub Cloud Resolver automatiza correções de código e fornece assistência
|
||||
## Configuração
|
||||
|
||||
O Resolvedor do GitHub na Nuvem está disponível automaticamente quando você
|
||||
[concede acesso ao repositório do OpenHands Cloud](./openhands-cloud#adding-repository-access).
|
||||
[concede acesso ao repositório do OpenHands Cloud](./openhands-cloud.md#adding-repository-access).
|
||||
|
||||
## Uso
|
||||
|
||||
|
||||
@@ -292,17 +292,17 @@ As opções de configuração do agente são definidas nas seções `[agent]` e
|
||||
- Padrão: `true`
|
||||
- Descrição: Se a chamada de função está habilitada
|
||||
|
||||
- `enable_browsing`
|
||||
- `codeact_enable_browsing`
|
||||
- Tipo: `bool`
|
||||
- Padrão: `false`
|
||||
- Descrição: Se o delegado de navegação está habilitado no espaço de ação (funciona apenas com chamada de função)
|
||||
|
||||
- `enable_llm_editor`
|
||||
- `codeact_enable_llm_editor`
|
||||
- Tipo: `bool`
|
||||
- Padrão: `false`
|
||||
- Descrição: Se o editor LLM está habilitado no espaço de ação (funciona apenas com chamada de função)
|
||||
|
||||
- `enable_jupyter`
|
||||
- `codeact_enable_jupyter`
|
||||
- Tipo: `bool`
|
||||
- Padrão: `false`
|
||||
- Descrição: Se o Jupyter está habilitado no espaço de ação
|
||||
|
||||
@@ -35,7 +35,7 @@ Para executar o OpenHands no modo CLI com Docker:
|
||||
```bash
|
||||
docker run -it \
|
||||
--pull=always \
|
||||
-e SANDBOX_RUNTIME_CONTAINER_IMAGE=docker.all-hands.dev/all-hands-ai/runtime:0.37-nikolaik \
|
||||
-e SANDBOX_RUNTIME_CONTAINER_IMAGE=docker.all-hands.dev/all-hands-ai/runtime:0.30-nikolaik \
|
||||
-e SANDBOX_USER_ID=$(id -u) \
|
||||
-e WORKSPACE_MOUNT_PATH=$WORKSPACE_BASE \
|
||||
-e LLM_API_KEY=$LLM_API_KEY \
|
||||
@@ -45,7 +45,7 @@ docker run -it \
|
||||
-v ~/.openhands-state:/.openhands-state \
|
||||
--add-host host.docker.internal:host-gateway \
|
||||
--name openhands-app-$(date +%Y%m%d%H%M%S) \
|
||||
docker.all-hands.dev/all-hands-ai/openhands:0.37 \
|
||||
docker.all-hands.dev/all-hands-ai/openhands:0.30 \
|
||||
python -m openhands.core.cli
|
||||
```
|
||||
|
||||
|
||||
@@ -17,11 +17,7 @@ O OpenHands fornece um modo de Interface Gráfica do Usuário (GUI) para interag
|
||||
3. Insira a `Chave de API` correspondente para o provedor escolhido.
|
||||
4. Clique em `Salvar Alterações` para aplicar as configurações.
|
||||
|
||||
### Tokens de Controle de Versão
|
||||
|
||||
O OpenHands suporta múltiplos provedores de controle de versão. Você pode configurar tokens para vários provedores simultaneamente.
|
||||
|
||||
#### Configuração do Token do GitHub
|
||||
### Configuração do Token do GitHub
|
||||
|
||||
O OpenHands exporta automaticamente um `GITHUB_TOKEN` para o ambiente shell se ele estiver disponível. Isso pode acontecer de duas maneiras:
|
||||
|
||||
@@ -39,7 +35,7 @@ O OpenHands exporta automaticamente um `GITHUB_TOKEN` para o ambiente shell se e
|
||||
- Minimal Permissions (Selecione **Meta Data = Read-only** para pesquisa, **Pull Requests = Read and Write**, **Content = Read and Write** para criação de branches)
|
||||
2. **Insira o Token no OpenHands**:
|
||||
- Clique no botão Settings (ícone de engrenagem).
|
||||
- Navegue até a seção `Git Provider Settings`.
|
||||
- Navegue até a seção `GitHub Settings`.
|
||||
- Cole seu token no campo `GitHub Token`.
|
||||
- Clique em `Save Changes` para aplicar as alterações.
|
||||
</details>
|
||||
@@ -99,46 +95,6 @@ O OpenHands exporta automaticamente um `GITHUB_TOKEN` para o ambiente shell se e
|
||||
- Se estiver usando uma organização, autorize o acesso à organização se solicitado.
|
||||
</details>
|
||||
|
||||
#### Configuração do Token do GitLab
|
||||
|
||||
O OpenHands exporta automaticamente um `GITLAB_TOKEN` para o ambiente shell, apenas para instalações locais, se ele estiver disponível.
|
||||
|
||||
<details>
|
||||
<summary>Configurando um Token do GitLab</summary>
|
||||
|
||||
1. **Gere um Personal Access Token (PAT)**:
|
||||
- No GitLab, vá para User Settings > Access Tokens.
|
||||
- Crie um novo token com os seguintes escopos:
|
||||
- `api` (Acesso à API)
|
||||
- `read_user` (Leitura de informações do usuário)
|
||||
- `read_repository` (Leitura do repositório)
|
||||
- `write_repository` (Escrita no repositório)
|
||||
- Defina uma data de expiração ou deixe em branco para um token sem expiração.
|
||||
2. **Insira o Token no OpenHands**:
|
||||
- Clique no botão Settings (ícone de engrenagem).
|
||||
- Navegue até a seção `Git Provider Settings`.
|
||||
- Cole seu token no campo `GitLab Token`.
|
||||
- Se estiver usando GitLab auto-hospedado, insira a URL da sua instância GitLab.
|
||||
- Clique em `Save Changes` para aplicar as alterações.
|
||||
</details>
|
||||
|
||||
<details>
|
||||
<summary>Solução de Problemas</summary>
|
||||
|
||||
Problemas comuns e soluções:
|
||||
|
||||
- **Token Não Reconhecido**:
|
||||
- Certifique-se de que o token esteja salvo corretamente nas configurações.
|
||||
- Verifique se o token não expirou.
|
||||
- Verifique se o token possui os escopos necessários.
|
||||
- Para instâncias auto-hospedadas, verifique a URL correta da instância.
|
||||
|
||||
- **Acesso Negado**:
|
||||
- Verifique as permissões de acesso ao projeto.
|
||||
- Verifique se o token possui os escopos necessários.
|
||||
- Para repositórios de grupo/organização, certifique-se de ter o acesso adequado.
|
||||
</details>
|
||||
|
||||
### Configurações Avançadas
|
||||
|
||||
1. Dentro da página Settings, ative as opções `Advanced` para acessar configurações adicionais.
|
||||
|
||||
@@ -32,7 +32,7 @@ Para executar o OpenHands no modo Headless com Docker:
|
||||
```bash
|
||||
docker run -it \
|
||||
--pull=always \
|
||||
-e SANDBOX_RUNTIME_CONTAINER_IMAGE=docker.all-hands.dev/all-hands-ai/runtime:0.37-nikolaik \
|
||||
-e SANDBOX_RUNTIME_CONTAINER_IMAGE=docker.all-hands.dev/all-hands-ai/runtime:0.30-nikolaik \
|
||||
-e SANDBOX_USER_ID=$(id -u) \
|
||||
-e WORKSPACE_MOUNT_PATH=$WORKSPACE_BASE \
|
||||
-e LLM_API_KEY=$LLM_API_KEY \
|
||||
@@ -43,7 +43,7 @@ docker run -it \
|
||||
-v ~/.openhands-state:/.openhands-state \
|
||||
--add-host host.docker.internal:host-gateway \
|
||||
--name openhands-app-$(date +%Y%m%d%H%M%S) \
|
||||
docker.all-hands.dev/all-hands-ai/openhands:0.37 \
|
||||
docker.all-hands.dev/all-hands-ai/openhands:0.30 \
|
||||
python -m openhands.core.main -t "escreva um script bash que imprima oi"
|
||||
```
|
||||
|
||||
|
||||
@@ -58,17 +58,17 @@
|
||||
A maneira mais fácil de executar o OpenHands é no Docker.
|
||||
|
||||
```bash
|
||||
docker pull docker.all-hands.dev/all-hands-ai/runtime:0.37-nikolaik
|
||||
docker pull docker.all-hands.dev/all-hands-ai/runtime:0.30-nikolaik
|
||||
|
||||
docker run -it --rm --pull=always \
|
||||
-e SANDBOX_RUNTIME_CONTAINER_IMAGE=docker.all-hands.dev/all-hands-ai/runtime:0.37-nikolaik \
|
||||
-e SANDBOX_RUNTIME_CONTAINER_IMAGE=docker.all-hands.dev/all-hands-ai/runtime:0.30-nikolaik \
|
||||
-e LOG_ALL_EVENTS=true \
|
||||
-v /var/run/docker.sock:/var/run/docker.sock \
|
||||
-v ~/.openhands-state:/.openhands-state \
|
||||
-p 3000:3000 \
|
||||
--add-host host.docker.internal:host-gateway \
|
||||
--name openhands-app \
|
||||
docker.all-hands.dev/all-hands-ai/openhands:0.37
|
||||
docker.all-hands.dev/all-hands-ai/openhands:0.30
|
||||
```
|
||||
|
||||
Você encontrará o OpenHands em execução em http://localhost:3000!
|
||||
|
||||
@@ -13,7 +13,7 @@ Quando o OpenHands trabalha com um repositório, ele:
|
||||
|
||||
1. Carrega instruções específicas do repositório de `.openhands/microagents/`, se presentes no repositório.
|
||||
2. Carrega diretrizes gerais acionadas por palavras-chave nas conversas.
|
||||
Veja os [Microagentes Públicos](https://github.com/All-Hands-AI/OpenHands/tree/main/microagents) atuais.
|
||||
Veja os [Microagentes Públicos](https://github.com/All-Hands-AI/OpenHands/tree/main/microagents/knowledge) atuais.
|
||||
|
||||
## Formato do Microagente
|
||||
|
||||
@@ -21,8 +21,8 @@ Todos os microagentes usam arquivos markdown com frontmatter YAML que possuem in
|
||||
```
|
||||
---
|
||||
name: <Nome do microagente>
|
||||
type: <Tipo do Microagent>
|
||||
version: <Versão do Microagent>
|
||||
type: <Tipo do MicroAgent>
|
||||
version: <Versão do MicroAgent>
|
||||
agent: <O tipo de agente (normalmente CodeActAgent)>
|
||||
triggers:
|
||||
- <Palavras-chave opcionais que acionam o microagente. Se os gatilhos forem removidos, ele sempre será incluído>
|
||||
|
||||
@@ -4,7 +4,7 @@
|
||||
|
||||
Microagentes públicos são diretrizes especializadas acionadas por palavras-chave para todos os usuários do OpenHands.
|
||||
Eles são definidos em arquivos markdown no diretório
|
||||
[`microagents/`](https://github.com/All-Hands-AI/OpenHands/tree/main/microagents).
|
||||
[`microagents/knowledge/`](https://github.com/All-Hands-AI/OpenHands/tree/main/microagents/knowledge).
|
||||
|
||||
Microagentes públicos:
|
||||
- Monitoram comandos recebidos em busca de suas palavras-chave de acionamento.
|
||||
@@ -15,7 +15,7 @@ Microagentes públicos:
|
||||
## Microagentes Públicos Atuais
|
||||
|
||||
Para mais informações sobre microagentes específicos, consulte seus arquivos de documentação individuais no
|
||||
diretório [`microagents/`](https://github.com/All-Hands-AI/OpenHands/tree/main/microagents/).
|
||||
diretório [`microagents/knowledge/`](https://github.com/All-Hands-AI/OpenHands/tree/main/microagents/knowledge/).
|
||||
|
||||
### Agente GitHub
|
||||
**Arquivo**: `github.md`
|
||||
@@ -59,7 +59,7 @@ yes | npm install package-name
|
||||
## Contribuindo com um Microagente Público
|
||||
|
||||
Você pode criar seus próprios microagentes públicos adicionando novos arquivos markdown ao
|
||||
diretório [`microagents/`](https://github.com/All-Hands-AI/OpenHands/tree/main/microagents/).
|
||||
diretório [`microagents/knowledge/`](https://github.com/All-Hands-AI/OpenHands/tree/main/microagents/knowledge/).
|
||||
|
||||
### Melhores Práticas para Microagentes Públicos
|
||||
|
||||
@@ -81,7 +81,7 @@ Antes de criar um microagente público, considere:
|
||||
|
||||
#### 2. Crie o Arquivo
|
||||
|
||||
Crie um novo arquivo markdown em [`microagents/`](https://github.com/All-Hands-AI/OpenHands/tree/main/microagents/)
|
||||
Crie um novo arquivo markdown em [`microagents/knowledge/`](https://github.com/All-Hands-AI/OpenHands/tree/main/microagents/knowledge/)
|
||||
com um nome descritivo (por exemplo, `docker.md` para um agente focado em Docker).
|
||||
|
||||
Atualize o arquivo com o frontmatter necessário [de acordo com o formato exigido](./microagents-overview#microagent-format)
|
||||
@@ -149,5 +149,5 @@ Lembre-se de:
|
||||
- Otimizar para tempo de build e tamanho da imagem
|
||||
```
|
||||
|
||||
Veja os [microagentes públicos atuais](https://github.com/All-Hands-AI/OpenHands/tree/main/microagents) para
|
||||
Veja os [microagentes públicos atuais](https://github.com/All-Hands-AI/OpenHands/tree/main/microagents/knowledge) para
|
||||
mais exemplos.
|
||||
|
||||
@@ -13,7 +13,7 @@ Este é o Runtime padrão que é usado quando você inicia o OpenHands. Você po
|
||||
|
||||
```
|
||||
docker run # ...
|
||||
-e SANDBOX_RUNTIME_CONTAINER_IMAGE=docker.all-hands.dev/all-hands-ai/runtime:0.37-nikolaik \
|
||||
-e SANDBOX_RUNTIME_CONTAINER_IMAGE=docker.all-hands.dev/all-hands-ai/runtime:0.30-nikolaik \
|
||||
-v /var/run/docker.sock:/var/run/docker.sock \
|
||||
# ...
|
||||
```
|
||||
|
||||
@@ -349,17 +349,17 @@ Agent 配置选项在 `config.toml` 文件的 `[agent]` 和 `[agent.<agent_name>
|
||||
- 默认值: `true`
|
||||
- 描述: 是否启用函数调用
|
||||
|
||||
- `enable_browsing`
|
||||
- `codeact_enable_browsing`
|
||||
- 类型: `bool`
|
||||
- 默认值: `false`
|
||||
- 描述: 是否在 action space 中启用浏览代理(仅适用于函数调用)
|
||||
|
||||
- `enable_llm_editor`
|
||||
- `codeact_enable_llm_editor`
|
||||
- 类型: `bool`
|
||||
- 默认值: `false`
|
||||
- 描述: 是否在 action space 中启用 LLM 编辑器(仅适用于函数调用)
|
||||
|
||||
- `enable_jupyter`
|
||||
- `codeact_enable_jupyter`
|
||||
- 类型: `bool`
|
||||
- 默认值: `false`
|
||||
- 描述: 是否在 action space 中启用 Jupyter
|
||||
|
||||
@@ -1,6 +1,6 @@
|
||||
# 💿 如何创建自定义 Docker 沙箱
|
||||
|
||||
默认的 OpenHands 沙箱包含一个[最小化 ubuntu 配置](https://github.com/All-Hands-AI/OpenHands/blob/main/containers/e2b-sandbox/Dockerfile)。您的应用场景可能需要在默认状态下安装额外的软件。本指南将教您如何通过使用自定义 Docker 映像来实现这一目标。
|
||||
默认的 OpenHands 沙箱包含一个[最小化 ubuntu 配置](https://github.com/All-Hands-AI/OpenHands/blob/main/containers/sandbox/Dockerfile)。您的应用场景可能需要在默认状态下安装额外的软件。本指南将教您如何通过使用自定义 Docker 映像来实现这一目标。
|
||||
|
||||
目前提供两种实现方案:
|
||||
1. 从 Docker Hub 拉取已有镜像。例如,如果您想安装 `nodejs` ,您可以通过使用 `node:20` 镜像来实现。
|
||||
|
||||
@@ -50,7 +50,7 @@ LLM_API_KEY="sk_test_12345"
|
||||
```bash
|
||||
docker run -it \
|
||||
--pull=always \
|
||||
-e SANDBOX_RUNTIME_CONTAINER_IMAGE=docker.all-hands.dev/all-hands-ai/runtime:0.37-nikolaik \
|
||||
-e SANDBOX_RUNTIME_CONTAINER_IMAGE=docker.all-hands.dev/all-hands-ai/runtime:0.30-nikolaik \
|
||||
-e SANDBOX_USER_ID=$(id -u) \
|
||||
-e WORKSPACE_MOUNT_PATH=$WORKSPACE_BASE \
|
||||
-e LLM_API_KEY=$LLM_API_KEY \
|
||||
@@ -59,7 +59,7 @@ docker run -it \
|
||||
-v /var/run/docker.sock:/var/run/docker.sock \
|
||||
--add-host host.docker.internal:host-gateway \
|
||||
--name openhands-app-$(date +%Y%m%d%H%M%S) \
|
||||
docker.all-hands.dev/all-hands-ai/openhands:0.37 \
|
||||
docker.all-hands.dev/all-hands-ai/openhands:0.30 \
|
||||
python -m openhands.core.cli
|
||||
```
|
||||
|
||||
|
||||
@@ -19,18 +19,14 @@ OpenHands 提供了一个用户友好的图形用户界面(GUI)模式,用
|
||||
3. 输入所选提供商对应的 `API Key`。
|
||||
4. 点击"保存"应用设置。
|
||||
|
||||
### 版本控制令牌
|
||||
|
||||
OpenHands 支持多个版本控制提供商。您可以同时配置多个提供商的令牌。
|
||||
|
||||
#### GitHub Token 设置
|
||||
### GitHub Token 设置
|
||||
|
||||
如果可用,OpenHands 会自动将 `GITHUB_TOKEN` 导出到 shell 环境中。这可以通过两种方式实现:
|
||||
|
||||
1. **本地(OSS)**:用户直接输入他们的 GitHub token
|
||||
2. **在线(SaaS)**:通过 GitHub OAuth 身份验证获取 token
|
||||
|
||||
##### 设置本地 GitHub Token
|
||||
#### 设置本地 GitHub Token
|
||||
|
||||
1. **生成个人访问令牌(PAT)**:
|
||||
- 转到 GitHub 设置 > 开发者设置 > 个人访问令牌 > 令牌(经典)
|
||||
@@ -42,11 +38,11 @@ OpenHands 支持多个版本控制提供商。您可以同时配置多个提供
|
||||
|
||||
2. **在 OpenHands 中输入令牌**:
|
||||
- 点击右上角的设置按钮(齿轮图标)
|
||||
- 导航到"Git Provider Settings"部分
|
||||
- 导航到"GitHub"部分
|
||||
- 将令牌粘贴到"GitHub Token"字段中
|
||||
- 点击"保存"应用更改
|
||||
|
||||
##### 组织令牌策略
|
||||
#### 组织令牌策略
|
||||
|
||||
如果您使用组织仓库,可能需要额外的设置:
|
||||
|
||||
@@ -61,7 +57,7 @@ OpenHands 支持多个版本控制提供商。您可以同时配置多个提供
|
||||
- 如果需要,点击组织旁边的"启用 SSO"
|
||||
- 完成 SSO 授权过程
|
||||
|
||||
##### OAuth 身份验证(在线模式)
|
||||
#### OAuth 身份验证(在线模式)
|
||||
|
||||
在在线模式下使用 OpenHands 时,GitHub OAuth 流程:
|
||||
|
||||
@@ -76,7 +72,7 @@ OpenHands 支持多个版本控制提供商。您可以同时配置多个提供
|
||||
- 授权 OpenHands 访问您的 GitHub 帐户
|
||||
- 如果使用组织,在出现提示时授权组织访问
|
||||
|
||||
##### 故障排除
|
||||
#### 故障排除
|
||||
|
||||
常见问题和解决方案:
|
||||
|
||||
@@ -97,43 +93,6 @@ OpenHands 支持多个版本控制提供商。您可以同时配置多个提供
|
||||
- 检查浏览器控制台中是否有任何错误消息
|
||||
- 如果可用,使用设置中的"测试连接"按钮
|
||||
|
||||
#### GitLab Token 设置
|
||||
|
||||
OpenHands 会自动将 `GITLAB_TOKEN` 导出到 shell 环境中,仅适用于本地安装,如果它可用的话。
|
||||
|
||||
##### 设置 GitLab Token
|
||||
|
||||
1. **生成个人访问令牌(PAT)**:
|
||||
- 在 GitLab 中,转到用户设置 > 访问令牌
|
||||
- 创建具有以下范围的新令牌:
|
||||
- `api`(API 访问)
|
||||
- `read_user`(读取用户信息)
|
||||
- `read_repository`(读取仓库)
|
||||
- `write_repository`(写入仓库)
|
||||
- 设置过期日期或留空以获取永不过期的令牌
|
||||
|
||||
2. **在 OpenHands 中输入令牌**:
|
||||
- 点击设置按钮(齿轮图标)
|
||||
- 导航到 `Git Provider Settings` 部分
|
||||
- 将令牌粘贴到 `GitLab Token` 字段中
|
||||
- 如果使用自托管 GitLab,请输入您的 GitLab 实例 URL
|
||||
- 点击 `Save Changes` 应用更改
|
||||
|
||||
##### 故障排除
|
||||
|
||||
常见问题和解决方案:
|
||||
|
||||
1. **令牌无法识别**:
|
||||
- 确保令牌已正确保存在设置中
|
||||
- 检查令牌是否已过期
|
||||
- 验证令牌是否具有所需的范围
|
||||
- 对于自托管实例,验证正确的实例 URL
|
||||
|
||||
2. **访问被拒绝**:
|
||||
- 验证项目访问权限
|
||||
- 检查令牌是否具有必要的范围
|
||||
- 对于组/组织仓库,确保您拥有适当的访问权限
|
||||
|
||||
### 高级设置
|
||||
|
||||
1. 切换`高级选项`以访问其他设置。
|
||||
|
||||
@@ -47,7 +47,7 @@ LLM_API_KEY="sk_test_12345"
|
||||
```bash
|
||||
docker run -it \
|
||||
--pull=always \
|
||||
-e SANDBOX_RUNTIME_CONTAINER_IMAGE=docker.all-hands.dev/all-hands-ai/runtime:0.37-nikolaik \
|
||||
-e SANDBOX_RUNTIME_CONTAINER_IMAGE=docker.all-hands.dev/all-hands-ai/runtime:0.30-nikolaik \
|
||||
-e SANDBOX_USER_ID=$(id -u) \
|
||||
-e WORKSPACE_MOUNT_PATH=$WORKSPACE_BASE \
|
||||
-e LLM_API_KEY=$LLM_API_KEY \
|
||||
@@ -57,6 +57,6 @@ docker run -it \
|
||||
-v /var/run/docker.sock:/var/run/docker.sock \
|
||||
--add-host host.docker.internal:host-gateway \
|
||||
--name openhands-app-$(date +%Y%m%d%H%M%S) \
|
||||
docker.all-hands.dev/all-hands-ai/openhands:0.37 \
|
||||
docker.all-hands.dev/all-hands-ai/openhands:0.30 \
|
||||
python -m openhands.core.main -t "write a bash script that prints hi" --no-auto-continue
|
||||
```
|
||||
|
||||
@@ -11,16 +11,16 @@
|
||||
在 Docker 中运行 OpenHands 是最简单的方式。
|
||||
|
||||
```bash
|
||||
docker pull docker.all-hands.dev/all-hands-ai/runtime:0.37-nikolaik
|
||||
docker pull docker.all-hands.dev/all-hands-ai/runtime:0.30-nikolaik
|
||||
|
||||
docker run -it --rm --pull=always \
|
||||
-e SANDBOX_RUNTIME_CONTAINER_IMAGE=docker.all-hands.dev/all-hands-ai/runtime:0.37-nikolaik \
|
||||
-e SANDBOX_RUNTIME_CONTAINER_IMAGE=docker.all-hands.dev/all-hands-ai/runtime:0.30-nikolaik \
|
||||
-e LOG_ALL_EVENTS=true \
|
||||
-v /var/run/docker.sock:/var/run/docker.sock \
|
||||
-p 3000:3000 \
|
||||
--add-host host.docker.internal:host-gateway \
|
||||
--name openhands-app \
|
||||
docker.all-hands.dev/all-hands-ai/openhands:0.37
|
||||
docker.all-hands.dev/all-hands-ai/openhands:0.30
|
||||
```
|
||||
|
||||
你也可以在可脚本化的[无头模式](https://docs.all-hands.dev/modules/usage/how-to/headless-mode)下运行 OpenHands,作为[交互式 CLI](https://docs.all-hands.dev/modules/usage/how-to/cli-mode),或使用 [OpenHands GitHub Action](https://docs.all-hands.dev/modules/usage/how-to/github-action)。
|
||||
|
||||
@@ -42,7 +42,7 @@ OpenHands 是一个**自主 AI 软件工程师**,能够执行复杂的工程
|
||||
/>
|
||||
</a>
|
||||
<br></br>
|
||||
<a href="https://join.slack.com/t/openhands-ai/shared_invite/zt-34zm4j0gj-Qz5kRHoca8DFCbqXPS~f_A">
|
||||
<a href="https://join.slack.com/t/openhands-ai/shared_invite/zt-2ngejmfw6-9gW4APWOC9XUp1n~SiQ6iw">
|
||||
<img
|
||||
src="https://img.shields.io/badge/Slack-Join%20Us-red?logo=slack&logoColor=white&style=for-the-badge"
|
||||
alt="Join our Slack community"
|
||||
|
||||
@@ -11,7 +11,7 @@
|
||||
|
||||
```
|
||||
docker run # ...
|
||||
-e SANDBOX_RUNTIME_CONTAINER_IMAGE=docker.all-hands.dev/all-hands-ai/runtime:0.37-nikolaik \
|
||||
-e SANDBOX_RUNTIME_CONTAINER_IMAGE=docker.all-hands.dev/all-hands-ai/runtime:0.30-nikolaik \
|
||||
-v /var/run/docker.sock:/var/run/docker.sock \
|
||||
# ...
|
||||
```
|
||||
|
||||
@@ -1,8 +0,0 @@
|
||||
{
|
||||
"label": "OpenHands Cloud",
|
||||
"position": 9,
|
||||
"link": {
|
||||
"type": "generated-index",
|
||||
"description": "Documentation for OpenHands Cloud features and services."
|
||||
}
|
||||
}
|
||||
@@ -1,177 +0,0 @@
|
||||
# OpenHands Cloud API
|
||||
|
||||
OpenHands Cloud provides a REST API that allows you to programmatically interact with the service. This is useful if you easily want to kick off your own jobs from your programs in a flexible way.
|
||||
|
||||
This guide explains how to obtain an API key and use the API to start conversations.
|
||||
For more detailed information about the API, refer to the [OpenHands API Reference](https://docs.all-hands.dev/swagger-ui/).
|
||||
|
||||
## Obtaining an API Key
|
||||
|
||||
To use the OpenHands Cloud API, you'll need to generate an API key:
|
||||
|
||||
1. Log in to your [OpenHands Cloud](https://app.all-hands.dev) account
|
||||
2. Navigate to the [Settings page](https://app.all-hands.dev/settings)
|
||||
3. Locate the "API Keys" section
|
||||
4. Click "Generate New Key"
|
||||
5. Give your key a descriptive name (e.g., "Development", "Production")
|
||||
6. Copy the generated API key and store it securely - it will only be shown once
|
||||
|
||||

|
||||
|
||||
## API Usage
|
||||
|
||||
### Starting a New Conversation
|
||||
|
||||
To start a new conversation with OpenHands performing a task, you'll need to make a POST request to the conversation endpoint.
|
||||
|
||||
#### Request Parameters
|
||||
|
||||
| Parameter | Type | Required | Description |
|
||||
|-----------|------|----------|-------------|
|
||||
| `initial_user_msg` | string | Yes | The initial message to start the conversation |
|
||||
| `repository` | string | No | Git repository name to provide context in the format `owner/repo`. You must have access to the repo. |
|
||||
|
||||
#### Examples
|
||||
|
||||
<details>
|
||||
<summary>cURL</summary>
|
||||
|
||||
```bash
|
||||
curl -X POST "https://app.all-hands.dev/api/conversations" \
|
||||
-H "Authorization: Bearer YOUR_API_KEY" \
|
||||
-H "Content-Type: application/json" \
|
||||
-d '{
|
||||
"initial_user_msg": "Check whether there is any incorrect information in the README.md file and send a PR to fix it if so.",
|
||||
"repository": "yourusername/your-repo"
|
||||
}'
|
||||
```
|
||||
</details>
|
||||
|
||||
<details>
|
||||
<summary>Python (with requests)</summary>
|
||||
|
||||
```python
|
||||
import requests
|
||||
|
||||
api_key = "YOUR_API_KEY"
|
||||
url = "https://app.all-hands.dev/api/conversations"
|
||||
|
||||
headers = {
|
||||
"Authorization": f"Bearer {api_key}",
|
||||
"Content-Type": "application/json"
|
||||
}
|
||||
|
||||
data = {
|
||||
"initial_user_msg": "Check whether there is any incorrect information in the README.md file and send a PR to fix it if so.",
|
||||
"repository": "yourusername/your-repo"
|
||||
}
|
||||
|
||||
response = requests.post(url, headers=headers, json=data)
|
||||
conversation = response.json()
|
||||
|
||||
print(f"Conversation Link: https://app.all-hands.dev/conversations/{conversation['id']}")
|
||||
print(f"Status: {conversation['status']}")
|
||||
```
|
||||
</details>
|
||||
|
||||
<details>
|
||||
<summary>TypeScript/JavaScript (with fetch)</summary>
|
||||
|
||||
```typescript
|
||||
const apiKey = "YOUR_API_KEY";
|
||||
const url = "https://app.all-hands.dev/api/conversations";
|
||||
|
||||
const headers = {
|
||||
"Authorization": `Bearer ${apiKey}`,
|
||||
"Content-Type": "application/json"
|
||||
};
|
||||
|
||||
const data = {
|
||||
initial_user_msg: "Check whether there is any incorrect information in the README.md file and send a PR to fix it if so.",
|
||||
repository: "yourusername/your-repo"
|
||||
};
|
||||
|
||||
async function startConversation() {
|
||||
try {
|
||||
const response = await fetch(url, {
|
||||
method: "POST",
|
||||
headers: headers,
|
||||
body: JSON.stringify(data)
|
||||
});
|
||||
|
||||
const conversation = await response.json();
|
||||
|
||||
console.log(`Conversation Link: https://app.all-hands.dev/conversations/${conversation.id}`);
|
||||
console.log(`Status: ${conversation.status}`);
|
||||
|
||||
return conversation;
|
||||
} catch (error) {
|
||||
console.error("Error starting conversation:", error);
|
||||
}
|
||||
}
|
||||
|
||||
startConversation();
|
||||
```
|
||||
|
||||
</details>
|
||||
|
||||
#### Response
|
||||
|
||||
The API will return a JSON object with details about the created conversation:
|
||||
|
||||
```json
|
||||
{
|
||||
"status": "ok",
|
||||
"conversation_id": "abc1234",
|
||||
}
|
||||
```
|
||||
|
||||
You may also receive an `AuthenticationError` if:
|
||||
|
||||
1. You provided an invalid API key
|
||||
2. You provided the wrong repo name
|
||||
3. You don't have access to the repo
|
||||
|
||||
|
||||
### Retrieving Conversation Status
|
||||
|
||||
You can check the status of a conversation by making a GET request to the conversation endpoint.
|
||||
|
||||
#### Endpoint
|
||||
|
||||
```
|
||||
GET https://app.all-hands.dev/api/conversations/{conversation_id}
|
||||
```
|
||||
|
||||
#### Example
|
||||
|
||||
<details>
|
||||
<summary>cURL</summary>
|
||||
|
||||
```bash
|
||||
curl -X GET "https://app.all-hands.dev/api/conversations/{conversation_id}" \
|
||||
-H "Authorization: Bearer YOUR_API_KEY"
|
||||
```
|
||||
</details>
|
||||
|
||||
#### Response
|
||||
|
||||
The response is formatted as follows:
|
||||
|
||||
```json
|
||||
{
|
||||
"conversation_id":"abc1234",
|
||||
"title":"Update README.md",
|
||||
"created_at":"2025-04-29T15:13:51.370706Z",
|
||||
"last_updated_at":"2025-04-29T15:13:57.199210Z",
|
||||
"status":"RUNNING",
|
||||
"selected_repository":"yourusername/your-repo",
|
||||
"trigger":"gui"
|
||||
}
|
||||
```
|
||||
|
||||
## Rate Limits
|
||||
|
||||
The API has a limit of 10 simultaneous conversations per account. If you need a higher limit for your use case, please contact us at [contact@all-hands.dev](mailto:contact@all-hands.dev).
|
||||
|
||||
If you exceed this limit, the API will return a 429 Too Many Requests response.
|
||||
@@ -5,7 +5,7 @@ The GitHub Resolver automates code fixes and provides intelligent assistance for
|
||||
## Setup
|
||||
|
||||
The Cloud GitHub Resolver is available automatically when you
|
||||
[grant OpenHands Cloud repository access](./openhands-cloud#adding-repository-access).
|
||||
[grant OpenHands Cloud repository access](./openhands-cloud.md#adding-repository-access).
|
||||
|
||||
## Usage
|
||||
|
||||
|
||||
45
docs/modules/usage/cloud/openhands-cloud.md
Normal file
45
docs/modules/usage/cloud/openhands-cloud.md
Normal file
@@ -0,0 +1,45 @@
|
||||
# Openhands Cloud
|
||||
|
||||
OpenHands Cloud is the cloud hosted version of OpenHands by All Hands AI.
|
||||
|
||||
## Accessing OpenHands Cloud
|
||||
|
||||
Currently, users are being admitted to access OpenHands Cloud in waves. To sign up,
|
||||
[join the waitlist](https://www.all-hands.dev/join-waitlist). Once you are approved, you will get an email with
|
||||
instructions on how to access it.
|
||||
|
||||
## Getting Started
|
||||
|
||||
After visiting OpenHands Cloud, you will be asked to connect with your GitHub account:
|
||||
1. After reading and accepting the terms of service, click `Connect to GitHub`.
|
||||
2. Review the permissions requested by OpenHands and then click `Authorize OpenHands AI`.
|
||||
- OpenHands will require some permissions from your GitHub account. To read more about these permissions,
|
||||
you can click the `Learn more` link on the GitHub authorize page.
|
||||
|
||||
## Repository Access
|
||||
|
||||
### Adding Repository Access
|
||||
|
||||
You can grant OpenHands specific repository access:
|
||||
1. Click the `Select a GitHub project` dropdown, select `Add more repositories...`.
|
||||
2. Select the organization, then choose the specific repositories to grant OpenHands access to.
|
||||
- Openhands requests short-lived tokens (8-hour expiry) with these permissions:
|
||||
- Actions: Read and write
|
||||
- Administration: Read-only
|
||||
- Commit statuses: Read and write
|
||||
- Contents: Read and write
|
||||
- Issues: Read and write
|
||||
- Metadata: Read-only
|
||||
- Pull requests: Read and write
|
||||
- Webhooks: Read and write
|
||||
- Workflows: Read and write
|
||||
- Repository access for a user is granted based on:
|
||||
- Granted permission for the repository.
|
||||
- User's GitHub permissions (owner/collaborator).
|
||||
3. Click on `Install & Authorize`.
|
||||
|
||||
### Modifying Repository Access
|
||||
|
||||
You can modify repository access at any time by:
|
||||
* Using the same `Select a GitHub project > Add more repositories` workflow, or
|
||||
* Visiting the Settings page and selecting `Configure GitHub Repositories` under the `GitHub Settings` section.
|
||||
@@ -1,65 +0,0 @@
|
||||
# Openhands Cloud
|
||||
|
||||
OpenHands Cloud is the cloud hosted version of OpenHands by All Hands AI.
|
||||
|
||||
## Accessing OpenHands Cloud
|
||||
|
||||
OpenHands Cloud can be accessed at https://app.all-hands.dev/.
|
||||
|
||||
You can also interact with OpenHands Cloud programmatically using the [API](./cloud-api).
|
||||
|
||||
## Getting Started
|
||||
|
||||
After visiting OpenHands Cloud, you will be asked to connect with your GitHub or GitLab account:
|
||||
|
||||
1. After reading and accepting the terms of service, click `Log in with GitHub` or `Log in with GitLab`.
|
||||
2. Review the permissions requested by OpenHands and then click `Authorize OpenHands AI`.
|
||||
- OpenHands will require some permissions from your GitHub or GitLab account. To read more about these permissions:
|
||||
- GitHub: You can click the `Learn more` link on the GitHub authorize page.
|
||||
- GitLab: You can expand each permission request on the GitLab authorize page.
|
||||
|
||||
## Repository Access
|
||||
|
||||
### GitHub
|
||||
|
||||
#### Adding Repository Access
|
||||
|
||||
You can grant OpenHands specific repository access:
|
||||
1. Click `Add GitHub repos` on the Home page.
|
||||
2. Select the organization, then choose the specific repositories to grant OpenHands access to.
|
||||
<details>
|
||||
<summary>Permission Details for Repository Access</summary>
|
||||
|
||||
Openhands requests short-lived tokens (8-hour expiry) with these permissions:
|
||||
- Actions: Read and write
|
||||
- Administration: Read-only
|
||||
- Commit statuses: Read and write
|
||||
- Contents: Read and write
|
||||
- Issues: Read and write
|
||||
- Metadata: Read-only
|
||||
- Pull requests: Read and write
|
||||
- Webhooks: Read and write
|
||||
- Workflows: Read and write
|
||||
|
||||
Repository access for a user is granted based on:
|
||||
- Granted permission for the repository.
|
||||
- User's GitHub permissions (owner/collaborator).
|
||||
</details>
|
||||
|
||||
3. Click on `Install & Authorize`.
|
||||
|
||||
#### Modifying Repository Access
|
||||
|
||||
You can modify GitHub repository access at any time by:
|
||||
* Using the same `Add GitHub repos` workflow, or
|
||||
* Visiting the Settings page and selecting `Configure GitHub Repositories` under the `Git Settings` section.
|
||||
|
||||
### GitLab
|
||||
|
||||
When using your GitLab account, OpenHands will automatically have access to your repositories.
|
||||
|
||||
## Conversation Persistence
|
||||
|
||||
- Conversations List – Displays only the 10 most recent conversations initiated within the past 10 days.
|
||||
- Workspaces – Conversation workspaces are retained for 14 days.
|
||||
- Runtimes – Runtimes remain active ("warm") for 30 minutes. After this period, resuming a conversation may take 1–2 minutes.
|
||||
@@ -1,8 +1,10 @@
|
||||
# Configuration Options
|
||||
|
||||
This guide details all configuration options available for OpenHands, helping you customize its behavior and integrate it with other services.
|
||||
|
||||
:::note
|
||||
This page outlines all available configuration options for OpenHands, allowing you to customize its behavior and
|
||||
integrate it with other services. In GUI Mode, any settings applied through the Settings UI will take precedence.
|
||||
If you are running in [GUI Mode](https://docs.all-hands.dev/modules/usage/how-to/gui-mode), the settings available in the Settings UI will always
|
||||
take precedence.
|
||||
:::
|
||||
|
||||
## Core Configuration
|
||||
@@ -291,17 +293,17 @@ The agent configuration options are defined in the `[agent]` and `[agent.<agent_
|
||||
- Default: `true`
|
||||
- Description: Whether function calling is enabled
|
||||
|
||||
- `enable_browsing`
|
||||
- `codeact_enable_browsing`
|
||||
- Type: `bool`
|
||||
- Default: `false`
|
||||
- Description: Whether browsing delegate is enabled in the action space (only works with function calling)
|
||||
|
||||
- `enable_llm_editor`
|
||||
- `codeact_enable_llm_editor`
|
||||
- Type: `bool`
|
||||
- Default: `false`
|
||||
- Description: Whether LLM editor is enabled in the action space (only works with function calling)
|
||||
|
||||
- `enable_jupyter`
|
||||
- `codeact_enable_jupyter`
|
||||
- Type: `bool`
|
||||
- Default: `false`
|
||||
- Description: Whether Jupyter is enabled in the action space
|
||||
|
||||
@@ -1,17 +1,18 @@
|
||||
# Repository Customization
|
||||
|
||||
You can customize how OpenHands interacts with your repository by creating a
|
||||
You can customize how OpenHands works with your repository by creating a
|
||||
`.openhands` directory at the root level.
|
||||
|
||||
## Microagents
|
||||
|
||||
Microagents allow you to extend OpenHands prompts with information specific to your project and define how OpenHands
|
||||
should function. See [Microagents Overview](../prompting/microagents-overview) for more information.
|
||||
You can use microagents to extend the OpenHands prompts with information
|
||||
about your project and how you want OpenHands to work. See
|
||||
[Repository Microagents](../prompting/microagents-repo) for more information.
|
||||
|
||||
|
||||
## Setup Script
|
||||
You can add a `.openhands/setup.sh` file, which will run every time OpenHands begins working with your repository.
|
||||
This is an ideal location for installing dependencies, setting environment variables, and performing other setup tasks.
|
||||
You can add `.openhands/setup.sh`, which will be run every time OpenHands begins
|
||||
working with your repository. This is a good place to install dependencies, set
|
||||
environment variables, etc.
|
||||
|
||||
For example:
|
||||
```bash
|
||||
|
||||
@@ -3,97 +3,109 @@
|
||||
So you've [run OpenHands](./installation) and have
|
||||
[set up your LLM](./installation#setup). Now what?
|
||||
|
||||
OpenHands can assist with a range of engineering tasks. However, the technology is still new, and we’re far from having
|
||||
agents that can handle complex tasks independently. It’s important to understand what the agent does well and where it
|
||||
needs support.
|
||||
OpenHands can help you tackle a wide variety of engineering tasks. But the technology
|
||||
is still new, and we're a long way off from having agents that can take on large, complicated
|
||||
engineering tasks without any guidance. So it's important to get a feel for what the agent
|
||||
does well, and where it might need some help.
|
||||
|
||||
## Hello World
|
||||
|
||||
Start with a simple "hello world" example. It might be trickier than it seems!
|
||||
The first thing you might want to try is a simple "hello world" example.
|
||||
This can be more complicated than it sounds!
|
||||
|
||||
Prompt the agent with:
|
||||
> Write a bash script hello.sh that prints "hello world!"
|
||||
Try prompting the agent with:
|
||||
> Please write a bash script hello.sh that prints "hello world!"
|
||||
|
||||
The agent will write the script, set the correct permissions, and run it to check the output.
|
||||
You should see that the agent not only writes the script, it sets the correct
|
||||
permissions and runs the script to check the output.
|
||||
|
||||
You can continue prompting the agent to refine your code. This is a great way to
|
||||
work with agents. Start simple, and iterate.
|
||||
|
||||
> Modify hello.sh so that it accepts a name as the first argument, but defaults to "world"
|
||||
> Please modify hello.sh so that it accepts a name as the first argument, but defaults to "world"
|
||||
|
||||
You can also use any language you need. The agent may need time to set up the environment.
|
||||
You can also work in any language you need, though the agent might need to spend some
|
||||
time setting up its environment!
|
||||
|
||||
> Please convert hello.sh to a Ruby script, and run it
|
||||
|
||||
## Building From Scratch
|
||||
|
||||
Agents excel at "greenfield" tasks, where they don’t need context about existing code and
|
||||
they can start from scratch.
|
||||
Begin with a simple task and iterate from there. Be specific about what you want and the tech stack.
|
||||
Agents do exceptionally well at "greenfield" tasks (tasks where they don't need
|
||||
any context about an existing codebase) and they can just start from scratch.
|
||||
|
||||
It's best to start with a simple task, and then iterate on it. It's also best to be
|
||||
as specific as possible about what you want, what the tech stack should be, etc.
|
||||
|
||||
For example, we might build a TODO app:
|
||||
|
||||
> Build a frontend-only TODO app in React. All state should be stored in localStorage.
|
||||
> Please build a basic TODO list app in React. It should be frontend-only, and all state
|
||||
> should be kept in localStorage.
|
||||
|
||||
Once the basic structure is in place, continue refining:
|
||||
We can keep iterating on the app once the skeleton is there:
|
||||
|
||||
> Allow adding an optional due date to each task.
|
||||
> Please allow adding an optional due date to every task.
|
||||
|
||||
Just like normal development, commit and push your code often.
|
||||
Just like with normal development, it's good to commit and push your code frequently.
|
||||
This way you can always revert back to an old state if the agent goes off track.
|
||||
You can ask the agent to commit and push for you:
|
||||
|
||||
> Commit the changes and push them to a new branch called "feature/due-dates"
|
||||
> Please commit the changes and push them to a new branch called "feature/due-dates"
|
||||
|
||||
|
||||
## Adding New Code
|
||||
|
||||
OpenHands is great at adding new code to an existing codebase.
|
||||
OpenHands can also do a great job adding new code to an existing code base.
|
||||
|
||||
For instance, you can ask OpenHands to add a GitHub action that lints your code. It might check your codebase to
|
||||
determine the language, then create a new file in `./github/workflows/lint.yml`.
|
||||
For example, you can ask OpenHands to add a new GitHub action to your project
|
||||
which lints your code. OpenHands may take a peek at your codebase to see what language
|
||||
it should use and then drop a new file into `./github/workflows/lint.yml`.
|
||||
|
||||
> Add a GitHub action that lints the code in this repository.
|
||||
> Please add a GitHub action that lints the code in this repository.
|
||||
|
||||
Some tasks need more context. While OpenHands can use commands like ls and grep to search, providing context upfront
|
||||
speeds things up and reduces token usage.
|
||||
Some tasks might require a bit more context. While OpenHands can use `ls` and `grep`
|
||||
to search through your codebase, providing context up front allows it to move faster,
|
||||
and more accurately. And it'll cost you fewer tokens!
|
||||
|
||||
> Modify ./backend/api/routes.js to add a new route that returns a list of all tasks.
|
||||
> Please modify ./backend/api/routes.js to add a new route that returns a list of all tasks.
|
||||
|
||||
> Add a new React component to the ./frontend/components directory to display a list of Widgets.
|
||||
> It should use the existing Widget component.
|
||||
> Please add a new React component that displays a list of Widgets to the ./frontend/components
|
||||
> directory. It should use the existing Widget component.
|
||||
|
||||
## Refactoring
|
||||
|
||||
OpenHands does great at refactoring code in small chunks. Rather than rearchitecting the entire codebase,
|
||||
it's more effective to break up long files and functions or rename variables.
|
||||
OpenHands does great at refactoring existing code, especially in small chunks.
|
||||
You probably don't want to try rearchitecting your whole codebase, but breaking up
|
||||
long files and functions, renaming variables, etc. tend to work very well.
|
||||
|
||||
> Rename all the single-letter variables in ./app.go.
|
||||
> Please rename all the single-letter variables in ./app.go.
|
||||
|
||||
> Split the `build_and_deploy_widgets` function into two functions, `build_widgets` and `deploy_widgets` in widget.php.
|
||||
> Please break the function `build_and_deploy_widgets` into two functions, `build_widgets` and `deploy_widgets` in widget.php.
|
||||
|
||||
> Break ./api/routes.js into separate files for each route.
|
||||
> Please break ./api/routes.js into separate files for each route.
|
||||
|
||||
## Bug Fixes
|
||||
|
||||
OpenHands can help track down and fix bugs, but bug fixing can be tricky and often requires more context.
|
||||
It’s helpful if you’ve already diagnosed the issue and just need OpenHands to handle the logic.
|
||||
OpenHands can also help you track down and fix bugs in your code. But as any
|
||||
developer knows, bug fixing can be extremely tricky, and often OpenHands will need more context.
|
||||
It helps if you've diagnosed the bug, but want OpenHands to figure out the logic.
|
||||
|
||||
> The email field in the `/subscribe` endpoint is rejecting .io domains. Fix this.
|
||||
> Currently the email field in the `/subscribe` endpoint is rejecting .io domains. Please fix this.
|
||||
|
||||
> The `search_widgets` function in ./app.py is doing a case-sensitive search. Make it case-insensitive.
|
||||
> The `search_widgets` function in ./app.py is doing a case-sensitive search. Please make it case-insensitive.
|
||||
|
||||
For bug fixing, test-driven development can be really useful. You can ask the agent to write a new test and iterate
|
||||
until the bug is fixed:
|
||||
It often helps to do test-driven development when bug fixing with an agent.
|
||||
You can ask the agent to write a new test, and then iterate until it fixes the bug:
|
||||
|
||||
> The `hello` function crashes on the empty string. Write a test that reproduces this bug, then fix the code so it passes.
|
||||
> The `hello` function crashes on the empty string. Please write a test that reproduces this bug, then fix the code so it passes.
|
||||
|
||||
## More
|
||||
|
||||
OpenHands can assist with nearly any coding task, but it takes some practice to get the best results.
|
||||
Keep these tips in mind:
|
||||
OpenHands is capable of helping out on just about any coding task but it takes some practice
|
||||
to get the most out of it. Remember to:
|
||||
* Keep your tasks small.
|
||||
* Be specific.
|
||||
* Provide plenty of context.
|
||||
* Be as specific as possible.
|
||||
* Provide as much context as possible.
|
||||
* Commit and push frequently.
|
||||
|
||||
See [Prompting Best Practices](./prompting/prompting-best-practices) for more tips on how to get the most out of OpenHands.
|
||||
|
||||
@@ -12,7 +12,7 @@ To start an interactive OpenHands session via the command line:
|
||||
2. Run the following command:
|
||||
|
||||
```bash
|
||||
poetry run python -m openhands.cli.main
|
||||
poetry run python -m openhands.core.cli
|
||||
```
|
||||
|
||||
This command will start an interactive session where you can input tasks and receive responses from OpenHands.
|
||||
@@ -35,7 +35,7 @@ To run OpenHands in CLI mode with Docker:
|
||||
```bash
|
||||
docker run -it \
|
||||
--pull=always \
|
||||
-e SANDBOX_RUNTIME_CONTAINER_IMAGE=docker.all-hands.dev/all-hands-ai/runtime:0.37-nikolaik \
|
||||
-e SANDBOX_RUNTIME_CONTAINER_IMAGE=docker.all-hands.dev/all-hands-ai/runtime:0.30-nikolaik \
|
||||
-e SANDBOX_USER_ID=$(id -u) \
|
||||
-e WORKSPACE_MOUNT_PATH=$WORKSPACE_BASE \
|
||||
-e LLM_API_KEY=$LLM_API_KEY \
|
||||
@@ -45,11 +45,52 @@ docker run -it \
|
||||
-v ~/.openhands-state:/.openhands-state \
|
||||
--add-host host.docker.internal:host-gateway \
|
||||
--name openhands-app-$(date +%Y%m%d%H%M%S) \
|
||||
docker.all-hands.dev/all-hands-ai/openhands:0.37 \
|
||||
python -m openhands.cli.main
|
||||
docker.all-hands.dev/all-hands-ai/openhands:0.30 \
|
||||
python -m openhands.core.cli
|
||||
```
|
||||
|
||||
This command will start an interactive session in Docker where you can input tasks and receive responses from OpenHands.
|
||||
|
||||
The `-e SANDBOX_USER_ID=$(id -u)` is passed to the Docker command to ensure the sandbox user matches the host user’s
|
||||
permissions. This prevents the agent from creating root-owned files in the mounted workspace.
|
||||
## Examples of CLI Commands and Expected Outputs
|
||||
|
||||
Here are some examples of CLI commands and their expected outputs:
|
||||
|
||||
### Example 1: Simple Task
|
||||
|
||||
```bash
|
||||
>> Write a Python script that prints "Hello, World!"
|
||||
```
|
||||
|
||||
Expected Output:
|
||||
|
||||
```bash
|
||||
🤖 Sure! Here is a Python script that prints "Hello, World!":
|
||||
|
||||
❯ print("Hello, World!")
|
||||
```
|
||||
|
||||
### Example 2: Bash Command
|
||||
|
||||
```bash
|
||||
>> Create a directory named "test_dir"
|
||||
```
|
||||
|
||||
Expected Output:
|
||||
|
||||
```bash
|
||||
🤖 Creating a directory named "test_dir":
|
||||
|
||||
❯ mkdir test_dir
|
||||
```
|
||||
|
||||
### Example 3: Error Handling
|
||||
|
||||
```bash
|
||||
>> Delete a non-existent file
|
||||
```
|
||||
|
||||
Expected Output:
|
||||
|
||||
```bash
|
||||
🤖 An error occurred. Please try again.
|
||||
```
|
||||
|
||||
@@ -1,10 +1,5 @@
|
||||
# Custom Sandbox
|
||||
|
||||
:::note
|
||||
This guide is for users that would like to use their own custom Docker image for the runtime. For example
|
||||
with certain tools or programming languages pre-installed.
|
||||
:::
|
||||
|
||||
The sandbox is where the agent performs its tasks. Instead of running commands directly on your computer
|
||||
(which could be risky), the agent runs them inside a Docker container.
|
||||
|
||||
|
||||
@@ -1,6 +1,6 @@
|
||||
# Using the OpenHands GitHub Action
|
||||
|
||||
This guide explains how to use the OpenHands GitHub Action in your own projects.
|
||||
This guide explains how to use the OpenHands GitHub Action, both within the OpenHands repository and in your own projects.
|
||||
|
||||
## Using the Action in the OpenHands Repository
|
||||
|
||||
|
||||
@@ -11,21 +11,17 @@ OpenHands provides a Graphical User Interface (GUI) mode for interacting with th
|
||||
|
||||
### Initial Setup
|
||||
|
||||
1. Upon first launch, you'll see a settings popup.
|
||||
1. Upon first launch, you'll see a settings page.
|
||||
2. Select an `LLM Provider` and `LLM Model` from the dropdown menus. If the required model does not exist in the list,
|
||||
select `see advanced settings`. Then toggle `Advanced` options and enter it with the correct prefix in the
|
||||
`Custom Model` text box.
|
||||
toggle `Advanced` options and enter it with the correct prefix in the `Custom Model` text box.
|
||||
3. Enter the corresponding `API Key` for your chosen provider.
|
||||
4. Click `Save Changes` to apply the settings.
|
||||
|
||||
### Version Control Tokens
|
||||
### GitHub Token Setup
|
||||
|
||||
OpenHands supports multiple version control providers. You can configure tokens for multiple providers simultaneously.
|
||||
|
||||
#### GitHub Token Setup
|
||||
|
||||
OpenHands automatically exports a `GITHUB_TOKEN` to the shell environment if provided:
|
||||
OpenHands automatically exports a `GITHUB_TOKEN` to the shell environment if it is available. This can happen in two ways:
|
||||
|
||||
**Local Installation**: The user directly inputs their GitHub token.
|
||||
<details>
|
||||
<summary>Setting Up a GitHub Token</summary>
|
||||
|
||||
@@ -36,11 +32,12 @@ OpenHands automatically exports a `GITHUB_TOKEN` to the shell environment if pro
|
||||
- `repo` (Full control of private repositories)
|
||||
- **Fine-Grained Tokens**
|
||||
- All Repositories (You can select specific repositories, but this will impact what returns in repo search)
|
||||
- Minimal Permissions ( Select `Meta Data = Read-only` read for search, `Pull Requests = Read and Write` and `Content = Read and Write` for branch creation)
|
||||
- Minimal Permissions ( Select **Meta Data = Read-only** read for search, **Pull Requests = Read and Write**, **Content = Read and Write** for branch creation)
|
||||
2. **Enter Token in OpenHands**:
|
||||
- Click the Settings button (gear icon).
|
||||
- Navigate to the `GitHub Settings` section.
|
||||
- Paste your token in the `GitHub Token` field.
|
||||
- Click `Save` to apply the changes.
|
||||
- Click `Save Changes` to apply the changes.
|
||||
</details>
|
||||
|
||||
<details>
|
||||
@@ -81,43 +78,21 @@ OpenHands automatically exports a `GITHUB_TOKEN` to the shell environment if pro
|
||||
- Check the browser console for any error messages.
|
||||
</details>
|
||||
|
||||
#### GitLab Token Setup
|
||||
|
||||
OpenHands automatically exports a `GITLAB_TOKEN` to the shell environment if provided:
|
||||
**OpenHands Cloud**: The token is obtained through GitHub OAuth authentication.
|
||||
|
||||
<details>
|
||||
<summary>Setting Up a GitLab Token</summary>
|
||||
<summary>OAuth Authentication</summary>
|
||||
|
||||
1. **Generate a Personal Access Token (PAT)**:
|
||||
- On GitLab, go to User Settings > Access Tokens.
|
||||
- Create a new token with the following scopes:
|
||||
- `api` (API access)
|
||||
- `read_user` (Read user information)
|
||||
- `read_repository` (Read repository)
|
||||
- `write_repository` (Write repository)
|
||||
- Set an expiration date or leave it blank for a non-expiring token.
|
||||
2. **Enter Token in OpenHands**:
|
||||
- Click the Settings button (gear icon).
|
||||
- Paste your token in the `GitLab Token` field.
|
||||
- Enter your GitLab instance URL if using self-hosted GitLab.
|
||||
- Click `Save` to apply the changes.
|
||||
</details>
|
||||
When using OpenHands Cloud, the GitHub OAuth flow requests the following permissions:
|
||||
- Repository access (read/write)
|
||||
- Workflow management
|
||||
- Organization read access
|
||||
|
||||
<details>
|
||||
<summary>Troubleshooting</summary>
|
||||
|
||||
Common issues and solutions:
|
||||
|
||||
- **Token Not Recognized**:
|
||||
- Ensure the token is properly saved in settings.
|
||||
- Check that the token hasn't expired.
|
||||
- Verify the token has the required scopes.
|
||||
- For self-hosted instances, verify the correct instance URL.
|
||||
|
||||
- **Access Denied**:
|
||||
- Verify project access permissions.
|
||||
- Check if the token has the necessary scopes.
|
||||
- For group/organization repositories, ensure you have proper access.
|
||||
To authenticate OpenHands:
|
||||
- Click `Sign in with GitHub` when prompted.
|
||||
- Review the requested permissions.
|
||||
- Authorize OpenHands to access your GitHub account.
|
||||
- If using an organization, authorize organization access if prompted.
|
||||
</details>
|
||||
|
||||
### Advanced Settings
|
||||
@@ -136,6 +111,7 @@ OpenHands automatically exports a `GITLAB_TOKEN` to the shell environment if pro
|
||||
## Tips for Effective Use
|
||||
|
||||
- Be specific in your requests to get the most accurate and helpful responses, as described in the [prompting best practices](../prompting/prompting-best-practices).
|
||||
- Use the workspace panel to explore your project structure.
|
||||
- Use one of the recommended models, as described in the [LLMs section](usage/llms/llms.md).
|
||||
|
||||
Remember, the GUI mode of OpenHands is designed to make your interaction with the AI assistant as smooth and intuitive
|
||||
|
||||
@@ -32,7 +32,7 @@ To run OpenHands in Headless mode with Docker:
|
||||
```bash
|
||||
docker run -it \
|
||||
--pull=always \
|
||||
-e SANDBOX_RUNTIME_CONTAINER_IMAGE=docker.all-hands.dev/all-hands-ai/runtime:0.37-nikolaik \
|
||||
-e SANDBOX_RUNTIME_CONTAINER_IMAGE=docker.all-hands.dev/all-hands-ai/runtime:0.30-nikolaik \
|
||||
-e SANDBOX_USER_ID=$(id -u) \
|
||||
-e WORKSPACE_MOUNT_PATH=$WORKSPACE_BASE \
|
||||
-e LLM_API_KEY=$LLM_API_KEY \
|
||||
@@ -43,13 +43,10 @@ docker run -it \
|
||||
-v ~/.openhands-state:/.openhands-state \
|
||||
--add-host host.docker.internal:host-gateway \
|
||||
--name openhands-app-$(date +%Y%m%d%H%M%S) \
|
||||
docker.all-hands.dev/all-hands-ai/openhands:0.37 \
|
||||
docker.all-hands.dev/all-hands-ai/openhands:0.30 \
|
||||
python -m openhands.core.main -t "write a bash script that prints hi"
|
||||
```
|
||||
|
||||
The `-e SANDBOX_USER_ID=$(id -u)` is passed to the Docker command to ensure the sandbox user matches the host user’s
|
||||
permissions. This prevents the agent from creating root-owned files in the mounted workspace.
|
||||
|
||||
## Advanced Headless Configurations
|
||||
|
||||
To view all available configuration options for headless mode, run the Python command with the `--help` flag.
|
||||
|
||||
@@ -58,31 +58,30 @@ A system with a modern processor and a minimum of **4GB RAM** is recommended to
|
||||
The easiest way to run OpenHands is in Docker.
|
||||
|
||||
```bash
|
||||
docker pull docker.all-hands.dev/all-hands-ai/runtime:0.37-nikolaik
|
||||
docker pull docker.all-hands.dev/all-hands-ai/runtime:0.30-nikolaik
|
||||
|
||||
docker run -it --rm --pull=always \
|
||||
-e SANDBOX_RUNTIME_CONTAINER_IMAGE=docker.all-hands.dev/all-hands-ai/runtime:0.37-nikolaik \
|
||||
-e SANDBOX_RUNTIME_CONTAINER_IMAGE=docker.all-hands.dev/all-hands-ai/runtime:0.30-nikolaik \
|
||||
-e LOG_ALL_EVENTS=true \
|
||||
-v /var/run/docker.sock:/var/run/docker.sock \
|
||||
-v ~/.openhands-state:/.openhands-state \
|
||||
-p 3000:3000 \
|
||||
--add-host host.docker.internal:host-gateway \
|
||||
--name openhands-app \
|
||||
docker.all-hands.dev/all-hands-ai/openhands:0.37
|
||||
docker.all-hands.dev/all-hands-ai/openhands:0.30
|
||||
```
|
||||
|
||||
You'll find OpenHands running at http://localhost:3000!
|
||||
|
||||
You can also [connect OpenHands to your local filesystem](https://docs.all-hands.dev/modules/usage/runtimes/docker#connecting-to-your-filesystem),
|
||||
You can also [connect OpenHands to your local filesystem](https://docs.all-hands.dev/modules/usage/runtimes#connecting-to-your-filesystem),
|
||||
run OpenHands in a scriptable [headless mode](https://docs.all-hands.dev/modules/usage/how-to/headless-mode),
|
||||
interact with it via a [friendly CLI](https://docs.all-hands.dev/modules/usage/how-to/cli-mode),
|
||||
or run it on tagged issues with [a GitHub action](https://docs.all-hands.dev/modules/usage/how-to/github-action).
|
||||
|
||||
## Setup
|
||||
|
||||
After launching OpenHands, you **must** select an `LLM Provider` and `LLM Model` and enter a corresponding `API Key`.
|
||||
This can be done during the initial settings popup or by selecting the `Settings`
|
||||
button (gear icon) in the UI.
|
||||
Upon launching OpenHands, you'll see a Settings page. You **must** select an `LLM Provider` and `LLM Model` and enter a corresponding `API Key`.
|
||||
These can be changed at any time by selecting the `Settings` button (gear icon) in the UI.
|
||||
|
||||
If the required model does not exist in the list, you can toggle `Advanced` options and manually enter it with the correct prefix
|
||||
in the `Custom Model` text box.
|
||||
@@ -94,17 +93,17 @@ OpenHands requires an API key to access most language models. Here's how to get
|
||||
|
||||
#### Anthropic (Claude)
|
||||
|
||||
1. [Create an Anthropic account](https://console.anthropic.com/).
|
||||
2. [Generate an API key](https://console.anthropic.com/settings/keys).
|
||||
3. [Set up billing](https://console.anthropic.com/settings/billing).
|
||||
1. [Create an Anthropic account](https://console.anthropic.com/)
|
||||
2. [Generate an API key](https://console.anthropic.com/settings/keys)
|
||||
3. [Set up billing](https://console.anthropic.com/settings/billing)
|
||||
|
||||
Consider setting usage limits to control costs.
|
||||
|
||||
#### OpenAI
|
||||
|
||||
1. [Create an OpenAI account](https://platform.openai.com/).
|
||||
2. [Generate an API key](https://platform.openai.com/api-keys).
|
||||
3. [Set up billing](https://platform.openai.com/account/billing/overview).
|
||||
1. [Create an OpenAI account](https://platform.openai.com/)
|
||||
2. [Generate an API key](https://platform.openai.com/api-keys)
|
||||
3. [Set up billing](https://platform.openai.com/account/billing/overview)
|
||||
|
||||
Now you're ready to [get started with OpenHands](./getting-started).
|
||||
|
||||
@@ -116,6 +115,8 @@ We use SemVer so `0.9` will automatically point to the latest `0.9.x` release, a
|
||||
- For the most up-to-date development version, replace $VERSION in `openhands:$VERSION` and `runtime:$VERSION`, with `main`.
|
||||
This version is unstable and is recommended for testing or development purposes only.
|
||||
|
||||
You can choose the tag that best suits your needs based on stability requirements and desired features.
|
||||
|
||||
For the development workflow, see [Development.md](https://github.com/All-Hands-AI/OpenHands/blob/main/Development.md).
|
||||
|
||||
Are you having trouble? Check out our [Troubleshooting Guide](https://docs.all-hands.dev/modules/usage/troubleshooting).
|
||||
|
||||
@@ -1,29 +1,60 @@
|
||||
|
||||
# OpenHands Feature Overview
|
||||
|
||||

|
||||
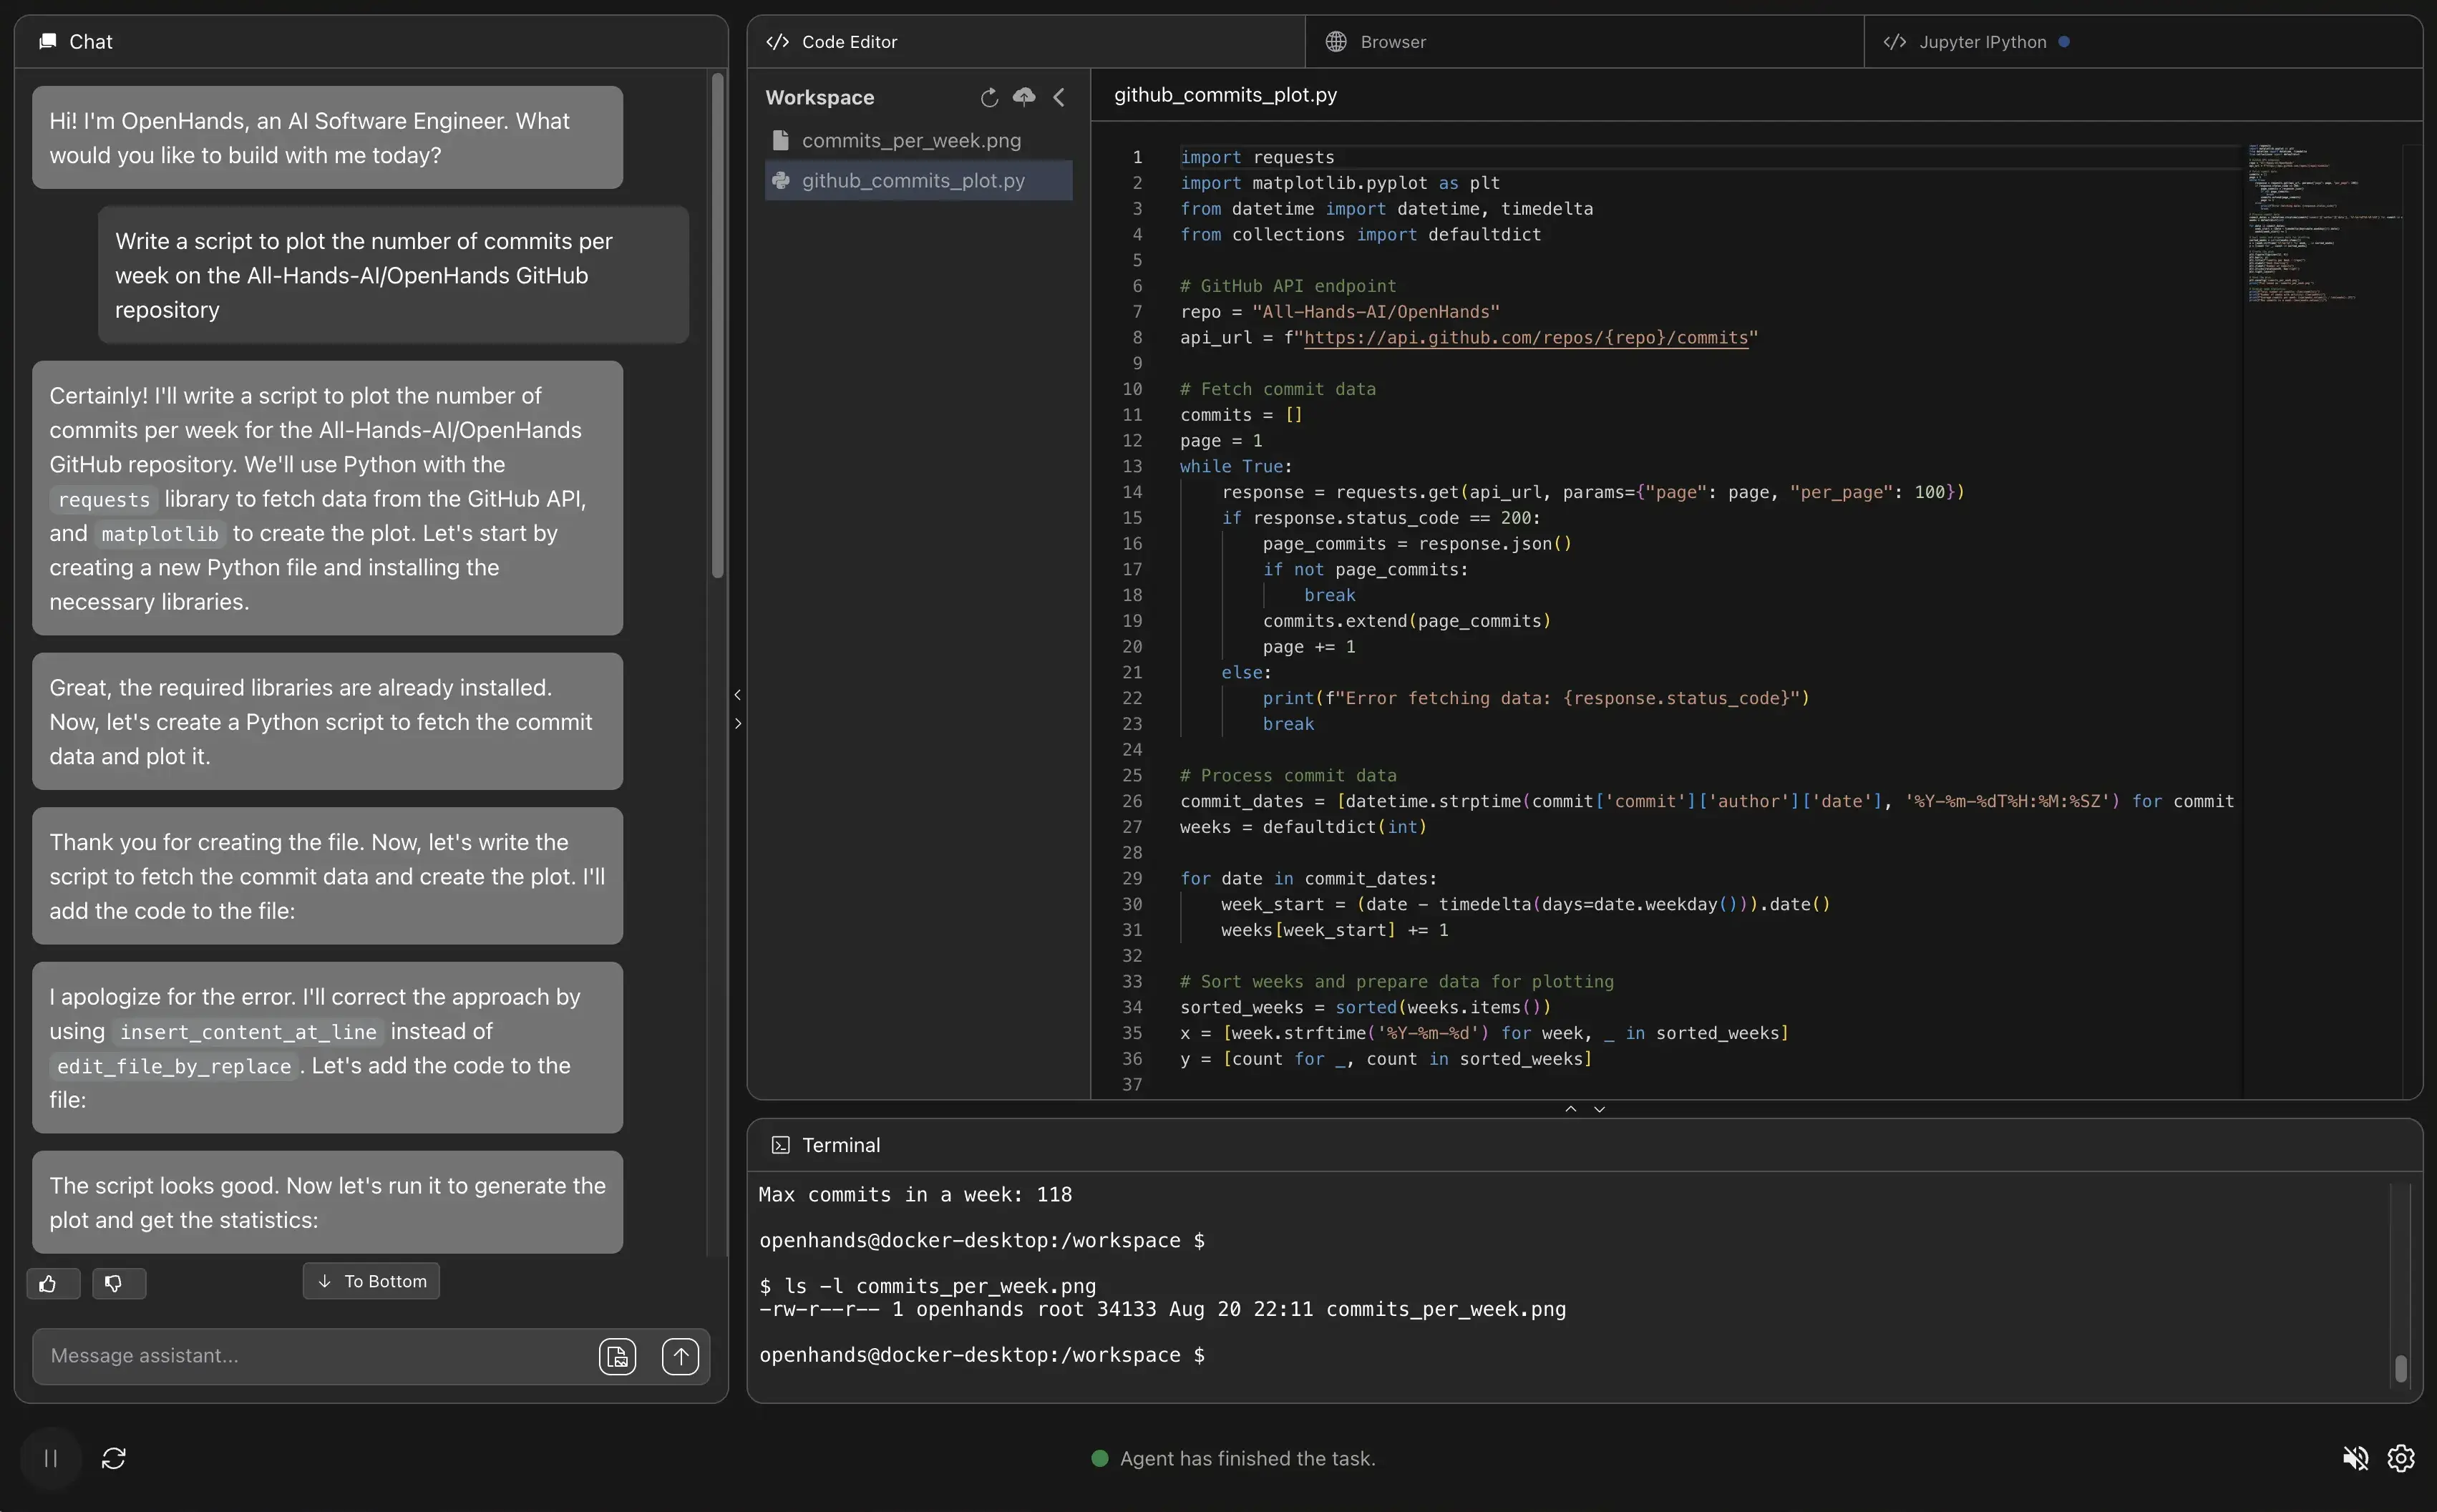
|
||||
|
||||
### Chat Panel
|
||||
- Displays the conversation between the user and OpenHands.
|
||||
- OpenHands explains its actions in this panel.
|
||||
## 1. Workspace
|
||||
The Workspace feature provides a comprehensive development environment with the following key capabilities:
|
||||
- File Explorer: Browse, view, and manage project files and directories
|
||||
- Project Management: Import, create, and navigate between different projects
|
||||
- Integrated Development Tools: Seamless integration with various development workflows
|
||||
- File Operations:
|
||||
* View file contents
|
||||
* Create new files and folders
|
||||
* Upload and download files
|
||||
* Basic file manipulation
|
||||
|
||||
### Changes
|
||||
- Shows the file changes performed by OpenHands.
|
||||
## 2. Jupyter Notebook
|
||||
The Jupyter Notebook feature offers an interactive coding and data analysis environment:
|
||||
- Interactive Code Cells: Execute Python code in a cell-based interface
|
||||
- Input and Output Tracking: Maintain a history of code inputs and their corresponding outputs
|
||||
- Persistent Session: Preserve code execution context between cells
|
||||
- Supports various Python operations and data analysis tasks
|
||||
- Real-time code execution and result visualization
|
||||
|
||||
### VS Code
|
||||
- Embedded VS Code for browsing and modifying files.
|
||||
- Can also be used to upload and download files.
|
||||
## 3. Browser (Beta)
|
||||
The Browser feature provides web interaction capabilities:
|
||||
- Web Page Navigation: Open and browse websites within the application
|
||||
- Screenshot Capture: Automatically generate screenshots of web pages
|
||||
- Interaction Tools:
|
||||
* Click elements
|
||||
* Fill out forms
|
||||
* Scroll pages
|
||||
* Navigate through web content
|
||||
- Supports 15 different browser interaction functions
|
||||
|
||||
### Terminal
|
||||
- A space for OpenHands and users to run terminal commands.
|
||||
## 4. Terminal
|
||||
The Terminal feature offers a command-line interface within the application:
|
||||
- Execute Shell Commands: Run bash and system commands
|
||||
- Command History: Track and recall previous commands
|
||||
- Environment Interaction: Interact directly with the system's command line
|
||||
- Support for various programming and system administration tasks
|
||||
|
||||
### Jupyter
|
||||
- Shows all Python commands that were executed by OpenHands.
|
||||
- Particularly handy when using OpenHands to perform data visualization tasks.
|
||||
## 5. Chat / AI Conversation
|
||||
The Chat interface provides an AI-powered conversational experience:
|
||||
- Interactive AI Assistant: Engage in natural language conversations
|
||||
- Context-Aware Responses: AI understands and responds to development-related queries
|
||||
- Action Suggestions: Provides actionable recommendations for tasks
|
||||
- Conversation Management: Create, delete, and manage different conversation threads
|
||||
|
||||
### App
|
||||
- Displays the web server when OpenHands runs an application.
|
||||
- Users can interact with the running application.
|
||||
## 6. App (Beta)
|
||||
The main application interface combines all these features:
|
||||
- Integrated Workspace: Seamless integration of workspace, browser, terminal, and AI chat
|
||||
- Configurable Layout: Customize the arrangement of different feature panels
|
||||
- State Management: Maintain context and state across different features
|
||||
- Security and Privacy Controls: Manage application settings and permissions
|
||||
|
||||
### Browser
|
||||
- Used by OpenHands to browse websites.
|
||||
- The browser is non-interactive.
|
||||
### Additional Notes
|
||||
- The application is currently in beta, with ongoing improvements and feature additions
|
||||
- Supports various development workflows and AI-assisted coding
|
||||
- Designed to enhance developer productivity through integrated tools and AI assistance
|
||||
|
||||
@@ -25,7 +25,7 @@ You will need your ChatGPT deployment name which can be found on the deployments
|
||||
<deployment-name> below.
|
||||
:::
|
||||
|
||||
1. Enable `Advanced` options.
|
||||
1. Enable `Advanced` options
|
||||
2. Set the following:
|
||||
- `Custom Model` to azure/<deployment-name>
|
||||
- `Base URL` to your Azure API Base URL (e.g. `https://example-endpoint.openai.azure.com`)
|
||||
|
||||
@@ -1,9 +1,5 @@
|
||||
# 🤖 LLM Backends
|
||||
|
||||
:::note
|
||||
This section is for users who want to connect OpenHands to different LLMs.
|
||||
:::
|
||||
|
||||
OpenHands can connect to any LLM supported by LiteLLM. However, it requires a powerful model to work.
|
||||
|
||||
## Model Recommendations
|
||||
@@ -13,14 +9,10 @@ recommendations for model selection. Our latest benchmarking results can be foun
|
||||
|
||||
Based on these findings and community feedback, the following models have been verified to work reasonably well with OpenHands:
|
||||
|
||||
- [anthropic/claude-3-7-sonnet-20250219](https://www.anthropic.com/api) (recommended)
|
||||
- [gemini/gemini-2.5-pro](https://blog.google/technology/google-deepmind/gemini-model-thinking-updates-march-2025/)
|
||||
- [deepseek/deepseek-chat](https://api-docs.deepseek.com/)
|
||||
- [openai/o3-mini](https://openai.com/index/openai-o3-mini/)
|
||||
- [openai/o3](https://openai.com/index/introducing-o3-and-o4-mini/)
|
||||
- [openai/o4-mini](https://openai.com/index/introducing-o3-and-o4-mini/)
|
||||
- [all-hands/openhands-lm-32b-v0.1](https://www.all-hands.dev/blog/introducing-openhands-lm-32b----a-strong-open-coding-agent-model) -- available through [OpenRouter](https://openrouter.ai/all-hands/openhands-lm-32b-v0.1)
|
||||
|
||||
- anthropic/claude-3-5-sonnet-20241022 (recommended)
|
||||
- anthropic/claude-3-5-haiku-20241022
|
||||
- deepseek/deepseek-chat
|
||||
- gpt-4o
|
||||
|
||||
:::warning
|
||||
OpenHands will issue many prompts to the LLM you configure. Most of these LLMs cost money, so be sure to set spending
|
||||
@@ -64,10 +56,10 @@ We have a few guides for running OpenHands with specific model providers:
|
||||
- [Azure](llms/azure-llms)
|
||||
- [Google](llms/google-llms)
|
||||
- [Groq](llms/groq)
|
||||
- [Local LLMs with SGLang or vLLM](llms/../local-llms.md)
|
||||
- [LiteLLM Proxy](llms/litellm-proxy)
|
||||
- [OpenAI](llms/openai-llms)
|
||||
- [OpenRouter](llms/openrouter)
|
||||
- [Local LLMs with SGLang or vLLM](llms/../local-llms.md)
|
||||
|
||||
### API retries and rate limits
|
||||
|
||||
|
||||
@@ -15,7 +15,7 @@ It is highly recommended that you use GPUs to serve local models for optimal exp
|
||||
For example, to download [OpenHands LM 32B v0.1](https://huggingface.co/all-hands/openhands-lm-32b-v0.1):
|
||||
|
||||
```bash
|
||||
huggingface-cli download all-hands/openhands-lm-32b-v0.1 --local-dir all-hands/openhands-lm-32b-v0.1
|
||||
huggingface-cli download all-hands/openhands-lm-32b-v0.1 --local-dir my_folder/openhands-lm-32b-v0.1
|
||||
```
|
||||
|
||||
## Create an OpenAI-Compatible Endpoint With a Model Serving Framework
|
||||
@@ -27,7 +27,7 @@ huggingface-cli download all-hands/openhands-lm-32b-v0.1 --local-dir all-hands/o
|
||||
|
||||
```bash
|
||||
SGLANG_ALLOW_OVERWRITE_LONGER_CONTEXT_LEN=1 python3 -m sglang.launch_server \
|
||||
--model all-hands/openhands-lm-32b-v0.1 \
|
||||
--model my_folder/openhands-lm-32b-v0.1 \
|
||||
--served-model-name openhands-lm-32b-v0.1 \
|
||||
--port 8000 \
|
||||
--tp 2 --dp 1 \
|
||||
@@ -41,7 +41,7 @@ SGLANG_ALLOW_OVERWRITE_LONGER_CONTEXT_LEN=1 python3 -m sglang.launch_server \
|
||||
- Example launch command for OpenHands LM 32B (with at least 2 GPUs):
|
||||
|
||||
```bash
|
||||
vllm serve all-hands/openhands-lm-32b-v0.1 \
|
||||
vllm serve my_folder/openhands-lm-32b-v0.1 \
|
||||
--host 0.0.0.0 --port 8000 \
|
||||
--api-key mykey \
|
||||
--tensor-parallel-size 2 \
|
||||
@@ -64,10 +64,10 @@ Ensure `config.toml` exists by running `make setup-config` which will create one
|
||||
|
||||
```
|
||||
[core]
|
||||
workspace_base="/path/to/your/workspace"
|
||||
workspace_base="./workspace"
|
||||
|
||||
[llm]
|
||||
model="openhands-lm-32b-v0.1"
|
||||
embedding_model="local"
|
||||
ollama_base_url="http://localhost:8000"
|
||||
```
|
||||
|
||||
|
||||
@@ -1,96 +0,0 @@
|
||||
# Model Context Protocol (MCP)
|
||||
|
||||
:::note
|
||||
This page outlines how to configure and use the Model Context Protocol (MCP) in OpenHands, allowing you to extend the agent's capabilities with custom tools.
|
||||
:::
|
||||
|
||||
## Overview
|
||||
|
||||
Model Context Protocol (MCP) is a mechanism that allows OpenHands to communicate with external tool servers. These servers can provide additional functionality to the agent, such as specialized data processing, external API access, or custom tools. MCP is based on the open standard defined at [modelcontextprotocol.io](https://modelcontextprotocol.io).
|
||||
|
||||
## Configuration
|
||||
|
||||
MCP configuration is defined in the `[mcp]` section of your `config.toml` file.
|
||||
|
||||
### Configuration Example
|
||||
|
||||
```toml
|
||||
[mcp]
|
||||
# SSE Servers - External servers that communicate via Server-Sent Events
|
||||
sse_servers = [
|
||||
# Basic SSE server with just a URL
|
||||
"http://example.com:8080/mcp",
|
||||
|
||||
# SSE server with API key authentication
|
||||
{url="https://secure-example.com/mcp", api_key="your-api-key"}
|
||||
]
|
||||
|
||||
# Stdio Servers - Local processes that communicate via standard input/output
|
||||
stdio_servers = [
|
||||
# Basic stdio server
|
||||
{name="fetch", command="uvx", args=["mcp-server-fetch"]},
|
||||
|
||||
# Stdio server with environment variables
|
||||
{
|
||||
name="data-processor",
|
||||
command="python",
|
||||
args=["-m", "my_mcp_server"],
|
||||
env={
|
||||
"DEBUG": "true",
|
||||
"PORT": "8080"
|
||||
}
|
||||
}
|
||||
]
|
||||
```
|
||||
|
||||
## Configuration Options
|
||||
|
||||
### SSE Servers
|
||||
|
||||
SSE servers are configured using either a string URL or an object with the following properties:
|
||||
|
||||
- `url` (required)
|
||||
- Type: `str`
|
||||
- Description: The URL of the SSE server
|
||||
|
||||
- `api_key` (optional)
|
||||
- Type: `str`
|
||||
- Default: `None`
|
||||
- Description: API key for authentication with the SSE server
|
||||
|
||||
### Stdio Servers
|
||||
|
||||
Stdio servers are configured using an object with the following properties:
|
||||
|
||||
- `name` (required)
|
||||
- Type: `str`
|
||||
- Description: A unique name for the server
|
||||
|
||||
- `command` (required)
|
||||
- Type: `str`
|
||||
- Description: The command to run the server
|
||||
|
||||
- `args` (optional)
|
||||
- Type: `list of str`
|
||||
- Default: `[]`
|
||||
- Description: Command-line arguments to pass to the server
|
||||
|
||||
- `env` (optional)
|
||||
- Type: `dict of str to str`
|
||||
- Default: `{}`
|
||||
- Description: Environment variables to set for the server process
|
||||
|
||||
## How MCP Works
|
||||
|
||||
When OpenHands starts, it:
|
||||
|
||||
1. Reads the MCP configuration from `config.toml`
|
||||
2. Connects to any configured SSE servers
|
||||
3. Starts any configured stdio servers
|
||||
4. Registers the tools provided by these servers with the agent
|
||||
|
||||
The agent can then use these tools just like any built-in tool. When the agent calls an MCP tool:
|
||||
|
||||
1. OpenHands routes the call to the appropriate MCP server
|
||||
2. The server processes the request and returns a response
|
||||
3. OpenHands converts the response to an observation and presents it to the agent
|
||||
@@ -1,38 +0,0 @@
|
||||
# Keyword-Triggered Microagents
|
||||
|
||||
## Purpose
|
||||
|
||||
Keyword-triggered microagents provide OpenHands with specific instructions that are activated when certain keywords
|
||||
appear in the prompt. This is useful for tailoring behavior based on particular tools, languages, or frameworks.
|
||||
|
||||
## Usage
|
||||
|
||||
These microagents are only loaded when a prompt includes one of the trigger words.
|
||||
|
||||
## Frontmatter Syntax
|
||||
|
||||
Frontmatter is required for keyword-triggered microagents. It must be placed at the top of the file,
|
||||
above the guidelines.
|
||||
|
||||
Enclose the frontmatter in triple dashes (---) and include the following fields:
|
||||
|
||||
| Field | Description | Required | Default |
|
||||
|------------|--------------------------------------------------|----------|------------------|
|
||||
| `triggers` | A list of keywords that activate the microagent. | Yes | None |
|
||||
| `agent` | The agent this microagent applies to. | No | 'CodeActAgent' |
|
||||
|
||||
|
||||
## Example
|
||||
|
||||
Keyword-triggered microagent file example located at `.openhands/microagents/yummy.md`:
|
||||
```
|
||||
---
|
||||
triggers:
|
||||
- yummyhappy
|
||||
- happyyummy
|
||||
---
|
||||
|
||||
The user has said the magic word. Respond with "That was delicious!"
|
||||
```
|
||||
|
||||
[See examples of microagents triggered by keywords in the official OpenHands repository](https://github.com/All-Hands-AI/OpenHands/tree/main/microagents)
|
||||
@@ -1,40 +1,31 @@
|
||||
# Microagents Overview
|
||||
|
||||
Microagents are specialized prompts that enhance OpenHands with domain-specific knowledge.
|
||||
They provide expert guidance, automate common tasks, and ensure consistent practices across projects.
|
||||
Microagents are specialized prompts that enhance OpenHands with domain-specific knowledge, repository-specific context
|
||||
and task-specific workflows. They help by providing expert guidance, automating common tasks, and ensuring
|
||||
consistent practices across projects.
|
||||
|
||||
## Microagent Types
|
||||
## Microagent Categories
|
||||
|
||||
Currently OpenHands supports the following types of microagents:
|
||||
Currently OpenHands supports two categories of microagents:
|
||||
|
||||
- [General Repository Microagents](./microagents-repo): General guidelines for OpenHands about the repository.
|
||||
- [Keyword-Triggered Microagents](./microagents-keyword): Guidelines activated by specific keywords in prompts.
|
||||
- [Repository-specific Microagents](./microagents-repo): Repository-specific context and guidelines for OpenHands.
|
||||
- [Public Microagents](./microagents-public): General guidelines triggered by keywords for all OpenHands users.
|
||||
|
||||
To customize OpenHands' behavior, create a .openhands/microagents/ directory in the root of your repository and
|
||||
add `<microagent_name>.md` files inside.
|
||||
A microagent is classified as repository-specific or public depending on its location:
|
||||
|
||||
:::note
|
||||
Loaded microagents take up space in the context window.
|
||||
These microagents, alongside user messages, inform OpenHands about the task and the environment.
|
||||
:::
|
||||
- Repository-specific microagents are located in a repository's `.openhands/microagents/` directory
|
||||
- Public microagents are located in the official OpenHands repository inside the `/microagents` folder
|
||||
|
||||
Example repository structure:
|
||||
When OpenHands works with a repository, it:
|
||||
|
||||
```
|
||||
some-repository/
|
||||
└── .openhands/
|
||||
└── microagents/
|
||||
└── repo.md # General repository guidelines
|
||||
└── trigger_this.md # Microagent triggered by specific keywords
|
||||
└── trigger_that.md # Microagent triggered by specific keywords
|
||||
```
|
||||
1. Loads **repository-specific** microagents from `.openhands/microagents/` if present in the repository.
|
||||
2. Loads **public knowledge** microagents triggered by keywords in conversations
|
||||
3. Loads **public tasks** microagents when explicitly requested by the user
|
||||
|
||||
## Microagents Frontmatter Requirements
|
||||
You can check out the existing public microagents at the [official OpenHands repository](https://github.com/All-Hands-AI/OpenHands/tree/main/microagents/).
|
||||
|
||||
Each microagent file may include frontmatter that provides additional information. In some cases, this frontmatter
|
||||
is required:
|
||||
## Microagent Format
|
||||
|
||||
| Microagent Type | Required |
|
||||
|----------------------------------|----------|
|
||||
| `General Repository Microagents` | No |
|
||||
| `Keyword-Triggered Microagents` | Yes |
|
||||
All microagents use markdown files with YAML frontmatter that have special instructions to help OpenHands activate them.
|
||||
|
||||
Check out the [syntax documentation](./microagents-syntax) for a comprehensive guide on how to configure your microagents.
|
||||
|
||||
@@ -1,17 +1,35 @@
|
||||
# Global Microagents
|
||||
# Public Microagents
|
||||
|
||||
## Overview
|
||||
|
||||
Global microagents are [keyword-triggered microagents](./microagents-keyword) that apply to all OpenHands users. A list of the current
|
||||
global microagents can be found [in the OpenHands repository](https://github.com/All-Hands-AI/OpenHands/tree/main/microagents).
|
||||
Public microagents provide specialized context and capabilities for all OpenHands users, regardless of their repository configuration. Unlike repository-specific microagents, public microagents are globally available across all repositories.
|
||||
|
||||
## Contributing a Global Microagent
|
||||
Public microagents come in two types:
|
||||
|
||||
You can create global microagents and share with the community by opening a pull request to the official repository.
|
||||
- **Knowledge microagents**: Automatically activated when keywords in conversations match their triggers
|
||||
- **Task microagents**: Explicitly invoked by users to guide through specific workflows
|
||||
|
||||
Both types follow the same syntax and structure as repository-specific microagents, using markdown files with YAML frontmatter that define their behavior and capabilities. They are located in the official OpenHands repository under:
|
||||
|
||||
- [`microagents/knowledge/`](https://github.com/All-Hands-AI/OpenHands/tree/main/microagents/knowledge) for knowledge microagents
|
||||
- [`microagents/tasks/`](https://github.com/All-Hands-AI/OpenHands/tree/main/microagents/tasks) for task microagents
|
||||
|
||||
Public microagents:
|
||||
|
||||
- Monitor incoming commands for their trigger words.
|
||||
- Activate when relevant triggers are detected.
|
||||
- Apply their specialized knowledge and capabilities.
|
||||
- Follow their specific guidelines and restrictions.
|
||||
|
||||
When loading public microagents, OpenHands scans the official repository's microagents directories recursively, processing all markdown files except README.md. The system categorizes each microagent based on its `type` field in the YAML frontmatter, regardless of its exact file location within the knowledge or tasks directories.
|
||||
|
||||
## Contributing a Public Microagent
|
||||
|
||||
You can create public microagents and share with the community by opening a pull request to the official repository.
|
||||
|
||||
See the [CONTRIBUTING.md](https://github.com/All-Hands-AI/OpenHands/blob/main/CONTRIBUTING.md) for specific instructions on how to contribute to OpenHands.
|
||||
|
||||
### Global Microagents Best Practices
|
||||
### Public Microagents Best Practices
|
||||
|
||||
- **Clear Scope**: Keep the microagent focused on a specific domain or task.
|
||||
- **Explicit Instructions**: Provide clear, unambiguous guidelines.
|
||||
@@ -19,11 +37,11 @@ See the [CONTRIBUTING.md](https://github.com/All-Hands-AI/OpenHands/blob/main/CO
|
||||
- **Safety First**: Include necessary warnings and constraints.
|
||||
- **Integration Awareness**: Consider how the microagent interacts with other components.
|
||||
|
||||
### Steps to Contribute a Global Microagent
|
||||
### Steps to Contribute a Public Microagent
|
||||
|
||||
#### 1. Plan the Global Microagent
|
||||
#### 1. Plan the Public Microagent
|
||||
|
||||
Before creating a global microagent, consider:
|
||||
Before creating a public microagent, consider:
|
||||
|
||||
- What specific problem or use case will it address?
|
||||
- What unique capabilities or knowledge should it have?
|
||||
@@ -33,19 +51,23 @@ Before creating a global microagent, consider:
|
||||
#### 2. Create File
|
||||
|
||||
Create a new Markdown file with a descriptive name in the appropriate directory:
|
||||
[`microagents/`](https://github.com/All-Hands-AI/OpenHands/tree/main/microagents)
|
||||
|
||||
#### 3. Testing the Global Microagent
|
||||
- [`microagents/knowledge/`](https://github.com/All-Hands-AI/OpenHands/tree/main/microagents/knowledge) for knowledge microagents
|
||||
- [`microagents/tasks/`](https://github.com/All-Hands-AI/OpenHands/tree/main/microagents/tasks) for task microagents
|
||||
|
||||
- Test the agent with various prompts.
|
||||
- Verify trigger words activate the agent correctly.
|
||||
- Ensure instructions are clear and comprehensive.
|
||||
- Check for potential conflicts and overlaps with existing agents.
|
||||
Ensure it follows the correct [syntax](./microagents-syntax.md) and [best practices](./microagents-syntax.md#markdown-content-best-practices).
|
||||
|
||||
#### 3. Testing the Public Microagent
|
||||
|
||||
- Test the agent with various prompts
|
||||
- Verify trigger words activate the agent correctly
|
||||
- Ensure instructions are clear and comprehensive
|
||||
- Check for potential conflicts and overlaps with existing agents
|
||||
|
||||
#### 4. Submission Process
|
||||
|
||||
Submit a pull request with:
|
||||
|
||||
- The new microagent file.
|
||||
- Updated documentation if needed.
|
||||
- Description of the agent's purpose and capabilities.
|
||||
- The new microagent file
|
||||
- Updated documentation if needed
|
||||
- Description of the agent's purpose and capabilities
|
||||
|
||||
@@ -1,31 +1,117 @@
|
||||
# General Repository Microagents
|
||||
# Repository-specific Microagents
|
||||
|
||||
## Purpose
|
||||
## Overview
|
||||
|
||||
General guidelines for OpenHands to work more effectively with the repository.
|
||||
OpenHands can be customized to work more effectively with specific repositories by providing repository-specific context and guidelines.
|
||||
|
||||
## Usage
|
||||
This section explains how to optimize OpenHands for your project.
|
||||
|
||||
These microagents are always loaded as part of the context.
|
||||
## Creating Repository Microagents
|
||||
|
||||
## Frontmatter Syntax
|
||||
You can customize OpenHands' behavior for your repository by creating a `.openhands/microagents/` directory in your repository's root.
|
||||
|
||||
The frontmatter for this type of microagent is optional.
|
||||
You can enhance OpenHands' performance by adding custom microagents to your repository:
|
||||
|
||||
Frontmatter should be enclosed in triple dashes (---) and may include the following fields:
|
||||
1. For overall repository-specific instructions, create a `.openhands/microagents/repo.md` file
|
||||
2. For reusable domain knowledge triggered by keywords, add multiple `.md` files to `.openhands/microagents/knowledge/`
|
||||
3. For common workflows and tasks, create multiple `.md` files to `.openhands/microagents/tasks/`
|
||||
|
||||
| Field | Description | Required | Default |
|
||||
|-----------|-----------------------------------------|----------|----------------|
|
||||
| `agent` | The agent this microagent applies to | No | 'CodeActAgent' |
|
||||
Check out the [best practices](./microagents-syntax.md#markdown-content-best-practices) for formatting the content of your custom microagent.
|
||||
|
||||
## Example
|
||||
Keep in mind that loaded microagents take up space in the context window. It's crucial to strike a balance between the additional context provided by microagents and the instructions provided in the user's inputs.
|
||||
|
||||
Note that you can use OpenHands to create new microagents. The public microagent [`add_agent`](https://github.com/All-Hands-AI/OpenHands/blob/main/microagents/knowledge/add_agent.md) is loaded to all OpenHands instance and can support you on this.
|
||||
|
||||
## Types of Microagents
|
||||
|
||||
OpenHands supports three primary types of microagents, each with specific purposes and features to enhance agent performance:
|
||||
|
||||
- [repository](#repository-microagents)
|
||||
- [knowledge](#knowledge-microagents)
|
||||
- [tasks](#tasks-microagents)
|
||||
|
||||
The standard directory structure within a repository is:
|
||||
|
||||
- One main `repo.md` file containing repository-specific instructions
|
||||
- Additional `Knowledge` agents in `.openhands/microagents/knowledge/` directory
|
||||
- Additional `Task` agents in `.openhands/microagents/tasks/` directory
|
||||
|
||||
When processing the `.openhands/microagents/` directory, OpenHands will recursively scan all subfolders and process any `.md` files (except `README.md`) it finds. The system determines the microagent type based on the `type` field in the YAML frontmatter, not by the file's location. However, for organizational clarity, it's recommended to follow the standard directory structure.
|
||||
|
||||
### Repository Microagents
|
||||
|
||||
The `Repository` microagent is loaded specifically from `.openhands/microagents/repo.md` and serves as the main
|
||||
repository-specific instruction file. This single file is automatically loaded whenever OpenHands works with that repository
|
||||
without requiring any keyword matching or explicit call from the user.
|
||||
|
||||
OpenHands does not support multiple `repo.md` files in different locations or multiple microagents with type `repo`.
|
||||
|
||||
If you need to organize different types of repository information, the recommended approach is to use a single `repo.md` file with well-structured sections rather than trying to create multiple microagents with the type `repo`.
|
||||
|
||||
The best practice is to include project-specific instructions, team practices, coding standards, and architectural guidelines that are relevant for **all** prompts in that repository.
|
||||
|
||||
Example structure:
|
||||
|
||||
General repository microagent file example located at `.openhands/microagents/repo.md`:
|
||||
```
|
||||
This project is a TODO application that allows users to track TODO items.
|
||||
|
||||
To set it up, you can run `npm run build`.
|
||||
Always make sure the tests are passing before committing changes. You can run the tests by running `npm run test`.
|
||||
your-repository/
|
||||
└── .openhands/
|
||||
└── microagents/
|
||||
└── repo.md # Repository-specific instructions
|
||||
```
|
||||
|
||||
[See more examples of general repository microagents here.](https://github.com/All-Hands-AI/OpenHands/tree/main/.openhands/microagents)
|
||||
[See the example in the official OpenHands repository](https://github.com/All-Hands-AI/OpenHands/blob/main/.openhands/microagents/repo.md?plain=1)
|
||||
|
||||
### Knowledge Microagents
|
||||
|
||||
Knowledge microagents provide specialized domain expertise:
|
||||
|
||||
- Recommended to be located in `.openhands/microagents/knowledge/`
|
||||
- Triggered by specific keywords in conversations
|
||||
- Contain expertise on tools, languages, frameworks, and common practices
|
||||
|
||||
Use knowledge microagents to trigger additional context relevant to specific technologies, tools, or workflows. For example, mentioning "git" in your conversation will automatically trigger git-related expertise to help with Git operations.
|
||||
|
||||
Examples structure:
|
||||
|
||||
```
|
||||
your-repository/
|
||||
└── .openhands/
|
||||
└── microagents/
|
||||
└── knowledge/
|
||||
└── git.md
|
||||
└── docker.md
|
||||
└── python.md
|
||||
└── ...
|
||||
└── repo.md
|
||||
```
|
||||
|
||||
You can find several real examples of `Knowledge` microagents in the [offical OpenHands repository](https://github.com/All-Hands-AI/OpenHands/tree/main/microagents/knowledge)
|
||||
|
||||
### Tasks Microagents
|
||||
|
||||
Task microagents guide users through interactive workflows:
|
||||
|
||||
- Recommended to be located in `.openhands/microagents/tasks/`
|
||||
- Provide step-by-step processes for common development tasks
|
||||
- Accept inputs and adapt to different scenarios
|
||||
- Ensure consistent outcomes for complex operations
|
||||
|
||||
Task microagents are a convenient way to store multi-step processes you perform regularly. For instance, you can create a `update_pr_description.md` microagent to automatically generate better pull request descriptions based on code changes.
|
||||
|
||||
Examples structure:
|
||||
|
||||
```
|
||||
your-repository/
|
||||
└── .openhands/
|
||||
└── microagents/
|
||||
└── tasks/
|
||||
└── update_pr_description.md
|
||||
└── address_pr_comments.md
|
||||
└── get_test_to_pass.md
|
||||
└── ...
|
||||
└── knowledge/
|
||||
└── ...
|
||||
└── repo.md
|
||||
```
|
||||
|
||||
You can find several real examples of `Tasks` microagents in the [offical OpenHands repository](https://github.com/All-Hands-AI/OpenHands/tree/main/microagents/tasks)
|
||||
|
||||
128
docs/modules/usage/prompting/microagents-syntax.md
Normal file
128
docs/modules/usage/prompting/microagents-syntax.md
Normal file
@@ -0,0 +1,128 @@
|
||||
# Microagents Syntax
|
||||
|
||||
Microagents are defined using markdown files with YAML frontmatter that specify their behavior, triggers, and capabilities.
|
||||
|
||||
Find below a comprehensive description of the frontmatter syntax and other details about how to use each type of microagent available at OpenHands.
|
||||
|
||||
## Frontmatter Schema
|
||||
|
||||
Every microagent requires a YAML frontmatter section at the beginning of the file, enclosed by triple dashes (`---`). The fields are:
|
||||
|
||||
| Field | Description | Required | Used By |
|
||||
| ---------- | -------------------------------------------------- | ------------------------ | ---------------- |
|
||||
| `name` | Unique identifier for the microagent | Yes | All types |
|
||||
| `type` | Type of microagent: `repo`, `knowledge`, or `task` | Yes | All types |
|
||||
| `version` | Version number (Semantic versioning recommended) | Yes | All types |
|
||||
| `agent` | The agent type (typically `CodeActAgent`) | Yes | All types |
|
||||
| `author` | Creator of the microagent | No | All types |
|
||||
| `triggers` | List of keywords that activate the microagent | Yes for knowledge agents | Knowledge agents |
|
||||
| `inputs` | Defines required user inputs for task execution | Yes for task agents | Task agents |
|
||||
|
||||
## Core Fields
|
||||
|
||||
### `agent`
|
||||
|
||||
**Purpose**: Specifies which agent implementation processes the microagent (typically `CodeActAgent`).
|
||||
|
||||
- Defines a single agent responsible for processing the microagent
|
||||
- Must be available in the OpenHands system (see the [agent hub](https://github.com/All-Hands-AI/OpenHands/tree/main/openhands/agenthub))
|
||||
- If the specified agent is not active, the microagent will not be used
|
||||
|
||||
### `triggers`
|
||||
|
||||
**Purpose**: Defines keywords that activate the `knowledge` microagent.
|
||||
|
||||
**Example**:
|
||||
|
||||
```yaml
|
||||
triggers:
|
||||
- kubernetes
|
||||
- k8s
|
||||
- docker
|
||||
- security
|
||||
- containers cluster
|
||||
```
|
||||
|
||||
**Key points**:
|
||||
|
||||
- Can include both single words and multi-word phrases
|
||||
- Case-insensitive matching is typically used
|
||||
- More specific triggers (like "docker compose") prevent false activations
|
||||
- Multiple triggers increase the chance of activation in relevant contexts
|
||||
- Unique triggers like "flarglebargle" can be used for testing or special functionality
|
||||
- Triggers should be carefully chosen to avoid unwanted activations or conflicts with other microagents
|
||||
- Common terms used in many conversations may cause the microagent to be activated too frequently
|
||||
|
||||
When using multiple triggers, the microagent will be activated if any of the trigger words or phrases appear in the
|
||||
conversation.
|
||||
|
||||
### `inputs`
|
||||
|
||||
**Purpose**: Defines parameters required from the user when a `task` microagent is activated.
|
||||
|
||||
**Schema**:
|
||||
|
||||
```yaml
|
||||
inputs:
|
||||
- name: INPUT_NAME # Used with {{ INPUT_NAME }}
|
||||
description: 'Description of what this input is for'
|
||||
required: true # Optional, defaults to true
|
||||
```
|
||||
|
||||
**Key points**:
|
||||
|
||||
- The `name` and `description` properties are required for each input
|
||||
- The `required` property is optional and defaults to `true`
|
||||
- Input values are referenced in the microagent body using double curly braces (e.g., `{{ INPUT_NAME }}`)
|
||||
- All inputs defined will be collected from the user before the task microagent executes
|
||||
|
||||
**Variable Usage**: Reference input values using double curly braces `{{ INPUT_NAME }}`.
|
||||
|
||||
## Example Formats
|
||||
|
||||
### Repository Microagent
|
||||
|
||||
Repository microagents provide context and guidelines for a specific repository.
|
||||
|
||||
- Located at: `.openhands/microagents/repo.md`
|
||||
- Automatically loaded when working with the repository
|
||||
- Only one per repository
|
||||
|
||||
The `Repository` microagent is loaded specifically from `.openhands/microagents/repo.md` and serves as the main
|
||||
repository-specific instruction file. This single file is automatically loaded whenever OpenHands works with that repository
|
||||
without requiring any keyword matching or explicit call from the user.
|
||||
|
||||
[See the example in the official OpenHands repository](https://github.com/All-Hands-AI/OpenHands/blob/main/.openhands/microagents/repo.md?plain=1)
|
||||
|
||||
### Knowledge Microagent
|
||||
|
||||
Provides specialized domain expertise triggered by keywords.
|
||||
|
||||
You can find several real examples of `Knowledge` microagents in the [offical OpenHands repository](https://github.com/All-Hands-AI/OpenHands/tree/main/microagents/knowledge)
|
||||
|
||||
### Task Microagent
|
||||
|
||||
When explicitly asked by the user, will guide through interactive workflows with specific inputs.
|
||||
|
||||
You can find several real examples of `Tasks` microagents in the [offical OpenHands repository](https://github.com/All-Hands-AI/OpenHands/tree/main/microagents/tasks)
|
||||
|
||||
## Markdown Content Best Practices
|
||||
|
||||
After the frontmatter, compose the microagent body using Markdown syntax. Examples of elements you can include are:
|
||||
|
||||
- Clear, concise instructions outlining the microagent's purpose and responsibilities
|
||||
- Specific guidelines and constraints the microagent should adhere to
|
||||
- Relevant code snippets and practical examples to illustrate key points
|
||||
- Step-by-step procedures for task agents, guiding users through workflows
|
||||
|
||||
**Design Tips**:
|
||||
|
||||
- Keep microagents focused with a clear purpose
|
||||
- Provide specific guidelines rather than general advice
|
||||
- Use distinctive triggers for knowledge agents
|
||||
- Keep content concise to minimize context window usage
|
||||
- Break large microagents into smaller, focused ones
|
||||
|
||||
Aim for clarity, brevity, and practicality in your writing. Use formatting like bullet points, code blocks, and emphasis to enhance readability and comprehension.
|
||||
|
||||
Remember that balancing microagents details with user input space is important for maintaining effective interactions.
|
||||
@@ -1,38 +1,37 @@
|
||||
# Prompting Best Practices
|
||||
|
||||
When working with OpenHands AI software developer, providing clear and effective prompts is key to getting accurate
|
||||
and useful responses. This guide outlines best practices for crafting effective prompts.
|
||||
When working with OpenHands AI software developer, it's crucial to provide clear and effective prompts. This guide outlines best practices for creating prompts that will yield the most accurate and useful responses.
|
||||
|
||||
## Characteristics of Good Prompts
|
||||
|
||||
Good prompts are:
|
||||
|
||||
- **Concrete**: Clearly describe what functionality should be added or what error needs fixing.
|
||||
- **Location-specific**: Specify the locations in the codebase that should be modified, if known.
|
||||
- **Appropriately scoped**: Focus on a single feature, typically not exceeding 100 lines of code.
|
||||
- **Concrete**: They explain exactly what functionality should be added or what error needs to be fixed.
|
||||
- **Location-specific**: If known, they explain the locations in the code base that should be modified.
|
||||
- **Appropriately scoped**: They should be the size of a single feature, typically not exceeding 100 lines of code.
|
||||
|
||||
## Examples
|
||||
|
||||
### Good Prompt Examples
|
||||
|
||||
- Add a function `calculate_average` in `utils/math_operations.py` that takes a list of numbers as input and returns their average.
|
||||
- Fix the TypeError in `frontend/src/components/UserProfile.tsx` occurring on line 42. The error suggests we're trying to access a property of undefined.
|
||||
- Implement input validation for the email field in the registration form. Update `frontend/src/components/RegistrationForm.tsx` to check if the email is in a valid format before submission.
|
||||
- "Add a function `calculate_average` in `utils/math_operations.py` that takes a list of numbers as input and returns their average."
|
||||
- "Fix the TypeError in `frontend/src/components/UserProfile.tsx` occurring on line 42. The error suggests we're trying to access a property of undefined."
|
||||
- "Implement input validation for the email field in the registration form. Update `frontend/src/components/RegistrationForm.tsx` to check if the email is in a valid format before submission."
|
||||
|
||||
### Bad Prompt Examples
|
||||
|
||||
- Make the code better. (Too vague, not concrete)
|
||||
- Rewrite the entire backend to use a different framework. (Not appropriately scoped)
|
||||
- There's a bug somewhere in the user authentication. Can you find and fix it? (Lacks specificity and location information)
|
||||
- "Make the code better." (Too vague, not concrete)
|
||||
- "Rewrite the entire backend to use a different framework." (Not appropriately scoped)
|
||||
- "There's a bug somewhere in the user authentication. Can you find and fix it?" (Lacks specificity and location information)
|
||||
|
||||
## Tips for Effective Prompting
|
||||
|
||||
- Be as specific as possible about the desired outcome or the problem to be solved.
|
||||
- Provide context, including relevant file paths and line numbers if available.
|
||||
- Break large tasks into smaller, manageable prompts.
|
||||
- Include relevant error messages or logs.
|
||||
- Specify the programming language or framework, if not obvious.
|
||||
- Break down large tasks into smaller, manageable prompts.
|
||||
- Include any relevant error messages or logs.
|
||||
- Specify the programming language or framework if it's not obvious from the context.
|
||||
|
||||
The more precise and informative your prompt, the better OpenHands can assist you.
|
||||
Remember, the more precise and informative your prompt is, the better the AI can assist you in developing or modifying the OpenHands software.
|
||||
|
||||
See [Getting Started with OpenHands](../getting-started) for more examples of helpful prompts.
|
||||
|
||||
@@ -1,26 +1,24 @@
|
||||
# Runtime Configuration
|
||||
|
||||
:::note
|
||||
This section is for users that would like to use a runtime other than Docker for OpenHands.
|
||||
:::
|
||||
|
||||
A Runtime is an environment where the OpenHands agent can edit files and run
|
||||
commands.
|
||||
|
||||
By default, OpenHands uses a [Docker-based runtime](./runtimes/docker), running on your local computer.
|
||||
By default, OpenHands uses a Docker-based runtime, running on your local computer.
|
||||
This means you only have to pay for the LLM you're using, and your code is only ever sent to the LLM.
|
||||
|
||||
We also support other runtimes, which are typically managed by third-parties.
|
||||
We also support "remote" runtimes, which are typically managed by third-parties.
|
||||
They can make setup a bit simpler and more scalable, especially
|
||||
if you're running many OpenHands conversations in parallel (e.g. to do evaluation).
|
||||
|
||||
Additionally, we provide a [Local Runtime](./runtimes/local) that runs directly on your machine without Docker,
|
||||
Additionally, we provide a "local" runtime that runs directly on your machine without Docker,
|
||||
which can be useful in controlled environments like CI pipelines.
|
||||
|
||||
## Available Runtimes
|
||||
|
||||
OpenHands supports several different runtime environments:
|
||||
|
||||
- [Docker Runtime](./runtimes/docker.md) - The default runtime that uses Docker containers for isolation (recommended for most users).
|
||||
- [OpenHands Remote Runtime](./runtimes/remote.md) - Cloud-based runtime for parallel execution (beta).
|
||||
- [Modal Runtime](./runtimes/modal.md) - Runtime provided by our partners at Modal.
|
||||
- [Daytona Runtime](./runtimes/daytona.md) - Runtime provided by Daytona.
|
||||
- [Local Runtime](./runtimes/local.md) - Direct execution on your local machine without Docker.
|
||||
- [Docker Runtime](./runtimes/docker.md) - The default runtime that uses Docker containers for isolation (recommended for most users)
|
||||
- [OpenHands Remote Runtime](./runtimes/remote.md) - Cloud-based runtime for parallel execution (beta)
|
||||
- [Modal Runtime](./runtimes/modal.md) - Runtime provided by our partners at Modal
|
||||
- [Daytona Runtime](./runtimes/daytona.md) - Runtime provided by Daytona
|
||||
- [Local Runtime](./runtimes/local.md) - Direct execution on your local machine without Docker
|
||||
|
||||
@@ -8,7 +8,7 @@ that contains our Runtime server, as well as some basic utilities for Python and
|
||||
You can also [build your own runtime image](../how-to/custom-sandbox-guide).
|
||||
|
||||
## Connecting to Your filesystem
|
||||
A useful feature is the ability to connect to your local filesystem. To mount your filesystem into the runtime:
|
||||
One useful feature here is the ability to connect to your local filesystem. To mount your filesystem into the runtime:
|
||||
1. Set `WORKSPACE_BASE`:
|
||||
|
||||
```bash
|
||||
@@ -35,25 +35,25 @@ A useful feature is the ability to connect to your local filesystem. To mount yo
|
||||
Be careful! There's nothing stopping the OpenHands agent from deleting or modifying
|
||||
any files that are mounted into its workspace.
|
||||
|
||||
The `-e SANDBOX_USER_ID=$(id -u)` is passed to the Docker command to ensure the sandbox user matches the host user’s
|
||||
permissions. This prevents the agent from creating root-owned files in the mounted workspace.
|
||||
This setup can cause some issues with file permissions (hence the `SANDBOX_USER_ID` variable)
|
||||
but seems to work well on most systems.
|
||||
|
||||
## Hardened Docker Installation
|
||||
|
||||
When deploying OpenHands in environments where security is a priority, you should consider implementing a hardened
|
||||
Docker configuration. This section provides recommendations for securing your OpenHands Docker deployment beyond the default configuration.
|
||||
When deploying OpenHands in environments where security is a priority, you should consider implementing a hardened Docker configuration. This section provides recommendations for securing your OpenHands Docker deployment beyond the default configuration.
|
||||
|
||||
### Security Considerations
|
||||
|
||||
The default Docker configuration in the README is designed for ease of use on a local development machine. If you're
|
||||
running on a public network (e.g. airport WiFi), you should implement additional security measures.
|
||||
The default Docker configuration in the README is designed for ease of use on a local development machine. If you're running on a public network (e.g. airport WiFi),
|
||||
you should implement additional security measures.
|
||||
|
||||
### Network Binding Security
|
||||
|
||||
By default, OpenHands binds to all network interfaces (`0.0.0.0`), which can expose your instance to all networks the
|
||||
host is connected to. For a more secure setup:
|
||||
By default, OpenHands binds to all network interfaces (`0.0.0.0`), which can expose your instance to all networks the host is connected to. For a more secure setup:
|
||||
|
||||
1. **Restrict Network Binding**: Use the `runtime_binding_address` configuration to restrict which network interfaces OpenHands listens on:
|
||||
1. **Restrict Network Binding**:
|
||||
|
||||
Use the `runtime_binding_address` configuration to restrict which network interfaces OpenHands listens on:
|
||||
|
||||
```bash
|
||||
docker run # ...
|
||||
@@ -63,7 +63,9 @@ host is connected to. For a more secure setup:
|
||||
|
||||
This configuration ensures OpenHands only listens on the loopback interface (`127.0.0.1`), making it accessible only from the local machine.
|
||||
|
||||
2. **Secure Port Binding**: Modify the `-p` flag to bind only to localhost instead of all interfaces:
|
||||
2. **Secure Port Binding**:
|
||||
|
||||
Modify the `-p` flag to bind only to localhost instead of all interfaces:
|
||||
|
||||
```bash
|
||||
docker run # ... \
|
||||
|
||||
@@ -1,26 +1,23 @@
|
||||
# Local Runtime
|
||||
|
||||
The Local Runtime allows the OpenHands agent to execute actions directly on your local machine without using Docker.
|
||||
This runtime is primarily intended for controlled environments like CI pipelines or testing scenarios where Docker is not available.
|
||||
The Local Runtime allows the OpenHands agent to execute actions directly on your local machine without using Docker. This runtime is primarily intended for controlled environments like CI pipelines or testing scenarios where Docker is not available.
|
||||
|
||||
:::caution
|
||||
**Security Warning**: The Local Runtime runs without any sandbox isolation. The agent can directly access and modify
|
||||
files on your machine. Only use this runtime in controlled environments or when you fully understand the security implications.
|
||||
**Security Warning**: The Local Runtime runs without any sandbox isolation. The agent can directly access and modify files on your machine. Only use this runtime in controlled environments or when you fully understand the security implications.
|
||||
:::
|
||||
|
||||
## Prerequisites
|
||||
|
||||
Before using the Local Runtime, ensure that:
|
||||
|
||||
1. You can run OpenHands using the [Development workflow](https://github.com/All-Hands-AI/OpenHands/blob/main/Development.md).
|
||||
1. You have followed the [Development setup instructions](https://github.com/All-Hands-AI/OpenHands/blob/main/Development.md).
|
||||
2. tmux is available on your system.
|
||||
|
||||
## Configuration
|
||||
|
||||
To use the Local Runtime, besides required configurations like the LLM provider, model and API key, you'll need to set
|
||||
the following options via environment variables or the [config.toml file](https://github.com/All-Hands-AI/OpenHands/blob/main/config.template.toml) when starting OpenHands:
|
||||
To use the Local Runtime, besides required configurations like the model, API key, you'll need to set the following options via environment variables or the [config.toml file](https://github.com/All-Hands-AI/OpenHands/blob/main/config.template.toml) when starting OpenHands:
|
||||
|
||||
Via environment variables:
|
||||
- Via environment variables:
|
||||
|
||||
```bash
|
||||
# Required
|
||||
@@ -30,7 +27,7 @@ export RUNTIME=local
|
||||
export WORKSPACE_BASE=/path/to/your/workspace
|
||||
```
|
||||
|
||||
Via `config.toml`:
|
||||
- Via `config.toml`:
|
||||
|
||||
```toml
|
||||
[core]
|
||||
@@ -62,3 +59,4 @@ The Local Runtime is particularly useful for:
|
||||
- CI/CD pipelines where Docker is not available.
|
||||
- Testing and development of OpenHands itself.
|
||||
- Environments where container usage is restricted.
|
||||
- Scenarios where direct file system access is required.
|
||||
|
||||
@@ -9,5 +9,5 @@ You'll then need to set the following environment variables when starting OpenHa
|
||||
docker run # ...
|
||||
-e RUNTIME=modal \
|
||||
-e MODAL_API_TOKEN_ID="your-id" \
|
||||
-e MODAL_API_TOKEN_SECRET="modal-api-key" \
|
||||
-e MODAL_API_TOKEN_SECRET="your-secret" \
|
||||
```
|
||||
|
||||
@@ -1,9 +1,6 @@
|
||||
# OpenHands Remote Runtime
|
||||
|
||||
:::note
|
||||
This runtime is specifically designed for agent evaluation purposes only through the
|
||||
[OpenHands evaluation harness](https://github.com/All-Hands-AI/OpenHands/tree/main/evaluation). It should not be used to launch production OpenHands applications.
|
||||
:::
|
||||
OpenHands Remote Runtime is currently in beta (read [here](https://runtime.all-hands.dev/) for more details), it allows you to launch runtimes in parallel in the cloud.
|
||||
Fill out [this form](https://docs.google.com/forms/d/e/1FAIpQLSckVz_JFwg2_mOxNZjCtr7aoBFI2Mwdan3f75J_TrdMS1JV2g/viewform) to apply if you want to try this out!
|
||||
|
||||
OpenHands Remote Runtime is currently in beta (read [here](https://runtime.all-hands.dev/) for more details), it allows you to launch runtimes
|
||||
in parallel in the cloud. Fill out [this form](https://docs.google.com/forms/d/e/1FAIpQLSckVz_JFwg2_mOxNZjCtr7aoBFI2Mwdan3f75J_TrdMS1JV2g/viewform) to apply if you want to try this out!
|
||||
NOTE: This runtime is specifically designed for agent evaluation purposes only through [OpenHands evaluation harness](https://github.com/All-Hands-AI/OpenHands/tree/main/evaluation). It should not be used to launch production OpenHands applications.
|
||||
|
||||
@@ -4,38 +4,6 @@
|
||||
OpenHands only supports Windows via WSL. Please be sure to run all commands inside your WSL terminal.
|
||||
:::
|
||||
|
||||
### Unable to access VS Code tab via local IP
|
||||
|
||||
**Description**
|
||||
|
||||
When accessing OpenHands through a non-localhost URL (such as a LAN IP address), the VS Code tab shows a "Forbidden" error, while other parts of the UI work fine.
|
||||
|
||||
**Resolution**
|
||||
|
||||
This happens because VS Code runs on a random high port that may not be exposed or accessible from other machines. To fix this:
|
||||
|
||||
1. Set a specific port for VS Code using the `SANDBOX_VSCODE_PORT` environment variable:
|
||||
```bash
|
||||
docker run -it --rm \
|
||||
-e SANDBOX_VSCODE_PORT=41234 \
|
||||
-e SANDBOX_RUNTIME_CONTAINER_IMAGE=docker.all-hands.dev/all-hands-ai/runtime:latest \
|
||||
-v /var/run/docker.sock:/var/run/docker.sock \
|
||||
-v ~/.openhands-state:/.openhands-state \
|
||||
-p 3000:3000 \
|
||||
-p 41234:41234 \
|
||||
--add-host host.docker.internal:host-gateway \
|
||||
--name openhands-app \
|
||||
docker.all-hands.dev/all-hands-ai/openhands:latest
|
||||
```
|
||||
|
||||
2. Make sure to expose the same port with `-p 41234:41234` in your Docker command.
|
||||
|
||||
3. Alternatively, you can set this in your `config.toml` file:
|
||||
```toml
|
||||
[sandbox]
|
||||
vscode_port = 41234
|
||||
```
|
||||
|
||||
### Launch docker client failed
|
||||
|
||||
**Description**
|
||||
@@ -52,18 +20,25 @@ Try these in order:
|
||||
* If using Docker Desktop, ensure `Settings > Advanced > Allow the default Docker socket to be used` is enabled.
|
||||
* Depending on your configuration you may need `Settings > Resources > Network > Enable host networking` enabled in Docker Desktop.
|
||||
* Reinstall Docker Desktop.
|
||||
---
|
||||
|
||||
### Permission Error
|
||||
# Development Workflow Specific
|
||||
### Error building runtime docker image
|
||||
|
||||
**Description**
|
||||
|
||||
On initial prompt, an error is seen with `Permission Denied` or `PermissionError`.
|
||||
Attempts to start a new session fail, and errors with terms like the following appear in the logs:
|
||||
```
|
||||
debian-security bookworm-security
|
||||
InRelease At least one invalid signature was encountered.
|
||||
```
|
||||
|
||||
**Resolution**
|
||||
This seems to happen when the hash of an existing external library changes and your local docker instance has
|
||||
cached a previous version. To work around this, please try the following:
|
||||
|
||||
* Check if the `~/.openhands-state` is owned by `root`. If so, you can:
|
||||
* Change the directory's ownership: `sudo chown <user>:<user> ~/.openhands-state`.
|
||||
* or update permissions on the directory: `sudo chmod 777 ~/.openhands-state`
|
||||
* or delete it if you don’t need previous data. OpenHands will recreate it. You'll need to re-enter LLM settings.
|
||||
* If mounting a local directory, ensure your `WORKSPACE_BASE` has the necessary permissions for the user running
|
||||
OpenHands.
|
||||
* Stop any containers where the name has the prefix `openhands-runtime-` :
|
||||
`docker ps --filter name=openhands-runtime- --filter status=running -aq | xargs docker stop`
|
||||
* Remove any containers where the name has the prefix `openhands-runtime-` :
|
||||
`docker rmi $(docker images --filter name=openhands-runtime- -q --no-trunc)`
|
||||
* Stop and Remove any containers / images where the name has the prefix `openhands-runtime-`
|
||||
* Prune containers / images : `docker container prune -f && docker image prune -f`
|
||||
|
||||
1587
docs/package-lock.json
generated
1587
docs/package-lock.json
generated
File diff suppressed because it is too large
Load Diff
@@ -4,30 +4,26 @@
|
||||
"private": true,
|
||||
"scripts": {
|
||||
"docusaurus": "docusaurus",
|
||||
"start": "node generate-swagger-ui.js && docusaurus start",
|
||||
"build": "node generate-swagger-ui.js && docusaurus build",
|
||||
"start": "docusaurus start",
|
||||
"build": "docusaurus build",
|
||||
"swizzle": "docusaurus swizzle",
|
||||
"deploy": "docusaurus deploy",
|
||||
"clear": "docusaurus clear",
|
||||
"serve": "docusaurus serve",
|
||||
"write-translations": "docusaurus write-translations",
|
||||
"write-heading-ids": "docusaurus write-heading-ids",
|
||||
"typecheck": "tsc",
|
||||
"generate-swagger-ui": "node generate-swagger-ui.js"
|
||||
"typecheck": "tsc"
|
||||
},
|
||||
"// Note": "The OpenAPI spec is stored in docs/static/openapi.json so it's accessible at /openapi.json in the deployed site",
|
||||
"dependencies": {
|
||||
"@docusaurus/core": "^3.7.0",
|
||||
"@docusaurus/plugin-content-pages": "^3.7.0",
|
||||
"@docusaurus/preset-classic": "^3.7.0",
|
||||
"@docusaurus/theme-mermaid": "^3.7.0",
|
||||
"@mdx-js/react": "^3.1.0",
|
||||
"@node-rs/jieba": "^2.0.1",
|
||||
"clsx": "^2.0.0",
|
||||
"docusaurus-lunr-search": "^3.6.0",
|
||||
"prism-react-renderer": "^2.4.1",
|
||||
"react": "^19.1.0",
|
||||
"react-dom": "^19.1.0",
|
||||
"react": "^19.0.0",
|
||||
"react-dom": "^19.0.0",
|
||||
"react-icons": "^5.5.0",
|
||||
"react-use": "^17.6.0"
|
||||
},
|
||||
@@ -35,9 +31,7 @@
|
||||
"@docusaurus/module-type-aliases": "^3.5.1",
|
||||
"@docusaurus/tsconfig": "^3.7.0",
|
||||
"@docusaurus/types": "^3.5.1",
|
||||
"swagger-cli": "^4.0.4",
|
||||
"swagger-ui-dist": "^5.21.0",
|
||||
"typescript": "~5.8.3"
|
||||
"typescript": "~5.8.2"
|
||||
},
|
||||
"browserslist": {
|
||||
"production": [
|
||||
@@ -53,6 +47,5 @@
|
||||
},
|
||||
"engines": {
|
||||
"node": ">=18.0"
|
||||
},
|
||||
"packageManager": "npm@10.5.0"
|
||||
}
|
||||
}
|
||||
|
||||
@@ -18,27 +18,6 @@ const sidebars: SidebarsConfig = {
|
||||
label: 'Key Features',
|
||||
id: 'usage/key-features',
|
||||
},
|
||||
{
|
||||
type: 'category',
|
||||
label: 'OpenHands Cloud',
|
||||
items: [
|
||||
{
|
||||
type: 'doc',
|
||||
label: 'Openhands Cloud',
|
||||
id: 'usage/cloud/openhands-cloud',
|
||||
},
|
||||
{
|
||||
type: 'doc',
|
||||
label: 'Cloud API',
|
||||
id: 'usage/cloud/cloud-api',
|
||||
},
|
||||
{
|
||||
type: 'doc',
|
||||
label: 'Cloud GitHub Resolver',
|
||||
id: 'usage/cloud/cloud-github-resolver',
|
||||
},
|
||||
],
|
||||
},
|
||||
{
|
||||
type: 'category',
|
||||
label: 'Prompting',
|
||||
@@ -48,17 +27,6 @@ const sidebars: SidebarsConfig = {
|
||||
label: 'Best Practices',
|
||||
id: 'usage/prompting/prompting-best-practices',
|
||||
},
|
||||
],
|
||||
},
|
||||
{
|
||||
type: 'category',
|
||||
label: 'Customization',
|
||||
items: [
|
||||
{
|
||||
type: 'doc',
|
||||
label: 'Repository Customization',
|
||||
id: 'usage/customization/repository',
|
||||
},
|
||||
{
|
||||
type: 'category',
|
||||
label: 'Microagents',
|
||||
@@ -70,23 +38,34 @@ const sidebars: SidebarsConfig = {
|
||||
},
|
||||
{
|
||||
type: 'doc',
|
||||
label: 'General Repository Microagents',
|
||||
label: 'Repository-specific',
|
||||
id: 'usage/prompting/microagents-repo',
|
||||
},
|
||||
{
|
||||
type: 'doc',
|
||||
label: 'Keyword-Triggered Microagents',
|
||||
id: 'usage/prompting/microagents-keyword',
|
||||
label: 'Public',
|
||||
id: 'usage/prompting/microagents-public',
|
||||
},
|
||||
{
|
||||
type: 'doc',
|
||||
label: 'Global Microagents',
|
||||
id: 'usage/prompting/microagents-public',
|
||||
label: 'Syntax',
|
||||
id: 'usage/prompting/microagents-syntax',
|
||||
},
|
||||
],
|
||||
},
|
||||
],
|
||||
},
|
||||
{
|
||||
type: 'category',
|
||||
label: 'Customization',
|
||||
items: [
|
||||
{
|
||||
type: 'doc',
|
||||
label: 'Repository Customization',
|
||||
id: 'usage/customization/repository',
|
||||
},
|
||||
],
|
||||
},
|
||||
{
|
||||
type: 'category',
|
||||
label: 'Usage Methods',
|
||||
@@ -111,6 +90,23 @@ const sidebars: SidebarsConfig = {
|
||||
label: 'Github Action',
|
||||
id: 'usage/how-to/github-action',
|
||||
},
|
||||
{
|
||||
type: 'category',
|
||||
label: 'Cloud',
|
||||
items: [
|
||||
{
|
||||
type: 'doc',
|
||||
label: 'Openhands Cloud',
|
||||
id: 'usage/cloud/openhands-cloud',
|
||||
},
|
||||
|
||||
{
|
||||
type: 'doc',
|
||||
label: 'Cloud GitHub Resolver',
|
||||
id: 'usage/cloud/cloud-github-resolver',
|
||||
},
|
||||
],
|
||||
},
|
||||
],
|
||||
},
|
||||
{
|
||||
@@ -145,11 +141,6 @@ const sidebars: SidebarsConfig = {
|
||||
label: 'Groq',
|
||||
id: 'usage/llms/groq',
|
||||
},
|
||||
{
|
||||
type: 'doc',
|
||||
label: 'Local LLMs with SGLang or vLLM',
|
||||
id: 'usage/llms/local-llms',
|
||||
},
|
||||
{
|
||||
type: 'doc',
|
||||
label: 'LiteLLM Proxy',
|
||||
@@ -165,6 +156,11 @@ const sidebars: SidebarsConfig = {
|
||||
label: 'OpenRouter',
|
||||
id: 'usage/llms/openrouter',
|
||||
},
|
||||
{
|
||||
type: 'doc',
|
||||
label: 'Local LLMs with SGLang or vLLM',
|
||||
id: 'usage/llms/local-llms',
|
||||
},
|
||||
],
|
||||
},
|
||||
],
|
||||
@@ -215,11 +211,6 @@ const sidebars: SidebarsConfig = {
|
||||
label: 'Custom Sandbox',
|
||||
id: 'usage/how-to/custom-sandbox-guide',
|
||||
},
|
||||
{
|
||||
type: 'doc',
|
||||
label: 'MCP',
|
||||
id: 'usage/mcp',
|
||||
}
|
||||
],
|
||||
},
|
||||
{
|
||||
|
||||
@@ -8,7 +8,7 @@ function CustomFooter() {
|
||||
<footer className="custom-footer">
|
||||
<div className="footer-content">
|
||||
<div className="footer-icons">
|
||||
<a href="https://join.slack.com/t/openhands-ai/shared_invite/zt-34zm4j0gj-Qz5kRHoca8DFCbqXPS~f_A" target="_blank" rel="noopener noreferrer">
|
||||
<a href="https://join.slack.com/t/openhands-ai/shared_invite/zt-2ngejmfw6-9gW4APWOC9XUp1n~SiQ6iw" target="_blank" rel="noopener noreferrer">
|
||||
<FaSlack />
|
||||
</a>
|
||||
<a href="https://discord.gg/ESHStjSjD4" target="_blank" rel="noopener noreferrer">
|
||||
|
||||
@@ -45,14 +45,15 @@ export function HomepageHeader() {
|
||||
<div align="center" className="header-links">
|
||||
<a href="https://github.com/All-Hands-AI/OpenHands/graphs/contributors"><img src="https://img.shields.io/github/contributors/All-Hands-AI/OpenHands?style=for-the-badge&color=blue" alt="Contributors" /></a>
|
||||
<a href="https://github.com/All-Hands-AI/OpenHands/stargazers"><img src="https://img.shields.io/github/stars/All-Hands-AI/OpenHands?style=for-the-badge&color=blue" alt="Stargazers" /></a>
|
||||
<a href="https://codecov.io/github/All-Hands-AI/OpenHands?branch=main"><img alt="CodeCov" src="https://img.shields.io/codecov/c/github/All-Hands-AI/OpenHands?style=for-the-badge&color=blue" /></a>
|
||||
<a href="https://github.com/All-Hands-AI/OpenHands/blob/main/LICENSE"><img src="https://img.shields.io/github/license/All-Hands-AI/OpenHands?style=for-the-badge&color=blue" alt="MIT License" /></a>
|
||||
<br/>
|
||||
<a href="https://join.slack.com/t/openhands-ai/shared_invite/zt-34zm4j0gj-Qz5kRHoca8DFCbqXPS~f_A"><img src="https://img.shields.io/badge/Slack-Join%20Us-red?logo=slack&logoColor=white&style=for-the-badge" alt="Join our Slack community" /></a>
|
||||
<a href="https://join.slack.com/t/openhands-ai/shared_invite/zt-2ngejmfw6-9gW4APWOC9XUp1n~SiQ6iw"><img src="https://img.shields.io/badge/Slack-Join%20Us-red?logo=slack&logoColor=white&style=for-the-badge" alt="Join our Slack community" /></a>
|
||||
<a href="https://discord.gg/ESHStjSjD4"><img src="https://img.shields.io/badge/Discord-Join%20Us-purple?logo=discord&logoColor=white&style=for-the-badge" alt="Join our Discord community" /></a>
|
||||
<a href="https://github.com/All-Hands-AI/OpenHands/blob/main/CREDITS.md"><img src="https://img.shields.io/badge/Project-Credits-blue?style=for-the-badge&color=FFE165&logo=github&logoColor=white" alt="Credits" /></a>
|
||||
<br/>
|
||||
<a href="https://arxiv.org/abs/2407.16741"><img src="https://img.shields.io/badge/Paper%20on%20Arxiv-000?logoColor=FFE165&logo=arxiv&style=for-the-badge" alt="Paper on Arxiv" /></a>
|
||||
<a href="https://docs.google.com/spreadsheets/d/1wOUdFCMyY6Nt0AIqF705KN4JKOWgeI4wUGUP60krXXs/edit?gid=0#gid=0"><img src="https://img.shields.io/badge/Benchmark%20score-000?logoColor=FFE165&logo=huggingface&style=for-the-badge" alt="Evaluation Benchmark Score" /></a>
|
||||
<a href="https://huggingface.co/spaces/OpenHands/evaluation"><img src="https://img.shields.io/badge/Benchmark%20score-000?logoColor=FFE165&logo=huggingface&style=for-the-badge" alt="Evaluation Benchmark Score" /></a>
|
||||
</div>
|
||||
</div>
|
||||
</div>
|
||||
|
||||
15
docs/static/README.md
vendored
15
docs/static/README.md
vendored
@@ -1,15 +0,0 @@
|
||||
# Static Files for OpenHands Documentation
|
||||
|
||||
This directory contains static files that are copied directly to the build output of the Docusaurus documentation.
|
||||
|
||||
## OpenAPI Specification
|
||||
|
||||
The `openapi.json` file in this directory is the OpenAPI specification for the OpenHands API. It is copied to the build output and is accessible at `/openapi.json` in the deployed site.
|
||||
|
||||
This file is used by the Swagger UI interface, which is accessible at `/swagger-ui/` in the deployed site.
|
||||
|
||||
## Why is the OpenAPI spec in the static directory?
|
||||
|
||||
The OpenAPI specification is placed in the static directory so that it's accessible at a predictable URL in the deployed site. This allows the Swagger UI to reference it directly.
|
||||
|
||||
We only need one copy of the OpenAPI spec file, which is this one in the static directory.
|
||||
BIN
docs/static/img/docs/api-key-generation.png
vendored
BIN
docs/static/img/docs/api-key-generation.png
vendored
Binary file not shown.
|
Before Width: | Height: | Size: 26 KiB |
BIN
docs/static/img/oh-features.png
vendored
BIN
docs/static/img/oh-features.png
vendored
Binary file not shown.
|
Before Width: | Height: | Size: 144 KiB |
BIN
docs/static/img/teaser.mp4
vendored
BIN
docs/static/img/teaser.mp4
vendored
Binary file not shown.
Some files were not shown because too many files have changed in this diff Show More
Reference in New Issue
Block a user